


Key Takeaways
-
True-crime videos that “go viral” are usually engineered: a clear hook, tight beats, and a reason to comment or watch the next part.
-
Reusable prompt formats help you turn one well-researched case into a bingeable series, not a one-off upload.
-
With invideo, you can generate a strong first draft fast, then refine pacing, visuals, captions, and CTAs in a few focused passes.
True crime is all the rage nowadays. And rightly so, as viewers love a good mystery. As per research by Digital i, the average true crime viewing time on platforms such as Netflix, Prime Video, etc. rose to an average of 4 hours 34 minutes.
That said, true crime content is a challenge to sustain. You’re researching cases, fact‑checking, scripting, and editing; all while YouTube, Instagram, and TikToks expect you to publish constantly.
If you run a faceless YouTube channel, a TikTok account, or an Instagram Reels page, you already know the real bottleneck isn’t ideas or a big production house level budget. But rather, it’s research + scripting + editing at a pace that keeps the algorithm warm.
Look at the channels that consistently take off in this niche and a pattern emerges. Their “edge” is not one magic prompt or a single breakout upload; it is a handful of repeatable video formats, powered by tools like invideo, that make it possible to ship polished episodes at scale while keeping viewers watching, commenting, and coming back.
Here is the mindset shift that actually moves the needle: prompts are not spells you fire once. The ones that win over time are really compact, reusable story frameworks; structures designed to bake in retention, curiosity, and interaction from the very first frame, so every new case can plug into a format that’s already built to perform.
What “Viral” Actually Means for True Crime Content
In this niche, “viral” is not a lottery ticket; it’s a pattern of signals you can influence. True crime shorts and even full-length videos tend to blow up when the same ingredients line up over and over again: a hook that lands in the first few seconds, a timeline that keeps people watching to the end, and a payoff or twist that makes them want to rewatch or share.
These signals tend to show up when your videos nail four things:
1. Instant clarity: The hook makes it obvious, as in which case, which twist, or which question this short or full-length video covers.
For example:
- Weak Hook: “A crazy case from 2019…”
- Strong Hook: “In 2019, a man vanished on CCTV; in the only blind spot in the building.”
2. Tight pacing: A constant dose of adrenaline is the way to go.
Every few seconds something should change, like the visual, the beat of information, or the emotional angle.
3. A running curiosity loop: Curiosity is your best friend, so if there’s always at least one unanswered “but how?” or “why?”, you’re sure to keep viewers hooked.
4. A reason to interact: People love interacting with what they find interesting, so if viewers are explicitly invited to comment, save, or continue to the next part, half your job is already done.
The order of the day is that these four suggestions need to be integrated into your prompting when generating a true crime video. Use a generic ‘make a true crime video’ prompt, and you’re sure to land yourself in difficult waters.
Pre-Prompt Discipline: Consolidating Cases, Facts, and Scripts
Every prompt format below is designed to bake the aforementioned four drivers into your script and AI instructions, so you aren’t relying on vague prompts and hoping the algorithm cares.
Remember, AI can help you move faster, but it cannot be your fact‑source for real crimes. Treat this pre‑prompt work as non‑negotiable.
1. Choose cases with solid reporting
Before anything, you need to settle on a case that has all the facts straight and in order. Half-baked cases are sure to confuse you and ultimately your viewers, regardless of the richness of the visuals.
Prioritize:
-
Cases with robust public coverage: court documents, mainstream reporting, transcripts.
-
Stories far enough in the past that facts are relatively stable.
-
Situations where you’re not naming minors or private individuals without clear public interest.
Avoid:
-
Very fresh cases where facts are still emerging.
-
Stories that hinge heavily on rumor, gossip, or one unsourced thread.
2. Build a simple fact sheet
Think of this as your very own ‘murder board’. Here, you need to consolidate all that is critical to the case at hand. This will be your roadmap for drafting the script in the next step.
For each case, capture:
-
Dates and locations
-
Key events (each as a one-sentence bullet)
-
Named people and their roles
-
Sources (links or titles)
-
A “Notes” column where you mark items as “confirmed” vs “theory/speculation”
Rule of thumb:
Never turn anything in the “theory/speculation” column into a definitive statement in your script or voice over.
3. Draft a clear, short script
The script is the final execution of all your background hard work. It is the coming together of all the critical case details and when and how they will be presented in the final video product.
For each short:
-
1 hook line (1-2 sentences)
-
3-6 short beats for shorts and 20-25 beats for full-length videos (timeline events, clues, or concepts)
-
1 closing line (cliffhanger, question, or pointer to another part)
You can absolutely use AI to help draft and tighten your script, but it should be summarizing your fact sheet, not inventing missing events. Keep in mind that facts never come from the video model. They come from your prep. The prompts handle how you tell the story, not what happened.
A Universal Prompt Skeleton for True Crime Content
Before we get into the seven formats, it helps to have one prompt skeleton you can reuse.
Every prompt you write should include:
- Platform + length target
“Vertical 9:16 for YouTube Shorts, 30–45 seconds. Widescreen 16:9 for full-length videos, 15–18 minutes”
Here, the technical specifications such as vertical orientation and aspect ratio are prescribed, along with the length of the said video. The ‘9:16’ aspect ratio is perfect for mobile devices. If you are planning on full-length videos, however, ‘16:9’ aspect ratio works best with an average time duration ranging between 15-18 mins.
- Hook specification
“The exact first sentence or on-screen text you want in the first few seconds.”
This is your hook, as previously specified. What you say and show here will decide whether the viewer simply scrolls past your video or hangs back to watch further, and invideo’s cinematic presets are sure to be your godsend here.
- Scene plan (beats)
“5-8 beats, each 2-4 seconds, with a short description of what the viewer sees and learns. For a 30 second short, 6-8 beats at around 3-4 seconds each works well. For a 15-20 minute full-length video 20-25 beats at around 22-25 seconds each does the job.”
This dictates the dynamism of your video. A bland one-track, constant beat video is not the way to go here.
- Visual tone
“Documentary-style, non-graphic, minimalistic: maps, documents, timelines, empty locations; no reenacted violence.”
This focuses on informational and atmospheric elements rather than sensationalism of your video.
- Safety constraints
“Non-graphic, no gore, no injuries, no bodies, no realistic footage of crimes.”
This is one of the most important aspects as it deals with content restrictions. If not adhered to properly, this one seemingly simple element can decide whether your video gets ‘taken down’ or goes viral.
- Closing action
“A clear line asking viewers to comment, save, follow, or watch the next part.”
This is where you tackle the ‘interaction trigger’ aspect of the video. Think of this as your CTA (call-to-action).
7 Best AI Video Prompts for True Crime Creators
Each of the formats below is intentionally non‑graphic and leans toward a documentary tone rather than shock value. You can still create plenty of tension through sound design, typography, pacing, and restrained visuals like maps, timestamps, case files, and abstract or faceless reenactments.
1. Case‑File Cold Open (Hook‑First Intro.)
This is your opening line. It works because it quickly makes a clear promise and gives viewers an immediate idea of what they're about to watch.
Prompt: Create a vertical true-crime cold open in a documentary style (non-graphic, no gore).

Format: 9:16 vertical, short-form cold open
Tone: calm, investigative, slightly tense

First frame on-screen text:
"This case was solved... then reopened."

Scene plan (8 fast-cut beats, 2-3 seconds each):
1) Case file folder on a desk with stamped date and location
2) Blurred evidence photos with gloved hands flipping pages
3) Map zoom into the town or city with a pin drop
4) Simple timeline strip showing 3 key timestamps
5) CCTV-style b-roll with abstract silhouettes only
6) "3 facts we know" on short on-screen cards
7) "1 detail nobody explains" with a glitch-style transition
8) End card text: "Part 1: The timeline. Comment your theory."

Audio: subtle bass pulse and light ticking, no jump scares
Captions: bold, high contrast, synced word by word
Audio: subtle bass pulse and light ticking, no jump scares
Captions: bold, high contrast, synced word by word
When to use: Part 1 of a series; standalone shorts or full-length videos introducing a case.
Goal: Maximize swipe‑stop and first‑5‑second retention.
Here are a few quick ai editing tweaks you can use:
-
“Increase the pacing by about 10-12%.”
-
“Swap out scene 5 for more CCTV-style b-roll.”
-
“Cut this down to 12-15 seconds, but keep the hook intact.”
Quick guardrail: If your retention drops early, shorten the hook, move the most shocking (but non‑graphic) fact earlier, and simplify beat 2–4 into one combined beat.
2. Faceless Scene Recreation
Think of it as reconstructing the last confirmed moment we know about, using environment and implication instead of reenacting harm. What is of note is that it suggests a key moment without showing violence, faces, or graphic detail.
Prompt: Create a widescreen true-crime scene re-enacment video (faceless, documentary, non-graphic).

Format: 16:9 widescreen, long-form (1-minute)
Tone: observational, uneasy rather than shocking, narrative

Hook (first 3-5 seconds, text + voice):
"Here is the last moment we can verify."

Visual language (no faces, no weapons):

1. Close-ups of everyday objects in motion:
	* Footsteps passing under a streetlight
	* A door closing in a dim hallway
	* A bus pulling away from a stop
	* A phone left on a table, screen lighting up

2. Environmental details:
	* Empty street corner, flickering sign, elevator doors closing
	* Clock on a wall, station platform, apartment corridor

Scene plan (5–6 simple beats, 8–10 seconds each to fill ~1 minute):

1. Wide or medium shot establishing the location (street, hallway, station) with a subtle timestamp overlay
2. Close-up: movement without identity (shoes walking past, a hand reaching for a handle)
3. Object beat: phone, keys, or bag left behind or picked up
4. Environmental beat: bus/train pulling away, elevator doors closing, lights switching off
5. Overlay card: "After this, the timeline breaks."
6. End card: "Next: The timeline of horror."

Audio:

1. Low, steady tension (no jump scares)
2. Natural sound details: footsteps, door latch, bus brakes, distant traffic, soft room tone

Captions:

1. Minimal, high-contrast text:

	* Timestamps ("8:47 PM – apartment hallway")
	* One-line context ("Last time anyone saw them on camera.")
When to use:
- As a bridge between your timeline episode and your contradiction/evidence formats.
- When you need to make a moment feel significant without dramatizing violence or showing identifiable people.
Goal: Create a memorable, replay‑worthy moment that deepens tension and emotional stakes while staying firmly within ethical and platform‑safe boundaries.
Quick guardrail: If the scene starts to feel too literal or sensational, pull back to wider shots and objects, remove any identifiable faces or likenesses, and keep the copy focused on what is verified rather than speculating about unseen actions.
3. Timeline Snap‑Through
Timelines are retention jackpots when it comes to true crime, because viewers stick around to see the full sequence play out.
Prompt: Create a vertical true-crime timeline video (faceless, documentary, non-graphic).

Format: 9:16 vertical, short-form
Tone: investigative, tense

Hook (spoken + on-screen):
"The timeline is the part that doesn't add up."

Scene plan (6 timestamp beats + glitch):
1) Map pin drop - timestamp visual
2) Calendar flip - timestamp visual
3) Phone UI graphic - timestamp visual
4) Street b-roll - timestamp visual
5) WHAT CHANGED? glitch transition
6) Door close-up - timestamp visual
7) Receipt close-up - final timestamp

End card: "Next: the call that changes everything. Follow for Part 2."

Audio: subtle tension build
Captions: always-on, large, high contrast, timestamp stickers
When to use: After viewers know the basics; to make “what actually happened” clear.
Goal: Keep viewers watching to complete the sequence.
Quick guardrail: If viewers drop in the middle, cut one or two minor beats and move your biggest turning point earlier in the sequence.
4. Evidence Board Reveal
The format should be straightforward and easy to replicate: three clues → the connection → the missing piece. You’ll notice that the structure makes it perfect for turning into a weekly series.
Prompt: Create a 9:16 vertical true-crime "evidence board reveal" video, non-graphic.

Style: documentary, tense but not gory
Visuals: corkboard, pinned notes, blurred photos, red string connections, macro shots of objects (ticket stub, key, handwritten note)

Structure:
- Hook question in the first 2 seconds
- CLUE 1 (about 3 seconds)
- CLUE 2 (about 3 seconds)
- CLUE 3 (about 3 seconds)
- Connection reveal (about 3 seconds)
- Missing piece + cliffhanger (about 3 seconds)

End card text:
"Which clue matters most? Comment 1, 2, or 3."

Audio: cinematic whooshes on each clue with a low tension background
Captions: always on, high contrast, using labels "CLUE 1", "CLUE 2", "CLUE 3", "CONNECTION"
When to use: Mid‑series, to recap complexity and invite speculation.
Goal: Re‑orient new viewers and keep regulars engaged.
Quick guardrail: If the video feels cluttered, remove one card and keep only 3 clues visible at a time. However, stick to this layout going forward.
5. Contradiction Cut
You do not need reenactments to build tension. Contradictions do that on their own. And the format below zeroes in on statements that don't add up.
Prompt: Create a 9:16 vertical true-crime "contradiction cut" video, non-graphic, with a documentary tone.

Visuals only: hands, notepad, tape recorder, blurred documents, interview-room style lighting, silhouettes with no identifiable faces.

Core story beat:
"They said X... but earlier they said Y."

Structure:
- 3 contradiction cards:
  1) Statement A vs Statement B in split screen
  2) Quick cutaway to a timeline or map
  3) "Why this matters" in one short sentence
- Ending text: "Next: what the records show."
- CTA text: "Follow for Part 2."

Audio: subtle tension bed, light clicks or tape-recorder sounds.
Captions: always on, with clear split-screen labels for each statement.
When to use: To highlight inconsistencies in statements or coverage.
Goal: Create tension and discussion, without graphic visuals.
Quick Guardrail: Building tension is as much audio as it is visual. Tonal changes in voice overs can add a bucket’s worth of tension to an otherwise complicated narrative and ElevenLabs in invideo can do just that for you and more.
6. Forensics Mini‑Explainer (Save/Share Magnet)
This is your “save-worthy” format as people tend to save explainers so they can revisit them later or share them with friends.
Prompt: Create a 9:16 vertical true-crime explainer with cinematic motion graphics, non-graphic.

Topic: Explain phone tower pings (how investigators narrow timelines).

Structure:
- Hook (spoken + text): "This is how investigators narrow the timeline."
- Simple definition (1 sentence, on-screen)
- Animated diagram: map grid with signal arrows
- 2 practical implications (short bullets)
- 1 common misconception + quick correction
- Cliffhanger: "Now apply this to the case. Part 2 next."

Audio: clean documentary pulse, light hits on keywords
Captions: keyword highlights only (3-5 total)
CTA text: "Save this. Part 2 applies it."
When to use: To give your audience tools to understand future cases.
Goal: Drive saves and shares through “aha” moments.
Quick guardrail: Keep language simple. If you need more than 2-3 lines of on‑screen text to explain a step, you’re trying to fit too much into one shot. What’s more, invideo even allows you to tweak the voiceover speed if the pacing is too slow
7. Two Theories, One Twist
This is engagement by design, wherein viewers are forced to choose a side.
Prompt: Create a 9:16 vertical true-crime "two theories" video, non-graphic, documentary tone.

Hook text/voice: "Two explanations. Only one fits the timeline."

Structure:
- Split screen: THEORY A (left) vs THEORY B (right)
- For each: 2 supporting visuals (timeline strip, map pin, abstract silhouette b-roll)
- TWIST detail: Weakens one theory
- End text: "Which theory survives? Comment A or B (and why)."

Captions: Clear A/B labels + one-line evidence cards
Audio: Tense minimal bed, no horror stingers
When to use: Once your audience knows the basics and is ready to debate.
Goal: Generate thoughtful comments and return visits.
Quick Guardrail: Present it as “two theories people are already discussing” rather than making your own direct accusations. Stay especially cautious about naming private individuals or framing speculation as fact, and avoid repeating unverified claims that could harm someone’s reputation.
Models, Presets, and Visual Style
Invideo gives you a wide range of model types to choose from, and making that decision early helps every prompt hit the right tone.
1. When you want a cinematic true crime feel
For cold opens, theory breakdowns, and timeline-driven narratives, lean on high-end realistic models like Sora 2 Pro, Veo 3/Veo 3.1, or Kling 2.5 Turbo Pro. These excel at natural movement, depth, and atmosphere, which is exactly what you need for dramatic B-roll and detailed evidence shots. What’s more, even the voice over can be changed as per tonal preferences and synced accordingly using ElevenLabs on invideo.
2. When you are experimenting or iterating
If you are exploring prompt ideas, testing hooks, or running A/B versions, switch to lighter options such as Veo 3.1 Fast, Veo 3 Fast, or the non-Pro Sora 2. They are built for speed and lower cost, so you can refine your ideas before running a polished, high-quality render.
3. When you need stylized or motion-first visuals
For explainer-style forensics content, timeline visualizations, or graphics-led sequences, use models like PixVerse 5/5.5, Seedance, or Wan 2.5/Wan 2.6. They handle motion graphics, on-screen text, and more stylized looks much better than purely cinematic options.
Safety, Ethics, and Platform‑Friendliness
If your goal is to maximize reach, steer clear of shock-heavy content. Graphic or overly disturbing visuals can turn viewers away, limit shareability, and even run into platform restrictions.
What’s noteworthy is that you can still create real tension and curiosity by leaning on storytelling, pacing, sound, and smart edit choices instead of gore.
Make these defaults:
- Visuals
- Always specify “non‑graphic, no gore, no injuries, no bodies, no realistic crime‑scene footage.”
- Use symbolic visuals: maps, documents, objects, empty locations, silhouettes.
- Avoid visuals that could be mistaken for real footage of actual crimes.
- Facts
- Never use AI to fill in missing parts of the story.
- Distinguish between “confirmed” and “alleged/theory” in your scripts and visuals.
- Be especially cautious with ongoing cases, minors, and victims’ families; in many situations, it’s more ethical to skip these altogether.
- Policies & disclosure
- Check current YouTube and platform guidelines on violent/graphic content and harmful/dangerous acts before publishing.
- Consider noting in your description or pinned comment that visuals are AI‑generated reenactments/symbolic and not real footage.
If a draft feels exploitative, sensationalized, or disrespectful, discard it; even if it looks visually “cool.”
A Practical invideo Workflow
You can use these formats and plug them into invideo for outstanding results. Here’s how it looks inside invideo:
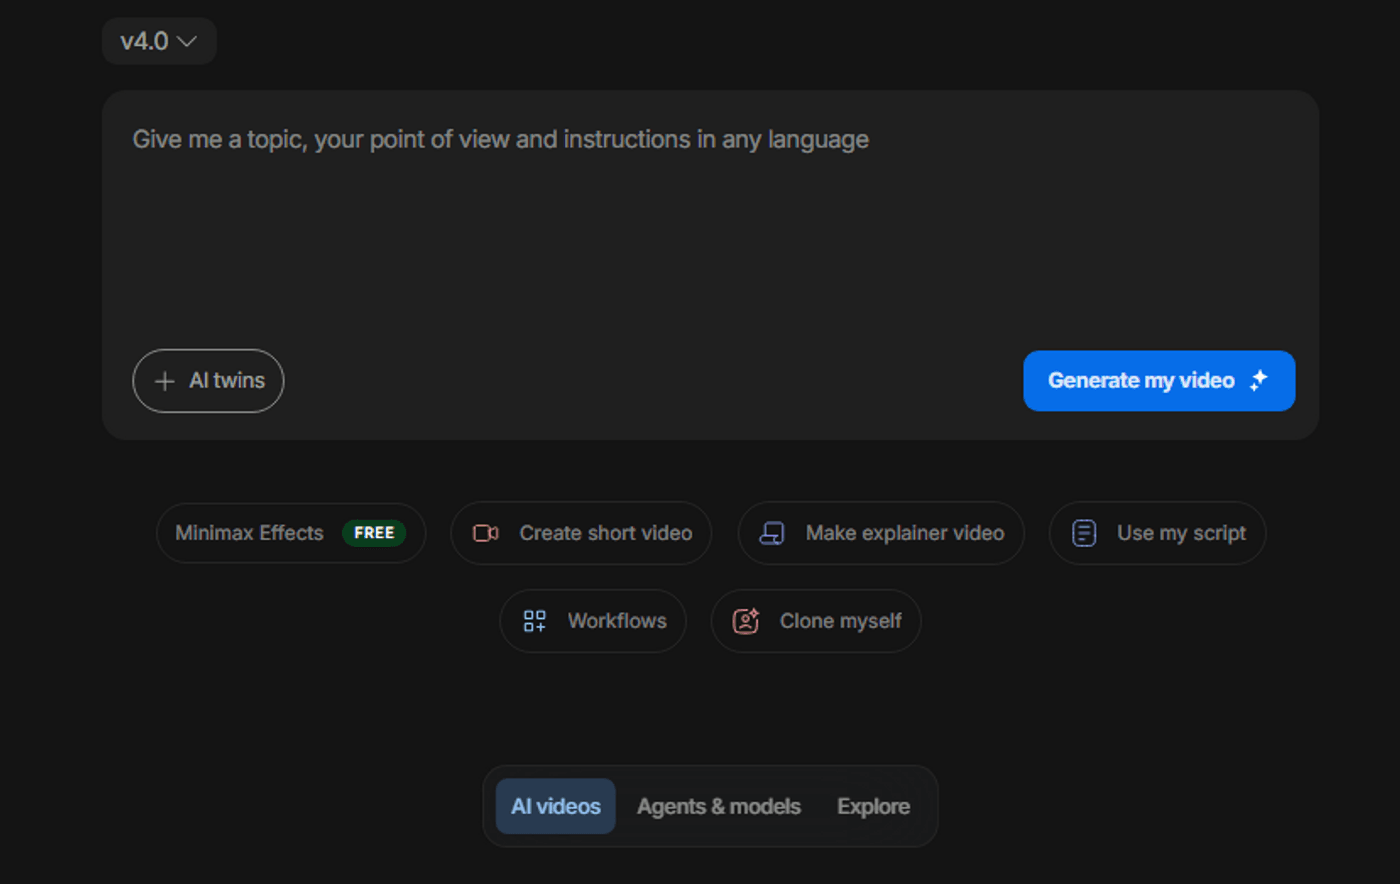
1. Open invideo and set up the project:
First things first, go to invideo AI and start a new project. Post that, click on ‘Create AI video’ to begin. If you prefer more control, however, open agents & models and pick the model you want to use.
Additional tips:
-
Choose vertical 9:16 if you will be posting on TikTok or as YouTube Shorts, etc. Otherwise, go for a widescreen 16:9 ratio for full-length videos.
-
Pick a “cinematic/documentary” preset as your default.
-
Select a voice that fits true crime: calm, neutral, not over-dramatic.
2. Paste the prompt format:
Select any one of the prompts from the aforementioned and paste it in as is (of course, you’re always welcome to make your own little tweaks here and there). After that, swap out the placeholder text with your own case details, including the location, key timeline beats, and hook line.
Additional tips:
-
Make sure the prompt is clear and succinct in describing what you want. You don’t want to confuse the AI, expecting it to be able to visualize what’s going on in your head.
3. Generate a draft & review for structure and safety:
Your video output should ideally have the hook within the first few seconds and should not have more than 6-8 scenes. As such, use the first iteration as your test video, so you can alter the prompt, if necessary.

Additional tips:
-
Watch the draft once as a viewer.
-
Ask yourself: Does the hook land? Are beats clear? Are visuals non-graphic and respectful?
-
Always have your captions turned on.
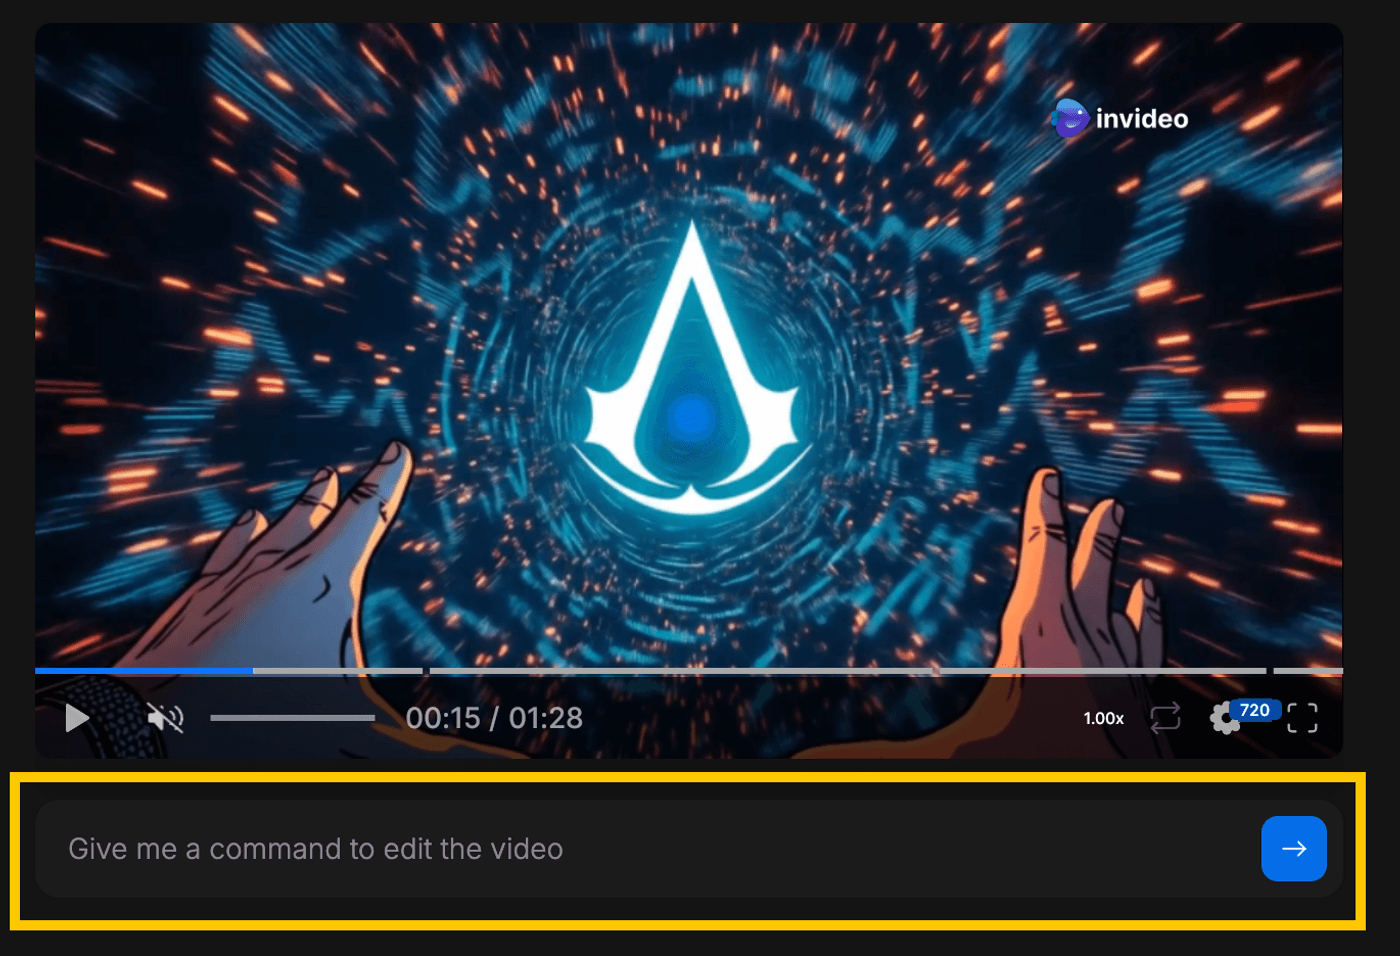
4. Refine with edit instructions:
Avoid trying to rewrite everything in a single message. Instead, break your edit into small, specific changes and apply them one at a time so you can stack those fixes and stay in control of the final result. Ideally, you should use Magic Box and give it short, clear instructions instead of a long laundry list.
Additional tips:
-
Use short, targeted instructions to:
-
Shorten overly long intros.
-
Increase pacing where drop-offs usually happen (often around 5-10 seconds).
-
Enlarge or reduce captions.
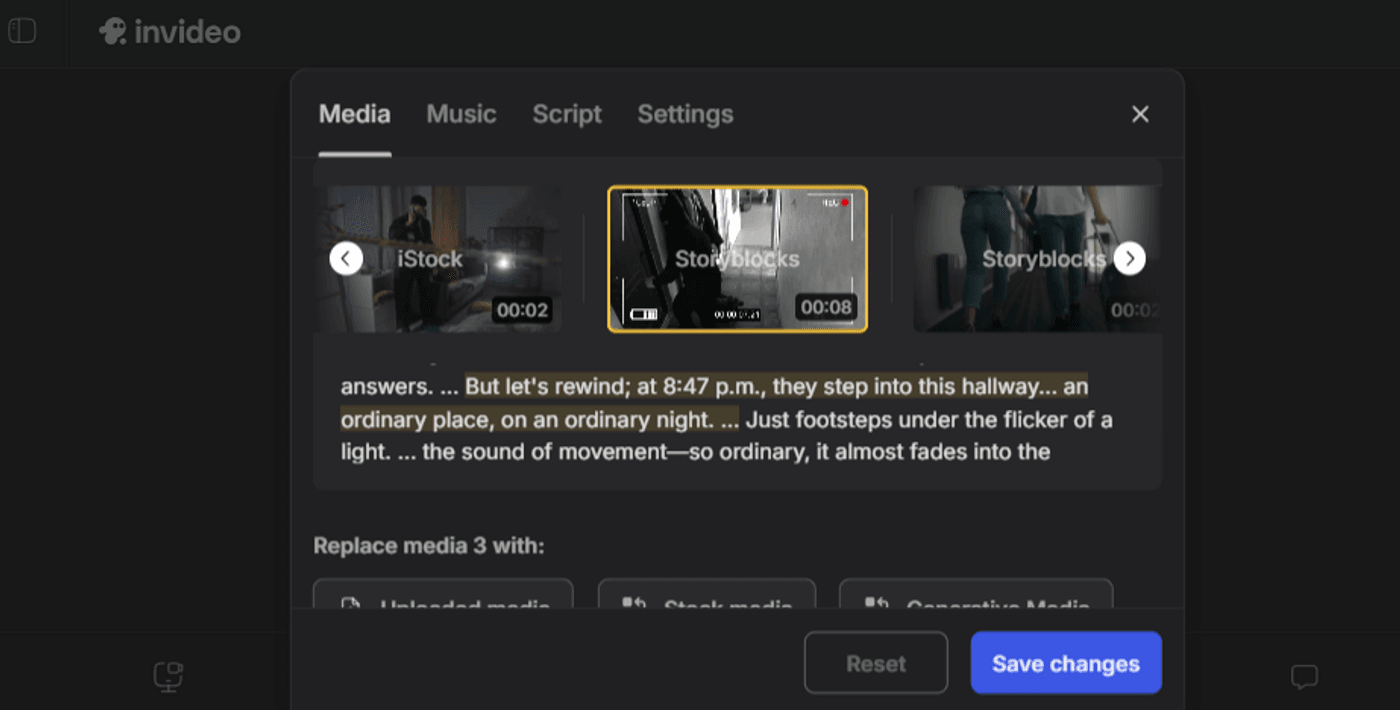
-
Swap out any visuals that feel too literal or insensitive.
5. Create 2-3 variants for testing and as options:
As the heading implies, it’s always a good idea to have at least two to three versions, so you have something to fall back on and for diversity purposes.
Additional tips:
-
Duplicate the project.
-
Change only one thing per variant: hook wording, first frame, or final question.
-
Publish variants over a few days; compare watch-time, retention graphs, and comments.
6. Save winning prompts as templates:
It’s always a good idea to save prompts that give you the best, most desirable results. You can also look at this for the PoV of which videos perform the best. This is so you have a ready template for your next viral true crime endeavor.
Additional tips:
-
When a format + hook pattern works repeatedly, save it as a template for future cases and tweak only the case-specific details.
-
Cap yourself at 3-4 focused refinement passes per video. Beyond that, it’s faster to tighten the script or choose a different format.
Start Today and Go Viral
True crime growth isn’t built on one perfect prompt. It’s built on repeatable formats, responsible storytelling, and fast iteration.
If you’re staring at a blank planner:
-
Pick one well-documented case.
-
Use the Case-file Cold Open format for Part 1 and the Timeline Snap-Through for Part 2.
-
Generate 2 hook variants for each inside Invideo.
-
Publish, wait a few days, and look at:
-
First 2-3 second retention.
-
Average view duration.
-
Comments and saves.
Take whatever performs best and use that format again for your next case. Viral-ish outcomes in true crime don’t come from one “perfect” prompt; they come from running simple, respectful experiments with solid formats over and over. What’s more, invideo is always there; always having your back!
FAQs
-
1.
How long should true crime microdramas be?
Start with 25-45 seconds for most formats. Timelines and explainers can run 40-60 seconds if the pacing stays tight (new beat every few seconds).
-
2.
Can I monetize AI-generated true crime videos?
Often, yes, but monetization depends on platform policies, originality, and whether the content is considered reused or sensational. Focus on original scripting, commentary, and consistent formatting.
-
3.
How do I avoid platform strikes in true crime?
Use non-graphic visuals, avoid realistic depictions of violence, don’t use real crime footage, and label speculation clearly. Always review each platform’s current policies before posting.
-
4.
How do I keep a consistent visual style across episodes?
Reuse the same prompt structure, keep a consistent typography/caption style, and maintain the same visual palette (maps, documents, case files). Saving a repeatable project template inside Invideo helps.
-
5.
When should I abandon a case vs keep iterating?
If you can’t verify facts cleanly, or the case is too sensitive/ongoing, skip it. If facts are solid but performance is weak, iterate on hook clarity and beat count before switching topics.