


Key takeaways
-
Strong product photos are now the raw material for your video ads. Money Shot inside invideo can turn a small set of smartphone shots into full commercials, but only if your images are clean, sharp, and focused on the product.
-
You do not need a studio. A window, a simple white background, and a stable phone setup are enough to create “AI-ready” photos you can reuse across campaigns.
-
A consistent shot list that covers a hero view, angled views, and close-ups gives AI everything it needs to create convincing camera moves and edits.
-
Nano Banana Pro helps you rescue or enhance older photos when you cannot reshoot, by upscaling, cleaning, and generating extra variations before you create video.
-
With one intentional shoot, you can create multiple ad variations for different hooks and platforms and even submit your best work to invideo’s 25K Money Shot Challenge.
If you work in marketing or content, you have probably felt this tension: your channels demand constant new video, but real shoots are slow and expensive. Even when you have a great idea, getting from “we should make this” to “it is live” can take weeks.
Money Shot inside invideo changes that cadence. It lives in Agents & Models → Trends → Money Shot, and it is built specifically to turn product photos into finished commercials. You pick a visual style, upload your photos, or create initial visuals with a text to image ai, describe the ad you want, and AI does the directing, shooting, and editing work for you.
Within the Money Shot tab you will see styles like:
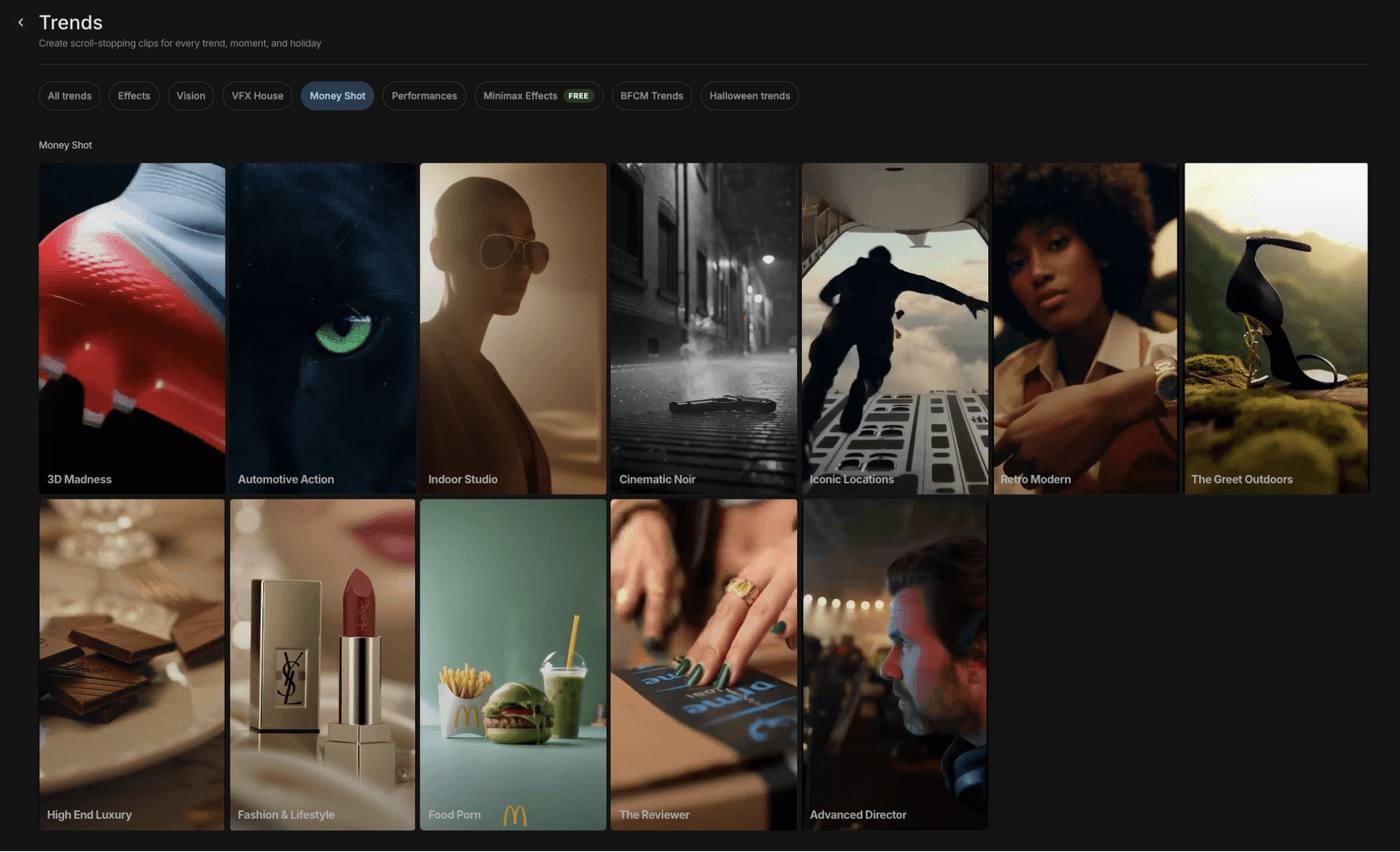
–3D Madness for dynamic, spinning objects and shoes
–Automotive Action for driving scenes and car hero shots
–Indoor Studio for clean, premium beauty and accessories
–Cinematic Noir for high contrast tech and luxury
–Iconic Locations for larger-than-life billboards and city backdrops
–Retro Modern and The Great Outdoors for lifestyle-driven looks
If you want an inspiration, here’s video from invideo’s Instagram:
The real shift is this: your photos are not just “extra assets” anymore. They are the material the entire video is built on. If you shoot them with that in mind, AI can give you results that feel like you hired a crew. If you do not, you will feel the limits quickly.
This guide shows you how to shoot product photos on your phone like a commercial photographer would shoot plates for a real ad, then how to feed those into Money Shot.
Why your product photos matter more than ever in an AI workflow
In a traditional production, the camera department fights for light, composition, and sharpness because every frame depends on it. Money Shot is no different. It just compresses the entire production into a few key inputs: your product stills, your chosen trend, and your prompt.
When you upload photos into a Money Shot trend, invideo:
1. Identifies and isolates your product from the background.
2. Builds a 3D-aware representation of its shape and texture.
3. Place it into scenes that match the preset you chose – a moody street for Cinematic Noir, a wet highway for Automotive Action, a pristine cyc wall for Indoor Studio, a giant digital billboard for Iconic Locations.
4. Generates camera moves, lighting transitions, and edits that look like you hired a director and a motion crew.
For this to work, the model needs to see your product clearly. White or simple backgrounds make it easy to separate the product cleanly. Cluttered rooms, mixed lighting, and heavy filters confuse the system, and you end up with muddy edges, odd reflections, or a product that does not “sit” believably in the new scene.
Small text is another constraint. Micro‑labels and fine print are hard for any system to reproduce from a distant, low‑resolution shot. That is why you will see a lot of macro detail in strong Money Shot outputs – the creators gave the AI close‑ups to work with.
If you treat your phone shoot as a real product shoot and respect these constraints, you give Money Shot the raw material it needs to create world class commercials within your budget.
Plan the story before you touch the camera
The best product shoots, even on a phone, start with a story. Not a big script, just a clear idea of what this ad needs to say.
Ask yourself three very practical questions:
1. What is the one promise this product needs to make in this ad?
Maybe it is “running shoes that do not feel heavy,” “a serum that helps sensitive skin,” “an energy drink that is not sugary,” or “a car that makes city driving feel calm.” Write it down in plain language.
2. Which Money Shot style backs that promise visually?
2.1 3D Madness fits when motion and shape are the heroes.
2.2 Indoor Studio fits when cleanliness and proof matter more.
2.3 Cinematic Noir adds drama for tech and luxury.
2.4 Iconic Locations makes sense when you want scale around a can or bottle.
2.5 Automotive Action and The Great Outdoors are natural choices for vehicles and outdoor gear.
3. What should viewers feel in the opening second?
Calm, excitement, curiosity, reassurance? The answer decides whether your hero shot should feel centered and balanced, or bold and in-your-face.
You will still capture the same basic angles, but your framing, light, and distance change slightly when you know you are aiming for “calm proof” rather than “fast energy.”
Build a repeatable home setup for product photos
You do not need a warehouse of gear. You do need a setup you can rebuild quickly whenever a new product shows up.
Think of it as a small table‑top stage.
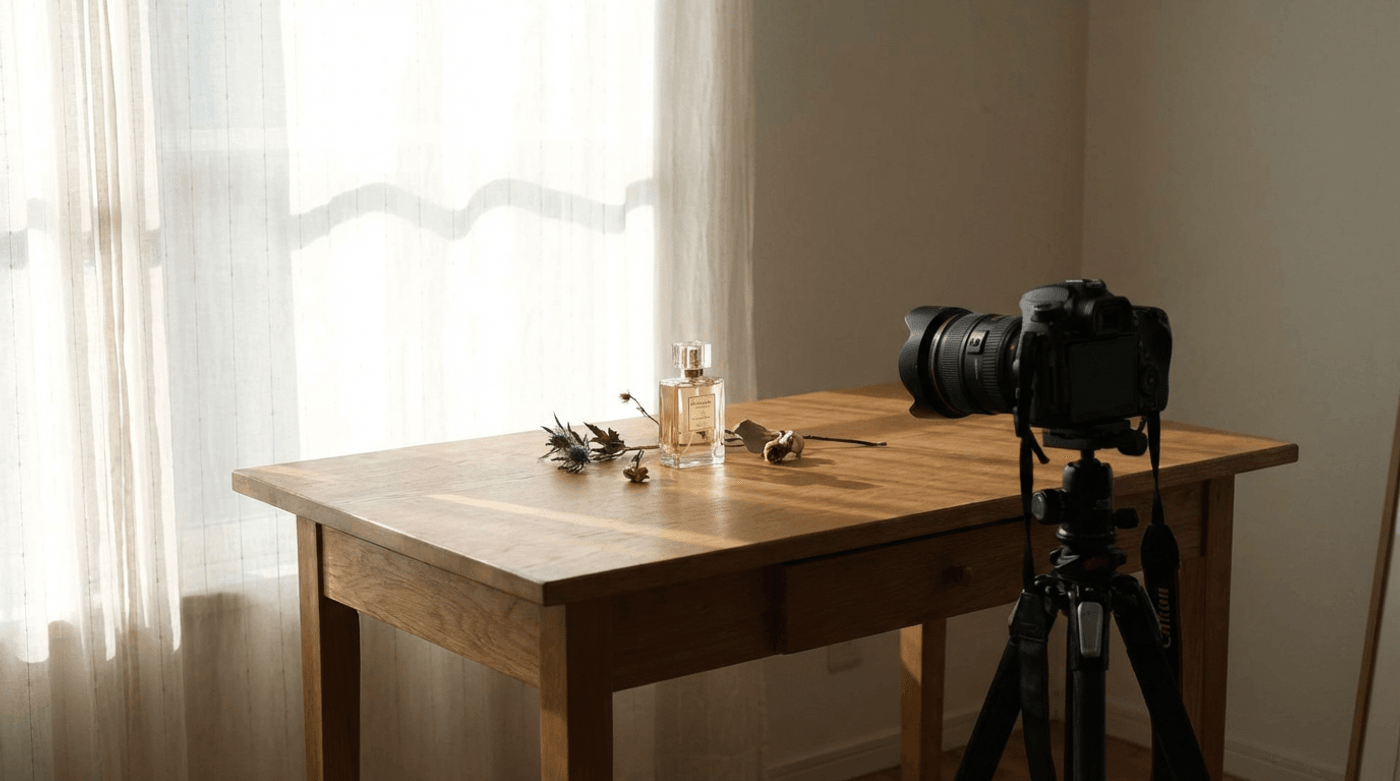
Step 1: Place a table near a window that gets bright but indirect light. You want that window acting as a big, soft source. Set the table so one long edge runs perpendicular to the window. That way light comes from the side and wraps around the product instead of flattening it.
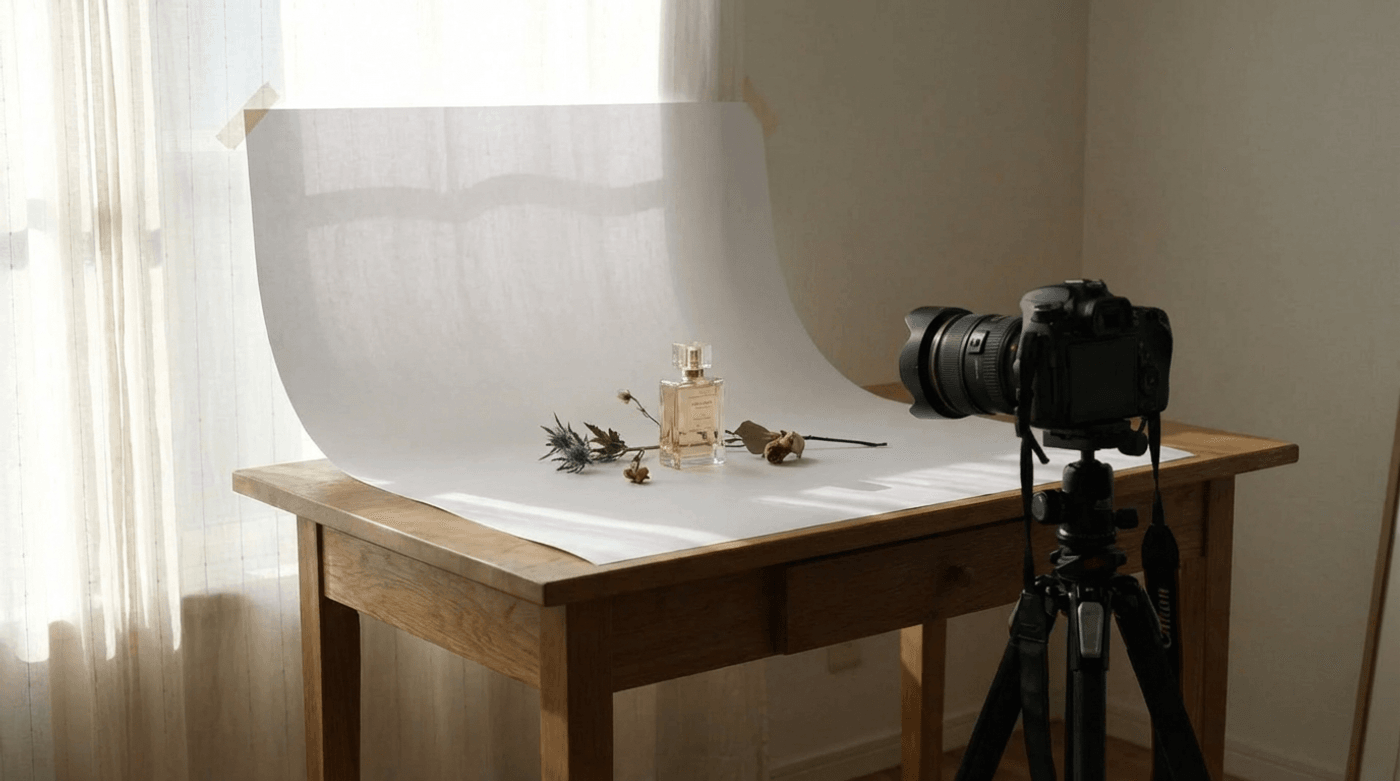
Step 2: Tape a sheet of white paper, card, or a small roll of white backdrop to the wall and curve it down onto the table. This “sweep” removes the hard line where wall meets table and gives you that clean, infinite look you see in ecommerce photos.
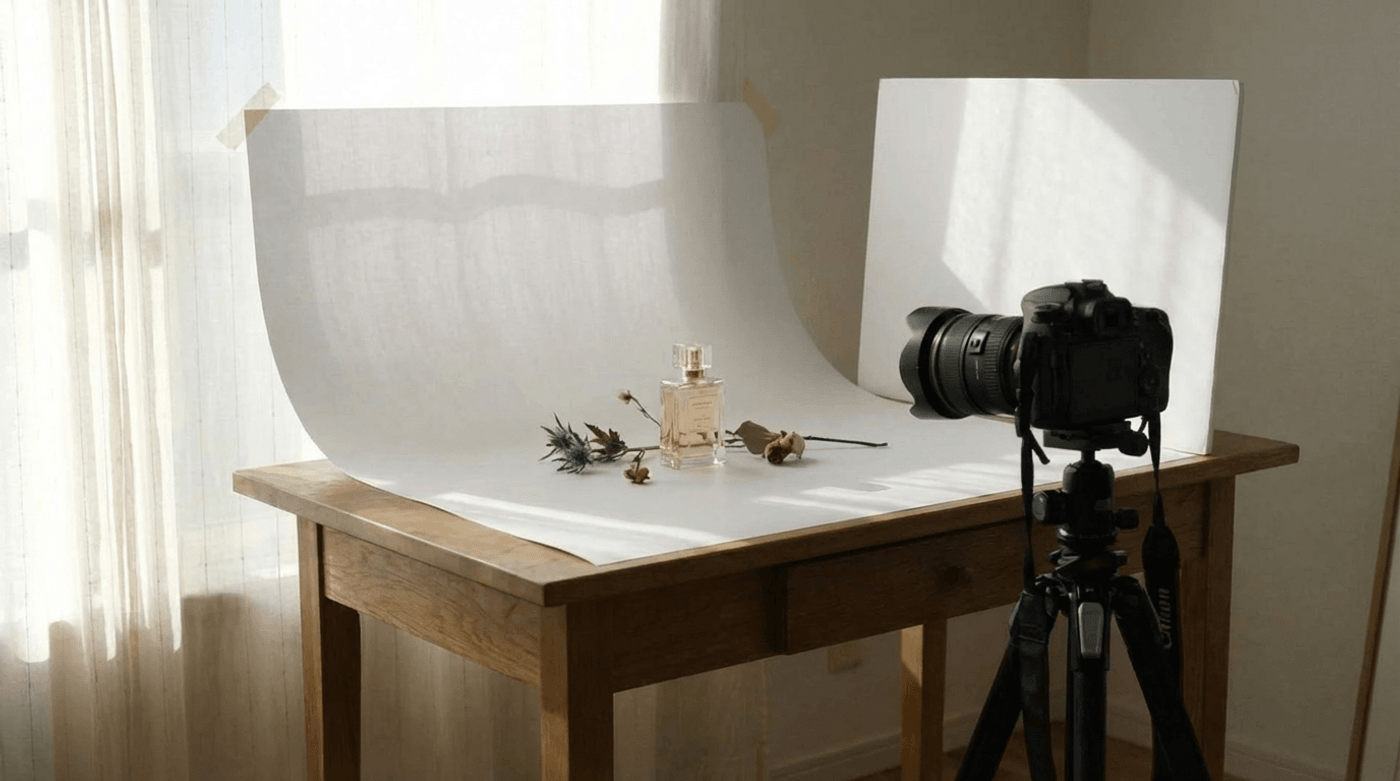
Step 3: Now stand a second white board or piece of foam core on the side opposite the window. This is your reflector. Light will hit the product from the window, bounce off the reflector, and fill in the shadows. You can pull that board closer for a softer look or move it away for a little more drama.
Step 4: Turn off every other light in the room. Mixed color temperatures are the fastest way to get strange color patches on white products or skin‑adjacent items like foundation and lipstick.

For stability, use a small tripod or clamp if you have one. If you do not, a stack of books with the phone wedged securely against them works surprisingly well. Set a three second timer on the camera so you are not touching the phone when it captures.

This simple arrangement gives you a consistent, neutral environment where the product always looks like the star and AI can easily see its edges.
Phone camera settings that actually matter
You do not need to flip into full manual mode to get good product photos. You just need to nudge your phone away from some of its more “creative” defaults.
Here is a focused table you can keep in mind.
If you stick to these six habits, you are already shooting like someone who understands what happens to these files later.
Prep your product like it is going on a billboard
There is a difference between “good enough for a quick story frame” and “good enough to stand as a frozen frame in a commercial.” When you are feeding images to Money Shot, aim for the second.
The way I like to think about it is this: imagine one of your frames being printed floor to ceiling in a store window. Once you have that image in mind, the little things are harder to ignore.
Walk through a simple preparation loop:
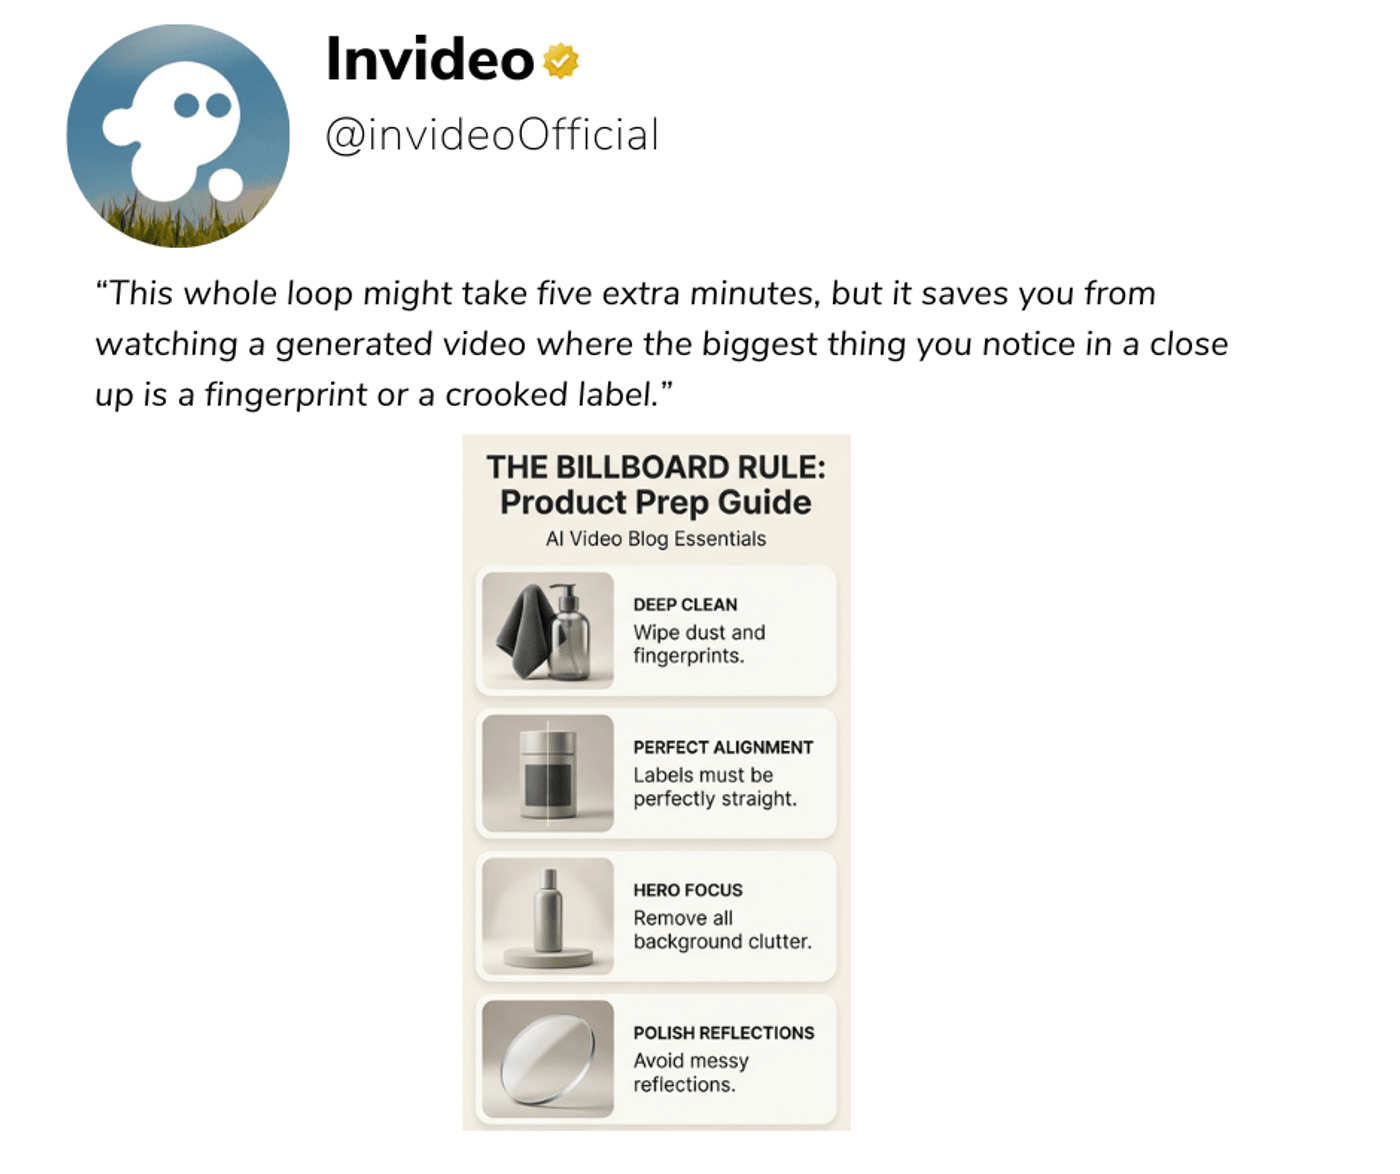
1. First, clean everything that can catch light. Fingerprints, dust, and smears love to live on glossy materials. Wipe bottles, cans, jars, phone screens, and watch crystals with a microfiber cloth. For fabric products, run a lint roller over them and smooth out any obvious wrinkles. For shoes, take a moment to wipe midsoles and laces. You do not need to be obsessive, just thorough enough that nothing messy jumps out when you zoom in
2. Next, fix alignment. Stand directly in front of the product and look at it like you are looking at a poster. Is the label truly straight or just “straight enough”? Is the cap fully tightened and lined up with the front? Are any boxes stacked evenly? Straightness is one of those small cues people notice without realizing it. It quietly tells them whether you take the product seriously.
3. Then, simplify the space. Ask yourself what is stealing attention from the product. A bright color in the background, a patterned counter, or an unrelated object half in frame will all pull focus, and AI does not know which of those items is the actual hero unless you make it obvious. Most of the time your product looks best with either nothing else in frame or one very intentional, neutral prop.
4. Finally, look for reflections. With glass, polished metal, and glossy boxes, reflections are the difference between a clean, premium look and a slightly amateur one. Tilt the product a little or adjust where you stand so you see the sweep or a soft highlight in the reflection instead of your own arm, the edge of a cupboard, or something brightly colored in the room.
This whole loop might take five extra minutes, but it saves you from watching a generated video where the biggest thing you notice in a close up is a fingerprint or a crooked label.
A practical angle system you can reuse
Once the product looks camera ready, you want to give AI enough angles to work with while still moving quickly.
A reliable run looks like this:
1. Start with a straight on hero shot: Put the product in the center of the frame, align it carefully using the grid, and leave room around it. This is your anchor image. It often becomes the first or last frame of the commercial, and it is also the one your performance marketer will want to use for thumbnails and static tests.
2. Step a little to the side into a three-quarter view: You should still see most of the front, but now a side of the product is visible too. This angle gives a sense of volume and depth, which is what styles like 3D Madness use when they start spinning or orbiting around an object.
3. Move around to a clean side profile: This matters most for shape-driven products. If you are shooting shoes, the side view is where design lives. For cars, it defines stance. For bottles and devices, it shows thickness and silhouette. Keep the height of the phone similar to your hero so the product does not suddenly feel like a different size.
For a typical product (shoe, bottle, gadget, accessory), aim for:
- One straight-on hero, perfectly aligned, with a clean label or logo.
- One 45-degree three-quarter where the product feels three-dimensional.
- One pure side profile that clearly shows shape and length.
- One top-down or flat-lay if it adds useful information (packaging layout, unboxing, set contents).
- Two close-ups: one of brand mark or label, one of texture or a key feature.
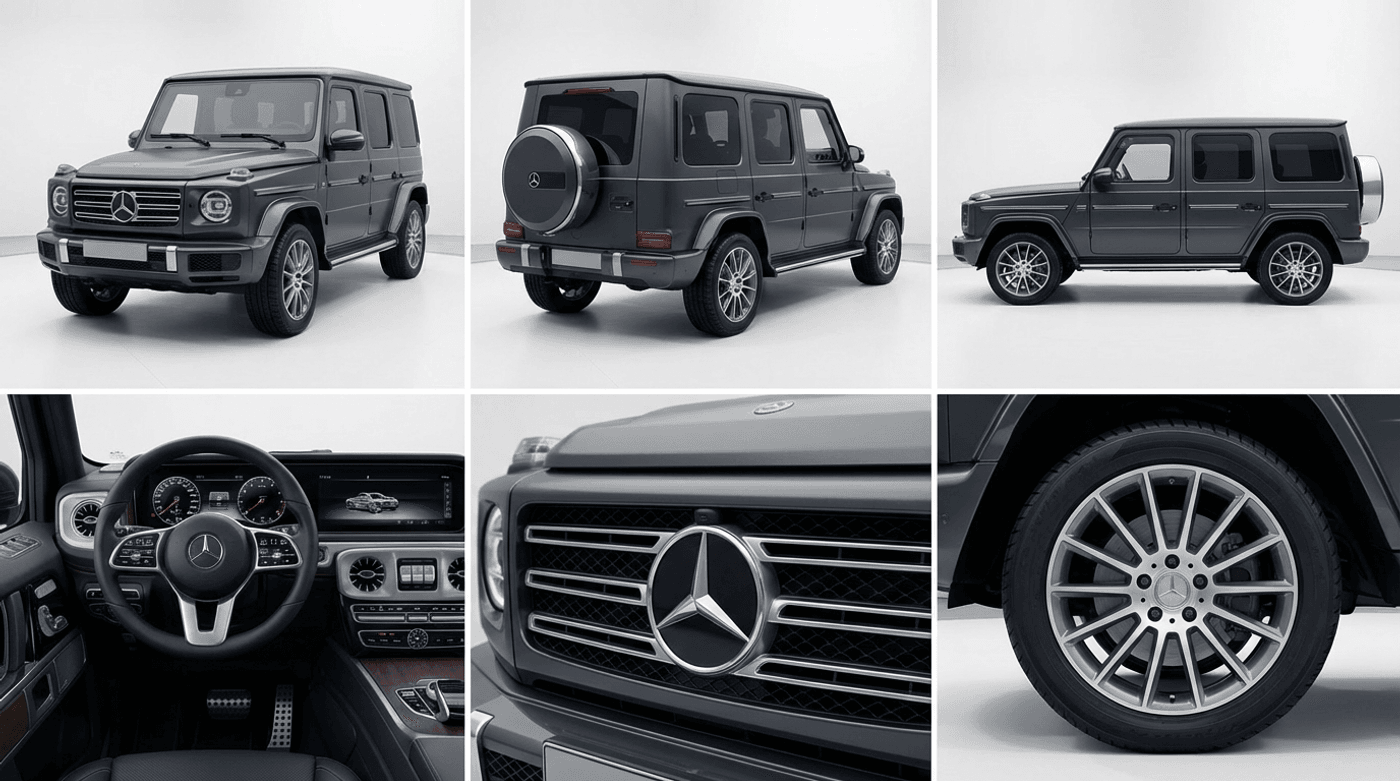
For automotive, you may select:
- Front three-quarter exterior.
- Rear three-quarter exterior.
- Pure side profile.
- Interior centred on steering wheel and dashboard.
- One or two detail shots (badge, wheels, infotainment).
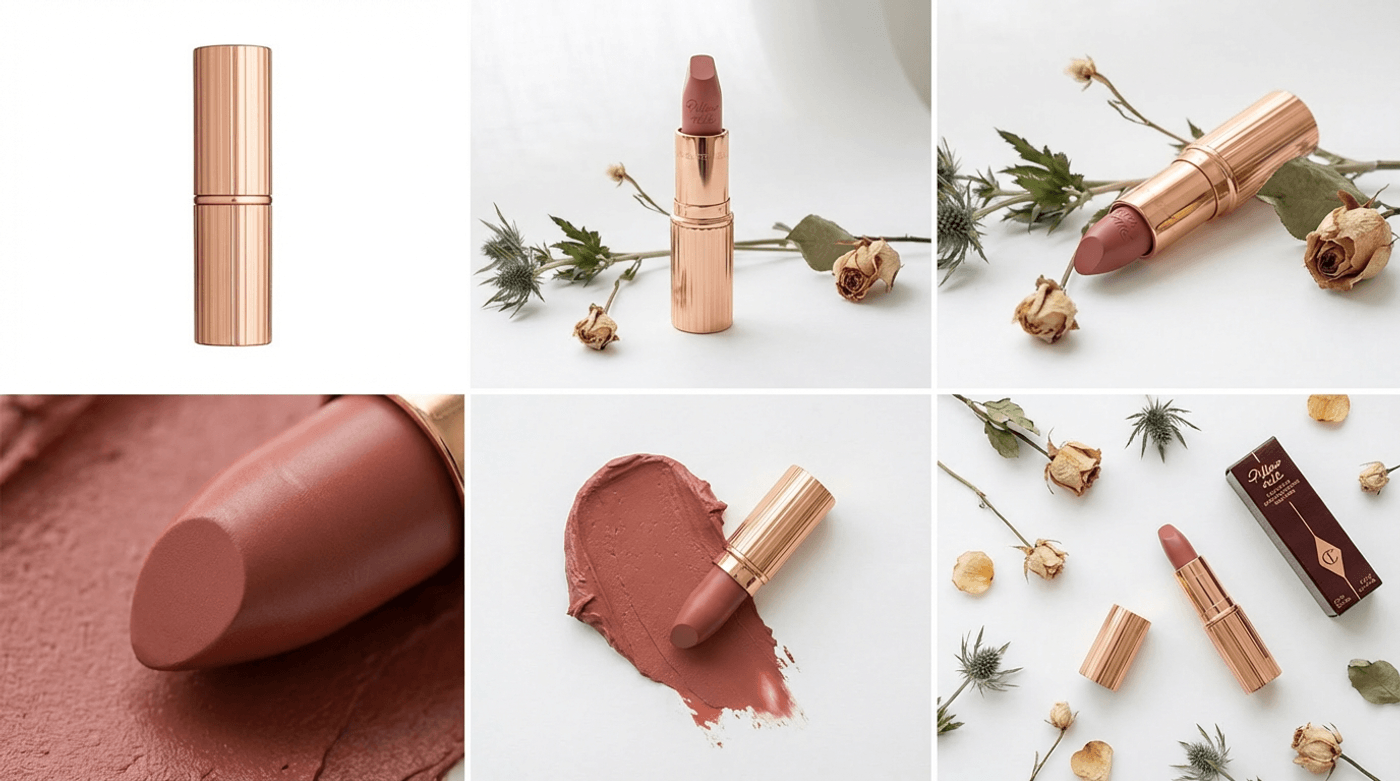
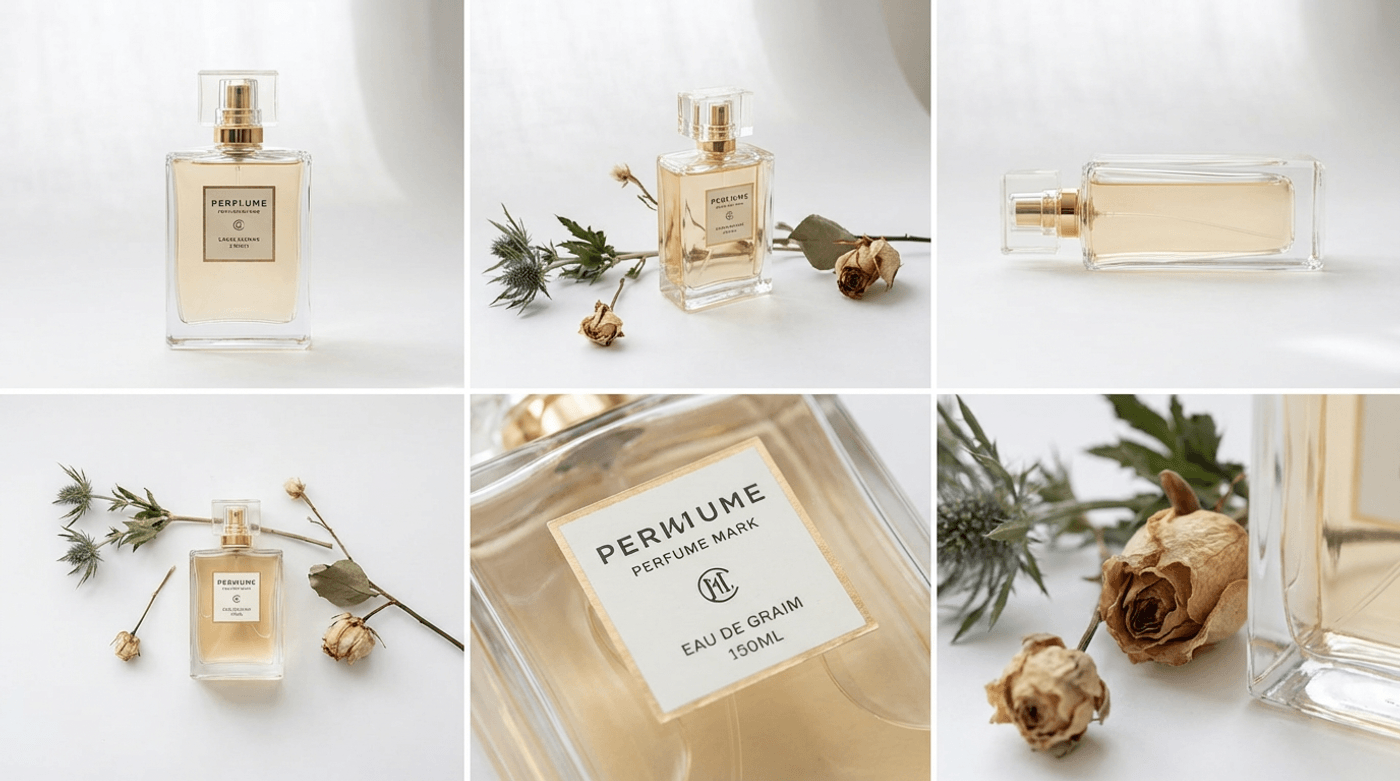
For food, beverages, and cosmetics:
- A front-on pack shot with perfect label alignment.
- A three-quarter angle shot.
- A macro texture shot (cream, lipstick, food surface, bubbles, or condensation).
- A flat-lay or top-down shot showing all components or an unboxing layout.
At this point, you can already generate strong commercials. The next step is to push the quality further by enhancing your photos with Nano Banana Pro, especially if your current assets are not perfect.
When you cannot reshoot: using Nano Banana Pro intelligently
In a perfect world you would shoot every product fresh using the workflow above. In reality, you are often working with what you already have: catalog images, UGC, or photos from a previous campaign shot on a different phone.
This is where Nano Banana Pro becomes more than “a nice add‑on” and turns into an essential part of the pipeline.
Think of Nano Banana Pro as your still image finishing room. When you feed an older or imperfect image into it, you are asking for three things:
1. More resolution so the image can hold up when used in video.
2. Cleaner detail so the AI does not have to fight noise and compression.
3. Useful variations that give you more angles or crops to work with.
A practical way to use it is to identify the strongest frame you already have for each product. It might be a hero pack shot from a previous shoot or a piece of UGC that just looks right.
Run that image through Nano Banana Pro on invideo to upscale it and remove some of the subtle noise and artifacts that stand out in motion.
From there, create a couple of variations that are actually useful in video.
— One might be a tight crop on the label, ready for on screen text.
— Another might be a crop that focuses purely on a feature, like foam, tread, or stitching.
— If your workflow allows slight angle shifts, you can also generate a new three-quarter feel from the same base.
Those enhanced frames then join your new phone shots in the set you feed into Money Shot. In other words, you are not asking Nano Banana Pro to fabricate a whole new visual identity. You are using it to bring your existing images up to the standard your new ones already meet.
Handled that way, Nano Banana Pro helps you bridge gaps in your asset library without undermining consistency.
Turn your stills into finished ads with Money Shot
Once you have your curated image set, open invideo and navigate to Agents & Models → Trends → Money Shot.
A practical flow looks like this:
1. Pick the best existing photo of your product – the one that is sharpest, cleanest, and most on-brand.
2. Run it through Nano Banana Pro to upscale it and generate a few alternate variations: maybe a slightly higher angle, a tighter crop on the logo, or a rotated view that reveals more depth.
3. Combine these Nano Banana outputs with any good shots from your phone session.
4. Shortlist four to eight images that now feel like they were shot in the same mini studio, even if they came from different sources.
5. Feed that curated set into your chosen Money Shot trend and use a prompt tailored to your story.
In the prompt field, talk to the tool the way you would brief a director. Give it the length, the platform, the energy level, and the beats you care about.
For example:
“Create a 10 second vertical ad for this energy drink with a bold, high energy feel. Start on a clean pack shot, then move into close ups of condensation and bubbles. Show the can at large scale in an urban setting and end on a centred pack shot with a simple offer line.”
or:
“Create a 8 second vertical ad for this serum with a calm, clinical studio look. Open on a texture close up, then reveal the bottle and box. Show the dropper in use and a clear label close up. Use soft motion and end on a simple pack shot with a CTA.”
Generate a first version, watch it the way a viewer would, and then tweak one thing at a time. Ask for faster cuts, or a darker mood, or more macro if you feel the balance is off. Generate multiple variations by using 4x to iterate faster.
The $25k Money Shot Challenge: a live stress test for this workflow
Invideo is running the $25k Money Shot Challenge until December 20, 2025, which is a very practical reason to try this workflow end to end.
You can find all the details, rules, and submission steps here:
https://invideo.notion.site/25k-money-shot-challenge
If you want a simple action plan, pick one product that represents your brand well, run it through the full process from this guide, and then generate two or three different Money Shot versions with different hooks and lengths. Choose the strongest one and submit it.
Even if you do not win, you will walk away with a finished ad that came from a single phone shoot instead of a full production.
Summing it up
At the start, it can feel ambitious to say that a few smartphone photos can become a full commercial. Once you see how Money Shot and Nano Banana Pro behave when you give them clean, well planned inputs, it starts to feel like the most practical way to work.
You are not replacing your eye or your taste. You are moving the heavy mechanical work of motion and editing to AI, so you can focus on ideas, angles, and light.
If you:
— prep your product like it might appear on a billboard
— use a simple, repeatable home setup
— control a handful of key camera habits
— shoot a small, thoughtful angle set
— and bring older assets through Nano Banana Pro before handing them to Money Shot
then one afternoon with your phone is enough to stock your ad account with new creative.
The fastest way to internalize this is to try it. Pick one product, clear a table near a window, follow the steps, and then open invideo to Agents & Models → Trends → Money Shot. Upload your photos, paste in one of the prompts from this guide, and generate your first piece.
Everything after that is just an iteration.
Also check out these related articles:
-
How to A/B Test Dozens of Product Ad Variations in a Single Afternoon Using invideo Money Shot
- 80+ AI Image Prompts for Effortless Visual Creation
FAQs
-
1.
How many photos should you upload per product?
Four to eight is usually enough. Focus on one straight on hero, one three-quarter angle, one side profile, and a couple of strong close ups that show branding and texture.
-
2.
Does the background have to be pure white?
It does not have to be, but white or very light neutral backgrounds are the most reliable for clean isolation and flexible compositing. If you use color, keep it simple and consistent across shots.
-
3.
What if your label text is not readable in the video?
Shoot at least one dedicated close up where the label fills most of the frame and is extremely sharp. Include that image in your upload set so AI has a clear reference when it creates close ups or textured shots.
-
4.
Can you use older catalog photos?
Yes, especially if you run them through Nano Banana Pro first to upscale and clean them. Just be cautious with images that are heavily filtered or lit in strange ways. A quick reshoot with your phone in good light will often give you better results.
-
5.
How do you shoot for both vertical and horizontal formats?
Frame a little wider than you think you need and keep the product well clear of the very top and bottom edges. That gives invideo room to crop for vertical platforms like Reels and Shorts and horizontal platforms like YouTube using the same base images.
-
6.
Should you include people in your base product photos?
For most Money Shot product flows, it is better to use product only images without faces. If you want creator or reviewer style content, use invideo’s tools that are built for UGC or avatar-driven videos rather than mixing people into your core product photos.