


Key Takeaways
-
Unlock full-screen magic with 9:16 (1080x1920); no crops or bars, just pure captivation.
-
Fortify headlines, faces, and CTAs in the center zone to conquer feed crops and grid squares.
-
Export H.264 at 30fps for razor-sharp reels that crush Instagram's compression.
-
Craft square-proof covers that turn profile grids into scroll-stopping engagement magnets.
-
Go vertical-first to build foolproof reels and own the algorithm with unshakable confidence.
Every second on Instagram is a tussle for attention. If you're a marketer, small business owner, or creator hustling on Instagram, you know how vital perfect reel specs are to hook audiences and skyrocket engagement.
Regardless of how killer your content is, the algorithm crushes anything with wonky crops, black bars, or fuzzy quality that sends viewers scrolling in frustration.
Many of you may have experienced this as well. The headline gets clipped in the feed. Subtitles sit too close to the bottom. Your cover looks fine in the reel section, but the profile grid looks weird. The reel simply doesn’t land the way you expected.
The good news is that this is no longer as painful as it once was. Invideo’s Reel Generator can now auto-generate reels that are already sized correctly from a simple idea. This removes a lot of friction and back and forth between teams.
Imagine flipping a quick phone clip into a pro reel like the following, minus the tech glitches.
Game-changing, right? Let’s dive right in.
Instagram Reel Size Cheat Sheet for 2026
This cheat sheet lays out every core Instagram reel size requirement you need to design and export against, so your videos don’t get cropped, compressed, or quietly downgraded by the algorithm.
How Instagram Reels Actually Show Up
Instagram reels appear across multiple spots in the app, adapting to each context for optimal mobile viewing. Full-screen playback in the dedicated Reels tab uses the native 9:16 aspect ratio (1080x1920 pixels), filling the entire smartphone screen vertically without black bars.
1. The Reels tab shows the full video
In the Reels tab, Instagram displays your video in its intended format. You get the full 9:16 vertical frame, edge to edge. Nothing is cropped here. This is the version most creators design for. But if your reel is not optimized for the 9:16 aspect, it might end up looking something like:
The issue here is that the video isn’t composed for a true 9:16 vertical frame, so Instagram crops it unevenly when it tries to force it into that aspect ratio.
2. The feed shows a cropped preview
When your reel appears in the main feed, Instagram does not show the full 9:16 frame. It crops the video to a 4:5 window, centered vertically. Check this, for instance:
Even though the video is 9:16, Instagram crops it to a 4:5 preview in the feed, which cuts the top and bottom of the frame. The content near the top and bottom edges disappeared in this view.
3. The profile grid shows a square
On your profile, Instagram crops the same reel into a 1:1 square. This is the most aggressive crop. Anything placed toward the sides or corners can vanish entirely, and it would look like:
This behavior explains most “my text is cut off” complaints. So, if you design only for full-screen 9:16, the other views will punish you.
Invideo’s Instagram Video Editor solves these issues by keeping everything centered on a true 9:16 canvas. It lets you preview how the same reel will appear across placements, so you design once with confidence rather than patching problems later. Apart from that, here are a few tips that can help:
-
Design for 9:16, but protect the center: Always start with a full 9:16 canvas (1080 × 1920), but keep key text, faces, and products centered. Treat the top and bottom edges as flexible space that may disappear in ‘feed’ view.
-
Assume the feed will crop to 4:5: Keeping user experience in mind, the most stable feed view is 1080 × 1350 (4:5). If your headline or subtitles survive this crop, they will survive everywhere else.
-
Leave breathing room at the bottom: Instagram overlays captions, buttons, and audio controls near the bottom of the screen. Keep subtitles and CTAs comfortably above that area to avoid collisions.
-
Check the square grid last: Your profile grid will crop everything to 1:1. Make sure your cover still looks intentional when viewed as a square, even if the full frame carries more detail.
-
Plan on a vertical canvas, not a horizontal fix: Most layout issues come from shooting horizontally and fixing later. Working on a vertical canvas that already reflects 9:16 and lets you preview feed and grid crops makes planning far easier.
Safe Zones For Instagram Reels
Safe zones exist because Instagram layers its own interface on top of your video and crops it differently across surfaces. Designing with certain safe zones in mind will help keep your message intact, no matter where Instagram decides to surface your reel.
Here are three safe zones to follow to make your grid look like this:
1. Keep key content in the central vertical band
The safest area for a reel sits in the middle of the frame. Faces, headlines, logos, and products should live here. This central band survives the full 9:16 view, the 4:5 feed crop, and the square profile grid with minimal loss.
2. Avoid the bottom area where captions and controls sit
Instagram places captions, audio info, and action buttons along the bottom portion of the screen. Subtitles and CTAs placed too low often collide with these overlays or disappear entirely in feed view. Leave clear space at the bottom and move text slightly higher than feels necessary when editing.
3. Watch out for side overlays and profile elements
Likes, comments, and share icons stack along the right edge of reels. Profile names and badges can also intrude near the top. Keep critical visuals away from both sides so these UI elements do not compete with or block what you want viewers to notice first.
Instagram Reel Cover Size And Thumbnail Strategy
Your reel cover is the first thing people see on your profile. Designing covers without accounting for that crop is one of the fastest ways to lose engagement.
Instagram uses the full vertical frame in the Reels tab, but on your profile grid, it crops that same cover into a 1:1 square (1080 × 1080). Anything outside the central square disappears on the grid.
That’s why the recommended cover size is 1080 × 1920 pixels (9:16). Designing in 9:16 lets your cover match the reel in full-screen view, while keeping all critical elements inside the central square ensures the grid crop stays clean, readable, and intentional instead of cutting off text or faces.
Here are a few best practices for designing the cover:
-
Keep text short and bold. One clear idea beats a sentence that gets clipped.
-
Use strong contrast. Covers shrink on the grid, so subtle text and soft colors lose impact.
-
Center the subject. A clear focal point survives cropping better than wide compositions.
Make sure that you don’t treat your cover as a separate entity or duplicate a strong frame from the reel. Use Invideo’s Thumbnail Maker to let you do this without leaving your editor. You can use image models like Nano Banana Pro or GPT Image 1.5 to refine the cover while keeping sizing and branding consistent.
Best Reel Length, Quality, And Export Settings For 2026
Reel performance does not depend on size alone. Length, quality, and export settings decide whether people keep watching and whether Instagram treats your video as worth distributing. Getting these wrong will definitely limit your reach. Here are the parameters that you must stick to.
1. Reel length: what’s allowed vs what actually works
Instagram keeps expanding the maximum allowed reel length, but longer does not automatically mean better. Discovery still favors videos that get to the point quickly and hold attention without friction. Let’s take a quick look at the ideal timeline for each use case.
A simple rule helps here. If the reel relies on discovery, keep it short. If it relies on intent or loyalty, you can go longer, but only if every second earns its place.
2. Export settings that hold up on Instagram
Once length is set, export quality becomes the next bottleneck. Instagram compresses every upload, so the goal is not maximum quality, but clean inputs that compress well without falling apart.
3. Reel Quality: Why some Reels turn blurry after upload
Blurry reels rarely come from using the wrong dimensions. They usually come from over-compression and repeated exports. Every time you export a video, the encoder throws away data. When you export again, it compresses an already compressed file. By the time Instagram applies its own compression on upload, there is very little detail left to preserve.
You can recover a lot of that lost clarity before upload by fixing the source file itself. Invideo’s video enhancer helps here by sharpening edges, correcting exposure, and cleaning up soft footage so the file you export holds up better when Instagram applies its compression.
-
Start with clean source footage.
-
If you’re exporting, do it with the right settings.
-
Avoid passing the file through multiple editors.
When your canvas, crops, and export settings are right from the start, you do not need to keep re-encoding just to fix layout issues. That is how you keep reels sharp even after Instagram does its compression.
Simple Workflow To Create Correctly Sized Reels Every Time
Once you understand how Instagram crops and compresses, the execution becomes easier. Here’s a simple workflow to avoid sizing issues before they happen.
Step 1. Start with a 9:16 canvas
The fastest way to avoid sizing issues is to start from a workflow that already assumes vertical video. Instead of manually choosing dimensions or repurposing old footage, start with a reel-specific setup so the canvas matches Instagram from the first frame.
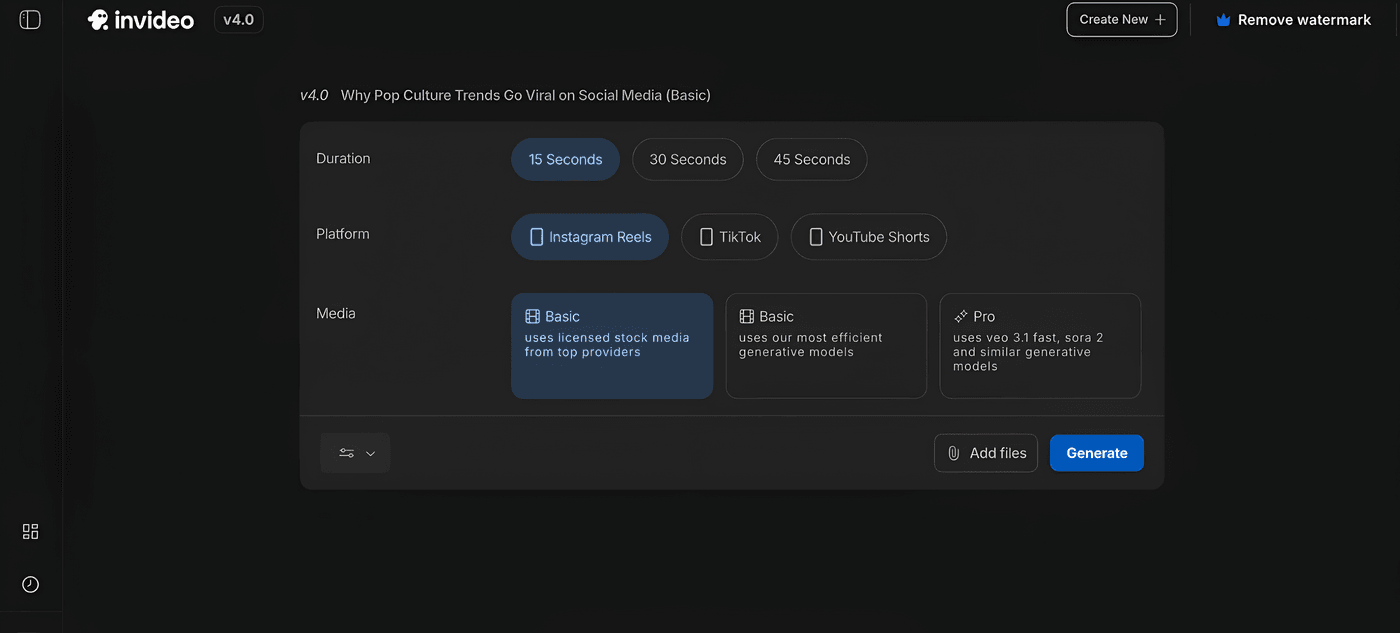
Post signing up or logging in, inside the Instagram Reels maker on invideo, you can start with an AI prompt or a preset where 9:16 is locked by default. Selecting Instagram Reels as the platform ensures the project opens vertically, with duration and layout tuned for mobile viewing.
You can add the prompt and the specifications, like duration, platform, and the media type that you want to generate the reel in.
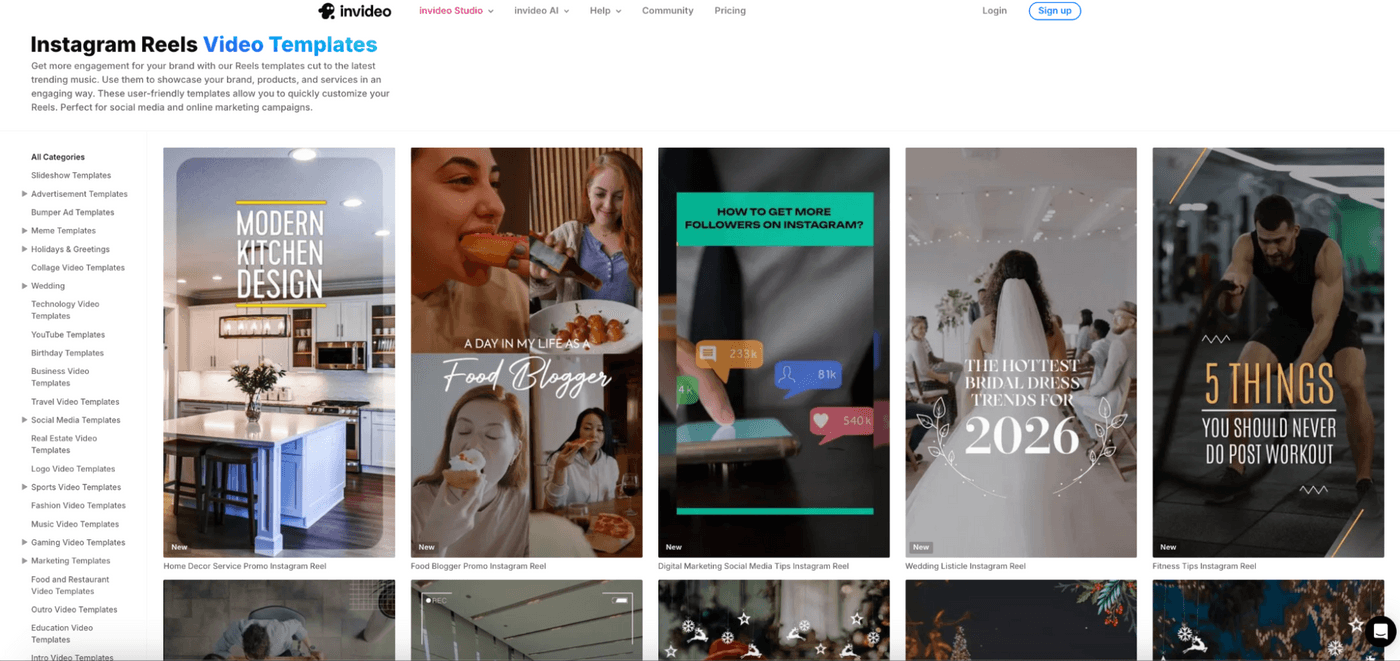
Alternatively, you can start from Invideo’s creative Instagram Reel templates and select from hundreds of narratives. The templates already follow vertical-first layout patterns that work for hooks, product demos, and promos. Since these templates are built for reel placements, it’s easier to keep text inside safe zones and avoid rebuilding the design from scratch.
Step 2. Generate video and place it in the correct aspect ratio
Once the canvas is set, the next risk is breaking the layout during creation. Scripts that are too long, subtitles that run wide, or visuals framed for horizontal video all create problems later.
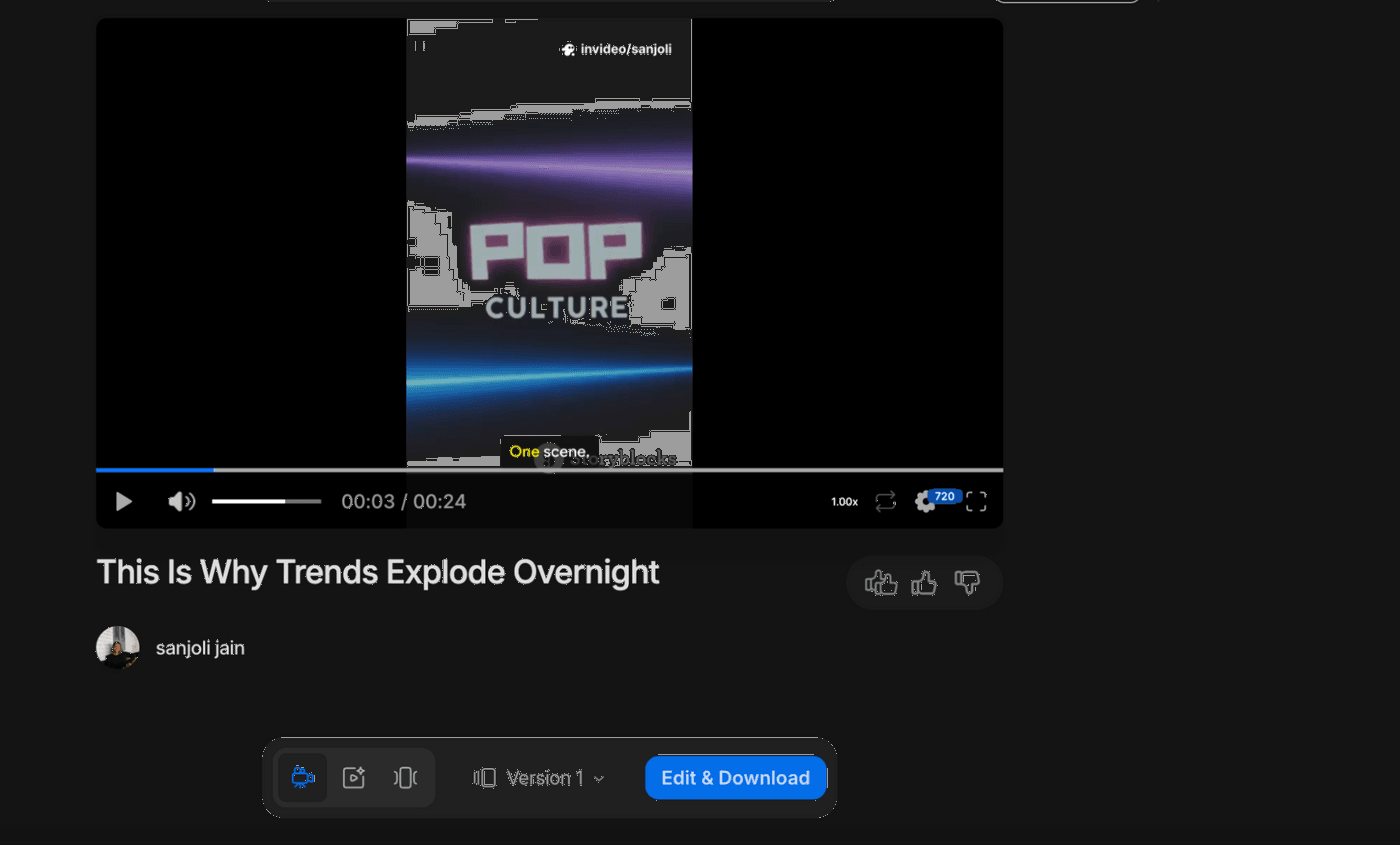
Invideo will generate a reel with the script, scenes, voiceover, and subtitles directly inside the vertical frame. Each scene is paced for short-form viewing, subtitles stay readable on mobile, and nothing spills outside the usable area of the screen. What’s more, you can even provide feedback and change certain things as per your vision.
Make sure you choose your AI model wisely. The Basic model handles standard scripts and visuals quickly but sticks to simpler voiceovers, stock footage variety, and auto-subtitles that work fine for casual posts.
The invideo Plus and Generative plans will help unlock advanced models with richer generative outputs, premium voice tones, dynamic animations, and unlimited image generations. This eventually will help you create reels that feel premium, hold attention longer, and convert better across feed, Stories, and Explore.
Step 3. Adjust layout with safe zones in mind
This is where many reels fail. The text looks fine in the preview, but gets cut in the feed or grid view. The fix is to adjust placement while you still have full control.
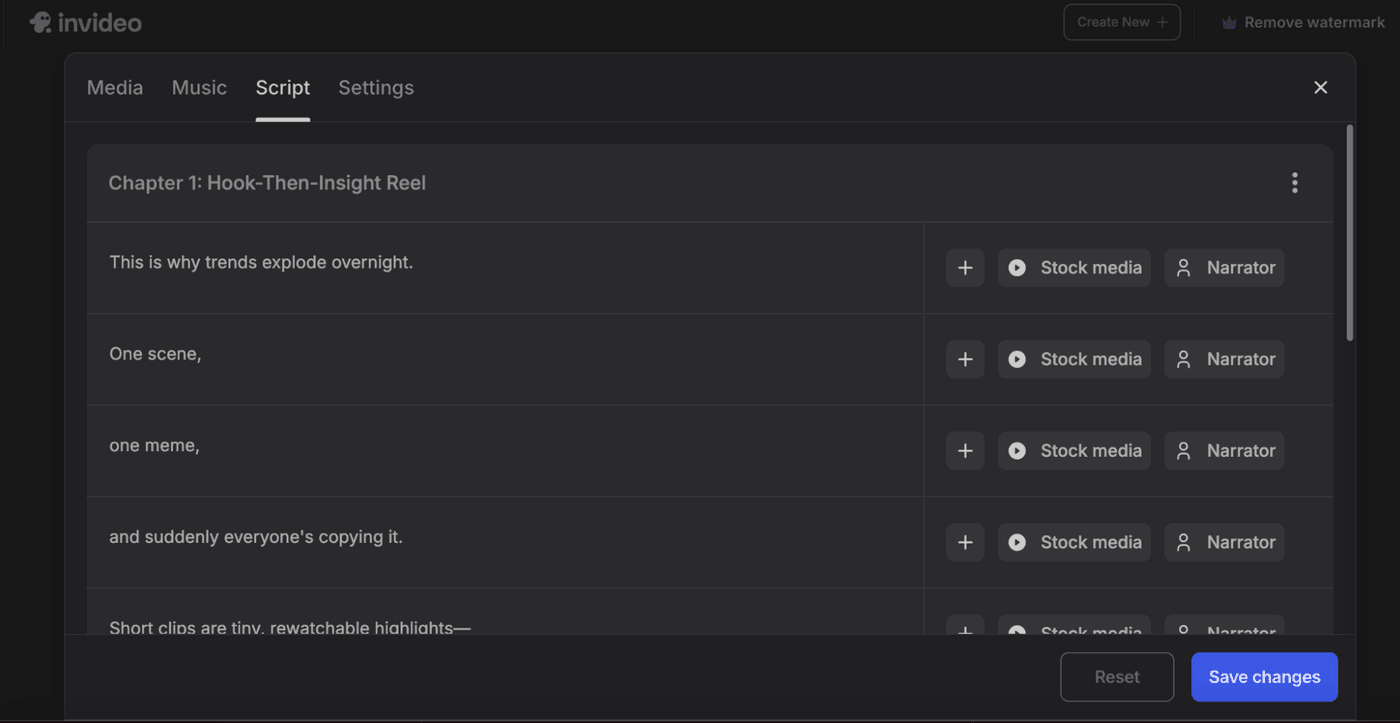
In Invideo’s editor, you can tweak text, subtitles, and visuals while seeing the full vertical layout. Keeping key elements centered and away from edges makes it easier to respect safe zones before export, not after publishing. You can also change the script, music, and other media settings depending on what and how you want your reels to look.
Step 4. Export with Reel-optimized settings
The final step is exporting cleanly so Instagram compression does not undo your work. Multiple exports or wrong settings often cause blur and soft text.
Invideo’s video enhancer presets will sort this out for you. It helps you lock the resolution, frame rate, and codec to Reel-friendly settings, so you export once and upload with confidence, without re-encoding or resizing the file elsewhere.
Advanced Sizing Tips for Repurposing Content Across Reels, TikTok, and Shorts
When you repurpose videos across Instagram reels, TikTok, and YouTube Shorts, vertical format alone is not enough. All three platforms use 9:16, but their UI overlays, caption placement, and feed previews differ. So your text that looks good on TikTok might get clipped on IG. Or your elements that look fine on Shorts might feel crowded on some other app.
The safest approach here is to design for a conservative central safe zone that works across all platforms. Keep all the faces, text, and CTAs tightly centered, and treat the edges as flexible space. Build one clean master vertical video first, then adapt length, captions, and pacing per platform. This will help you keep the quality consistent without redesigning every version from scratch.
Common Instagram Reel Size Mistakes And Quick Fixes
Most reel issues come from a handful of repeat mistakes. Each one has a straightforward fix once you know where Instagram crops and compresses.
-
Text or faces getting cut off: This usually happens when key elements sit too close to the top, bottom, or sides. To avoid this, make sure you design within the central safe zone and always account for the 4:5 feed crop and 1:1 grid crop.
-
Blurry or soft-looking videos: Blurriness often comes from double compression. Export once at 1080 × 1920, use the H.264 codec, keep bitrate reasonable, and enable high-quality uploads in the Instagram app.
-
Covers that look fine in reels but messy on the grid: The profile grid crops covers to a square. Redesign covers so the central 1:1 area carries the message, and the full 9:16 frame acts as support.
-
Awkward framing in the feed: Feed previews crop reels to 4:5, which trims the top and bottom. Ensure that you keep your headlines and subtitles away from those edges so the preview still reads cleanly.
-
Horizontal or reused assets causing layout issues: Shooting horizontally and fixing later leads to forced crops and wasted space. Start on a vertical 9:16 canvas and plan layouts with all three views in mind from the beginning.
Instagram Reels on invideo
If you take one thing from this guide, let it be this: design for how Instagram actually displays reels, not how they look inside your editor. When you plan for 9:16, protect safe zones, design covers for the square crop, and export with clean settings, your content shows up the way you intend.
Whether you build reels manually or use AI to speed things up, starting with the right canvas removes most of the guesswork. Invideo helps lock in those fundamentals early, but the sizing principles here apply no matter what workflow you use. Get these right once, and every reel you publish has a better shot at landing the way it should.
Check out more pieces on Instagram Reels from us:
FAQs
1. What is the best size for Instagram Reels?
The best size for Instagram Reels is 1080 × 1920 pixels. This matches Instagram’s native vertical resolution and compresses cleanly across all placements.
2. What is the ideal aspect ratio for Instagram Reels?
Instagram Reels use a 9:16 aspect ratio. This is the only ratio that displays full-screen in the Reels tab without cropping.
3. What size should an Instagram Reel cover image be?
You should design reel covers at 1080 × 1920 pixels (9:16), but keep all important elements inside the central 1:1 square. This way, your reel will survive the crop when it shows on your profile grid and on the audience’s personal feed.
4. Why are my Instagram Reels blurry even when I upload in HD?
Reels often turn blurry because of over-compression or repeated exports. Exporting multiple times reduces detail before Instagram applies its own compression.
5. Why does my text or caption get cut off on Instagram reels?
Your text might be getting cut off because Instagram crops reels differently in the feed and grid. Besides that, it places UI overlays on top of the video. So, keeping your text inside the safe zones is utterly important. If you are tired of guessing specs, starting with a correctly sized canvas in Invideo removes most of these issues.