


Key Takeaways
-
The real challenge is not producing a single great AI shot. It's making multiple angles feel like a single, cohesive moment.
-
Keep characters and environment consistent using fixed reference images in Nano Banana Pro.
-
Plan every angle upfront with a single 3×3 storyboard grid.
-
Upscale grid panels into full-resolution shots instead of cropping.
-
Animate with restraint in Kling 2.6, then stitch cleanly for cinematic continuity.
If you've ever built a narrative scene with AI, you already know where it breaks
One shot is easy. The moment you need coverage, a reaction, or a reverse shot, the scene continuity collapses. You rewrite prompts to fix framing and eyelines. Still, faces drift. Lighting shifts. What should feel like one cinematic moment turns into a stack of disjointed clips.
The problem isn't realism. It's consistency. Most workflows treat every angle as a fresh start, and those inconsistencies quietly ruin the story.
Today, we're fixing that.
By pairing Nano Banana Pro with Kling 2.6 on invideo, you can lock a scene's visual DNA upfront so characters stay consistent in all shots from all angles. The result? AI videos that look exactly like films that are shot in real life.
What Exactly are Multi-Angle Shots?
Multi-angle shots refer to the practice of capturing or generating the same scene, moment, or action from multiple camera positions, framings, or perspectives. In traditional filmmaking, this is achieved by using multiple physical cameras simultaneously or by reshooting the same performance from different positions.
In modern AI-powered video production, multi-angle shots can be generated from a single reference or prompt, creating varied coverage without the need for physical cameras, crews, or reshoots.
Multi-angle shots are the foundation of dynamic editing. They give editors choices, allow storytelling rhythm to shift, and help control what the audience focuses on at any given moment. A single locked-off wide shot can communicate information, but cutting between a wide, a medium, and a close-up transforms that same moment into something with pace, emotion, and visual interest.
Multi-Angle AI Shots: The Framework to Get it Right
Multi-angle shots have been for the longest time one of the biggest challenges due to the continuity aspect of the final product. Although AI has made things significantly better, before opening any AI tool, you need to define the virtual set. High-end visual integrity starts with a structured scenario, not a random prompt.
Take a look at "The Last-Minute Deal," a 30-second scene created entirely with this multi-angle workflow.
Here's the simple framework we locked before generating anything. You can use the same structure for any dialogue scene, whether it's a short film, video ads, or an Insta Reel.
-
Setting: A minimalist, sun-drenched urban cafe with the soft hum of an espresso machine and cafe chatter.
-
The Conflict: Two former business partners meet. One has a contract; the other has a secret.
-
Character A: Leo, the strategist. Late 30s. Camel-colored turtleneck, silver-rimmed glasses, clean-shaven, focused.
-
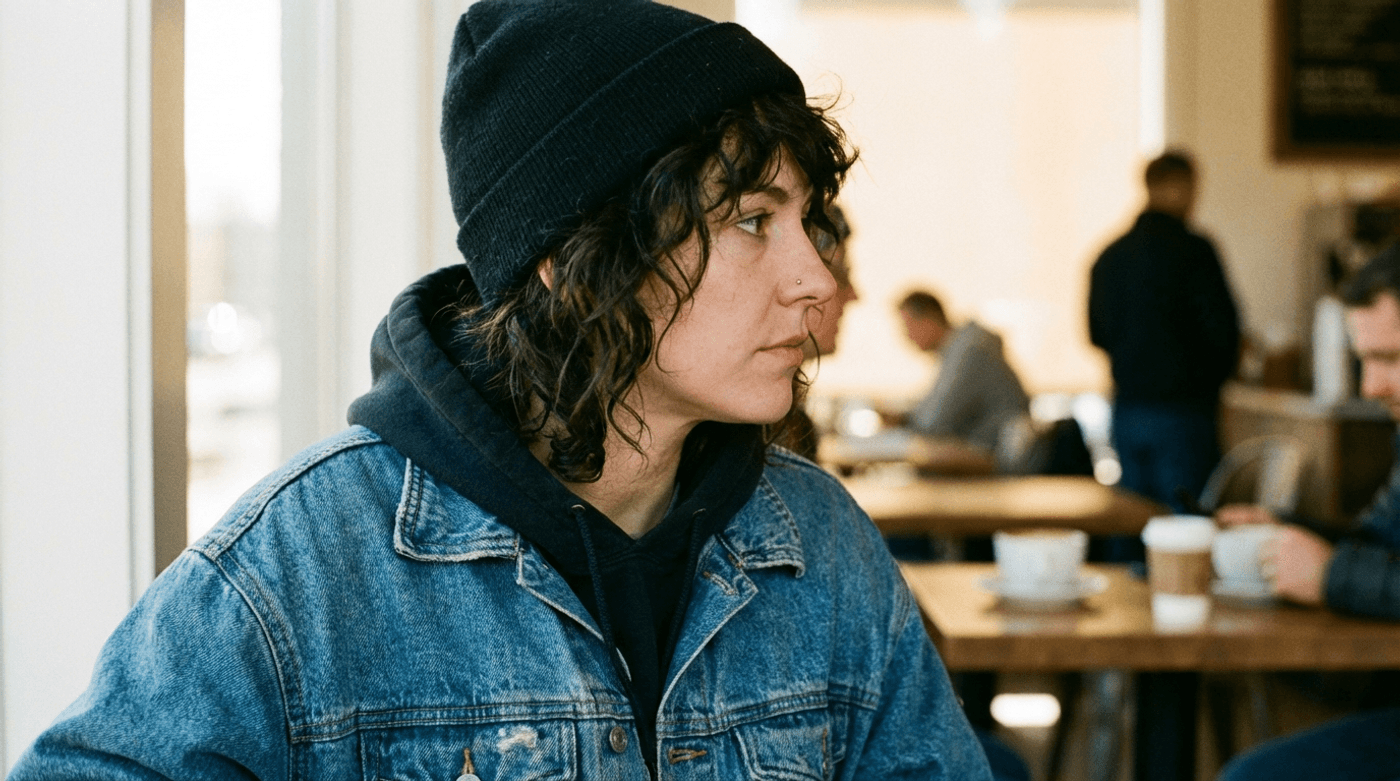
Character B: Maya, the rebel. Early 30s. Oversized faded denim jacket, black beanie, messy curls.
Watch how the scene cuts from a wide master shot to a tight close-up without any visual drift. Details like the table's wood grain and the creases in the denim jacket remain consistent across angles.
Here's the exact three-step workflow we used to design, lock, and animate this scene.
Step 1: Set the Visual Foundation for the Scene
The key to making this work is to start with two fixed character reference images.
Lock them in early, and every angle you generate later becomes a reframe of the same people, not a reinvention. That's what makes true multi-angle continuity possible.
To begin, open your invideo dashboard, either by logging in or signing up. Under Agents and Models, select Nano Banana Pro. This AI model works especially well here because it preserves character identity and accurately follows structured instructions.
When writing your directions, keep these rules in mind:
-
Define clear visual anchors for each character
-
Keep lighting natural and expressions neutral
-
Lock in clothing, accessories, and defining features that must remain consistent
Check out the prompts we used to generate the two base images for our story.
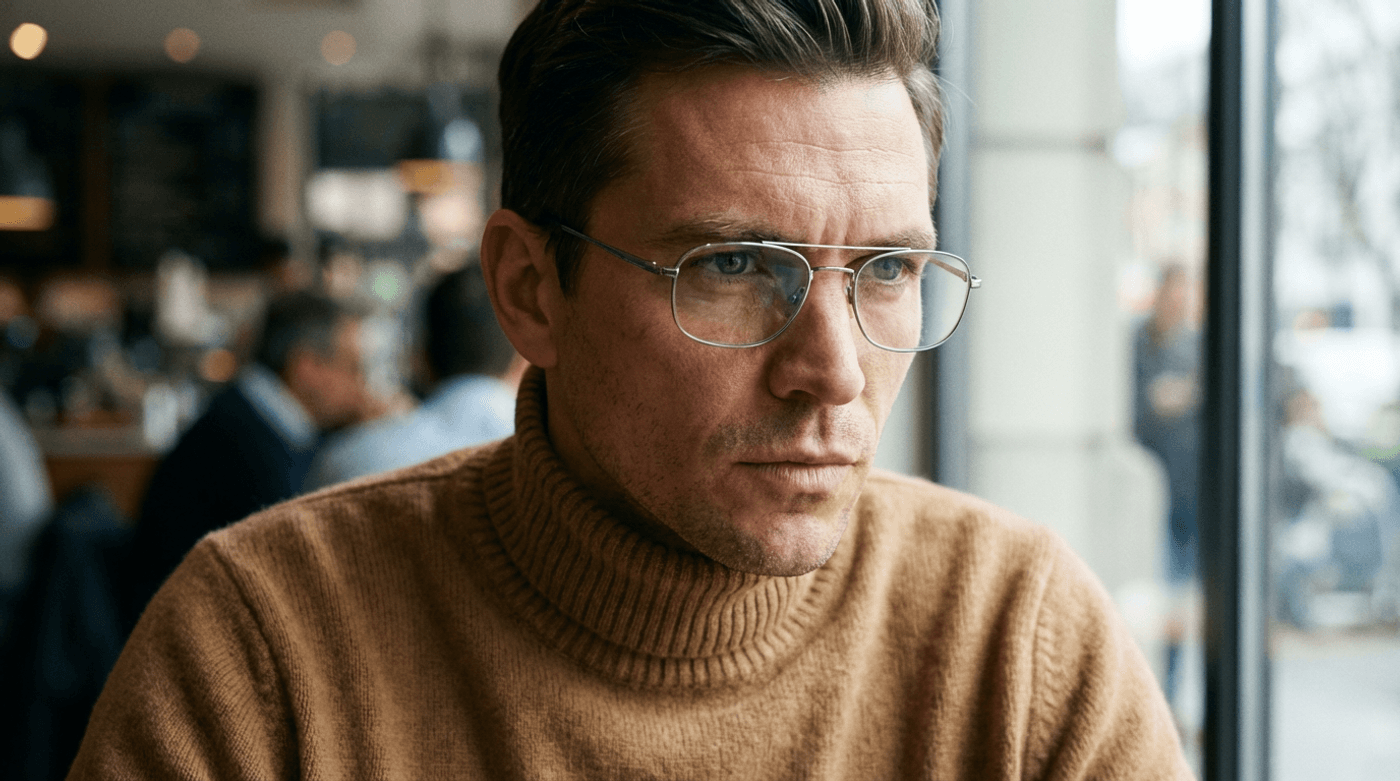
Alt-Text: Reference image of Leo created using Nano Banana Pro
Step 2: Build the Multi-Angle Frame Grid and Prep It for Animation
This is where most multi-angle AI workflows succeed or fail.
Instead of generating shots one at a time and hoping they line up, you create every camera angle upfront in a single image. One scene. One visual reality. Multiple viewpoints.
That single storyboard becomes the backbone of the entire sequence.
A. Create a 3×3 Master Grid with Nano Banana Pro
Using the two character references from Step 1, generate a single 3×3 storyboard grid that captures every required camera angle in one image. This grid becomes the source for all shots that follow.
In the image generator:
-
Upload both character reference images
-
Set the aspect ratio for your final video
-
Select a single image output
Once everything is set, click Generate.
Here's the exact prompt we used to generate the full multi-angle scene grid.
Scene: A minimalist, sun-drenched urban cafe in soft morning light. Both characters are seated directly opposite each other at a small, warm oak table set for a dialogue scene. The environment must remain consistent in every panel.
All panels must look like live-action cinematic frames with realistic lighting, depth of field, and lens behavior. Maintain eyeline continuity and consistent screen direction across over-the-shoulder shots.
Create a single 3×3 storyboard grid with thin borders separating panels. Panels must be numbered and read left to right, top to bottom.
Shot list (match each panel exactly):
1: Wide master shot, slightly elevated, establishing both characters, the table, and the cafe environment
2: Balanced medium two-shot at seated eye level, both characters in equal visual weight
3: Over-the-shoulder from Leo toward Maya, Leo's shoulder as soft foreground frame
4: Over-the-shoulder from Maya toward Leo, Maya's shoulder as soft foreground frame, same conversational axis
5: Medium close-up of Maya (chest-up), softly diffused cafe background
6: Medium close-up of Leo (chest-up), matching lighting and lens to the previous shot
7: Tight close-up of Maya, shallow depth of field, emotional detail visible
8: Tight close-up of Leo, matching lens behavior and lighting quality to the previous close-up
9: Insert shot: extreme close-up of an object on the table relevant to the scene (for example, a contract folder, coffee cup, or phone)
Once generated, you should see the entire scene mapped out in a single frame like this:
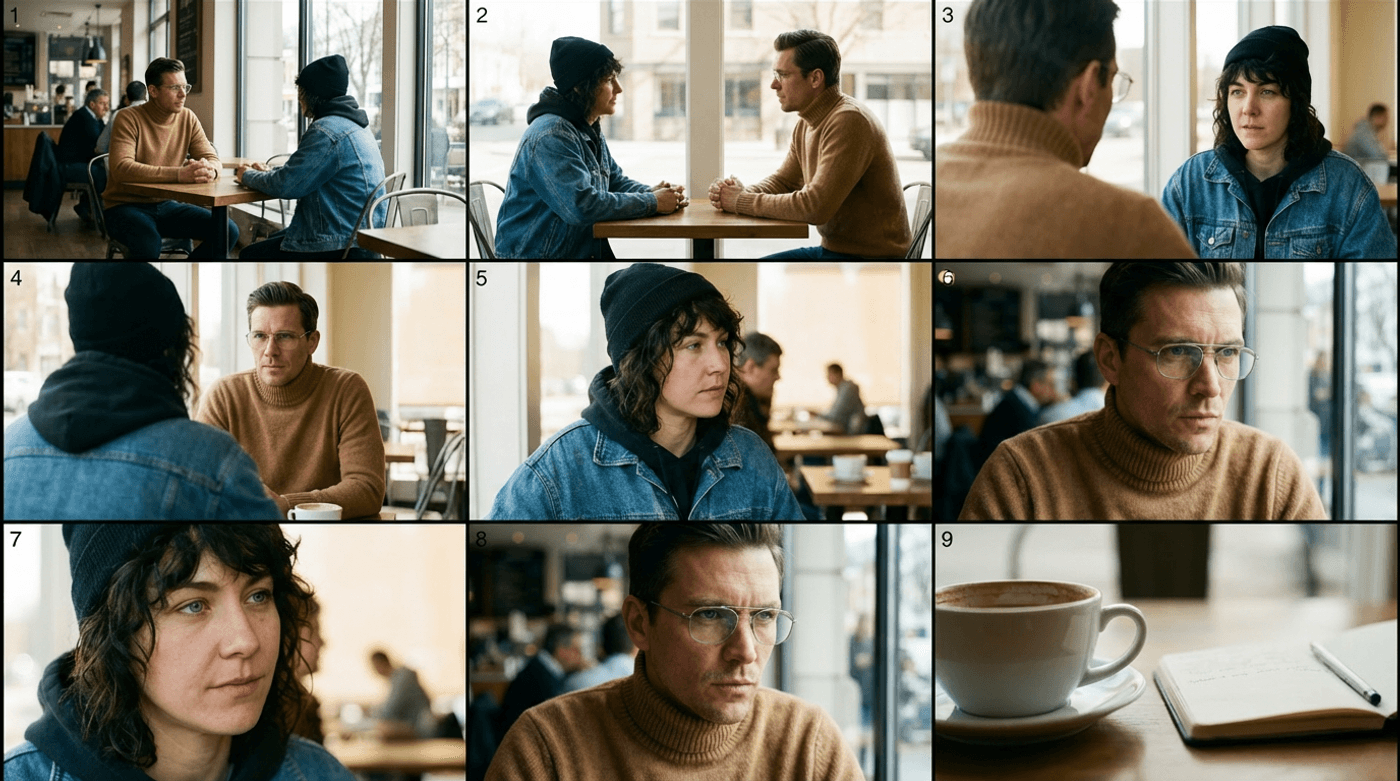
Alt-Text: 3×3 storyboard grid of a cafe dialogue scene showing consistent multi-angle shots generated with Nano Banana Pro
B. Isolate and Upscale Each Frame
The grid defines the scene, but it is not video-ready. To avoid a blurry result, you must turn your favorite panels into high-resolution "Master Plates."
Replace the character reference images with the 3×3 grid. Instead of cropping manually, let Nano Banana Pro isolate and upscale each shot. This preserves fine detail and prevents the softness that comes from enlarging a small section of the image.
Use this prompt for each angle:
This is exactly what you want. The framing, lighting, and details match the grid, now at full resolution. Repeat this for every angle, and you'll have a complete set of high-res shots.
Step 3: Animate the Scene and Bring It to Life
With the groundwork done, it's time to turn those static images into a moving narrative.
Select Kling 2.6 and animate each shot with motion, expression, and voice. The best part? Nothing changes in your setup. You're still working inside invideo, using the same workflow you've already set up.
Direct each shot using this high-fidelity approach:
-
Upload your Master Plate: Start with the 1080p upscaled shot you generated earlier.
-
Bind Dialogue to Motion: Use the audio feature to upload your dialogue or type the script. Kling 2.6 can produce blinks and micro-expressions that match the delivery.
-
Generate Short Bursts: Kling lets you generate 5- or 10-second clips, which helps maintain facial accuracy and control the visual "drift" that occurs in longer renders.
Here's the prompt we use to generate the first 5-second video sample:
Movement should be subtle and natural. Small head turns, eye shifts, controlled breathing. No exaggerated gestures. The tone is restrained and tense. Insert 1.5 seconds of silence between lines. Hold facial reactions during silence. No overlap.
LEO (calm): "We said this meeting wouldn't change anything."
Brief pause. Leo looks down, then back up.
MAYA (distant): "And yet you still showed up."
Short silence.
LEO: "I needed to see if you'd sign."
Generate one shot, move to the next, and keep motion restrained. By the end, you should have a clean set of clips that feel directed, not improvised.
To assemble the final scene, use a video editor to stitch the clips together.
Best Practices for Creating Consistent Multi-Angle Scenes Using AI
Even the best AI video models get fully accurate results less than 20% of the time. That's why the difference between a scene that feels "generated" and one that's "directed" comes down to control. Use these tactics to keep your edit feeling intentional from start to finish.
1. Direct the pauses, not just the lines
Dialogue alone does not carry emotion. Timing does. When lines land too close together, tension collapses, and scenes feel rushed. In filmmaking, the reaction is the action. Give your edit room to breathe by explicitly telling the AI to hold the moment.
2. Use voice as your realism anchor
Your viewers might forgive a minor visual glitch, but they won't tolerate a robotic or unstable voice. Consistent tone, pacing, and delivery across all clips are essential for immersion.
3. Restrain Motion for Cinematic Control
Excessive motion is a dead giveaway of AI-generated video. High-end scenes rely on stillness. Small eye movements, controlled breathing, and micro-reactions feel intentional and human.
4. Fix eyelines early, not in post-production
If your characters don't feel like they're actually looking at each other, the audience's sense of space breaks. Fix this in your grid prompts before you even hit the animate button.
5. Preserve screen direction during angle changes
Multi-angle scenes collapse when characters suddenly "swap sides." It's the classic 180-degree rule. If Character A is on the left in the wide shot, they must stay on the left in every other angle to keep the spatial logic intact.
Used together, these controls turn AI into a production system, not a shot generator. That shift is what makes multi-angle scenes stable, repeatable, and production-ready.
Ready to Build Your Own Multi-Angle Shots?
When continuity clicks, multi-angle scenes stop feeling risky and start feeling intentional. What once meant guesswork and reruns becomes a workflow you can trust. With a clear plan and AI models working together, your focus shifts from fixing inconsistencies to shaping performances.
You have the blueprint. The rest is just storytelling. Head over to your invideo dashboard and start building your scene. Also check out these related articles:
Also check out these related articles:
-
How to Create Brand Videos With AI (REAL Examples & Tips Included)
-
Kling on invideo: How It Became the Filmmaker's Favorite AI Video Engine
-
Kling vs Sora vs Veo vs Runway: Which AI Model Wins for Real Production?
FAQs
-
1.
Can AI-generated multi-angle shots replace real multi-camera shoots?
For short-form digital content, yes. AI is the fastest way to get clean coverage and reverse shots without a crew or physical set. Live shoots still matter for complex action and large-scale movement.
-
2.
Can AI-generated angles be mixed with live-action footage?
Absolutely. AI shots work well as cutaways, reaction shots, inserts, or even full scenes. Match pacing and color, and the transition feels seamless. AI-angles are especially useful as cutaways, reaction shots, inserts (hands, product close-ups, screens, signage), establishing shots, “bridge” shots between scenes, or even full replacement scenes when you can’t reshoot.
-
3.
What if there are small lighting or detail mismatches when stitching together multiple shots?
Do not fix shots individually. Return to the storyboard grid, tighten character references and lighting rules, then regenerate. In practical terms, small mismatches usually come from ambiguity in your references. If the character’s key light direction isn’t locked (for example, sometimes left, sometimes front), or the environment details aren’t specified (table props, background items, wardrobe accessories), the model may “interpret” differently from angle to angle.
-
4.
Can AI create believable over-the-shoulder (OTS) shots?
Yes, as long as you control foreground rules. OTS works when the foreground shoulder/head shape stays stable and the focus stays on the speaking subject. The easiest mistake is letting the model invent a new foreground person each time, which makes the scene feel like it changed actors. Lock the “foreground silhouette” as a consistent element (same hair shape, same shoulder line, same wardrobe color), and your OTS angles will cut together more like traditional coverage.