


Picture slideshow videos with music are fantastic digital souvenirs that you can gift to someone on a special occasion. They are also an effective method for creating visual presentations that emphasize a particular message.
Say a birthday or an anniversary is coming up. You could craft a wonderful video that puts together photos of some of the special moments you’ve shared with that person, as well as add a song that you both love.
Teachers can use picture videos with music to bring a lesson closer to their students. Businesses can also use this method to attract larger audiences or to introduce new employees to the company.
Whether you’re a fan making a music video for your favorite song or a marketer creating a highlight video to engage your target audience, coming up with an eye-catching slideshow isn’t a difficult task. What you need is:
- A selection of photos that you want to put together
- A concept of what you want your video to look like
- Basic knowledge on how to make a video
- An easy-to-use video editing app
Let’s take a look at how you can make a video with music and pictures using our video editing platform.

Source: Denise Jans @Unsplash
How To Make a Video With Music and Pictures Using InVideo
InVideo Homepage

If you’re looking for a handy video editing platform with plenty of features, InVideo has got what you need. You can use our platform to create enticing slideshows quickly and easily.
One of the main reasons why InVideo is a great solution for making picture videos with music is that we provide three methods for you to do that. Depending on how much creative freedom you need and what your preferred approach to video editing is, you can make a slideshow using:
|
InVideo Video Editing Options |
|
|
Import a script, website link, or a selection of media files and transform them into a series of scenes that you can add various features to |
|
|
Choose from our selection of more than 2,000 professional-looking templates that you can customize to your liking |
|
|
Blank templates |
Start making a video from scratch using a bare template that you have the full creative freedom to customize in line with your concept |
How To Make Videos With Pictures and Music Using the Text-To-Video Option
InVideo Text-To-Video Option
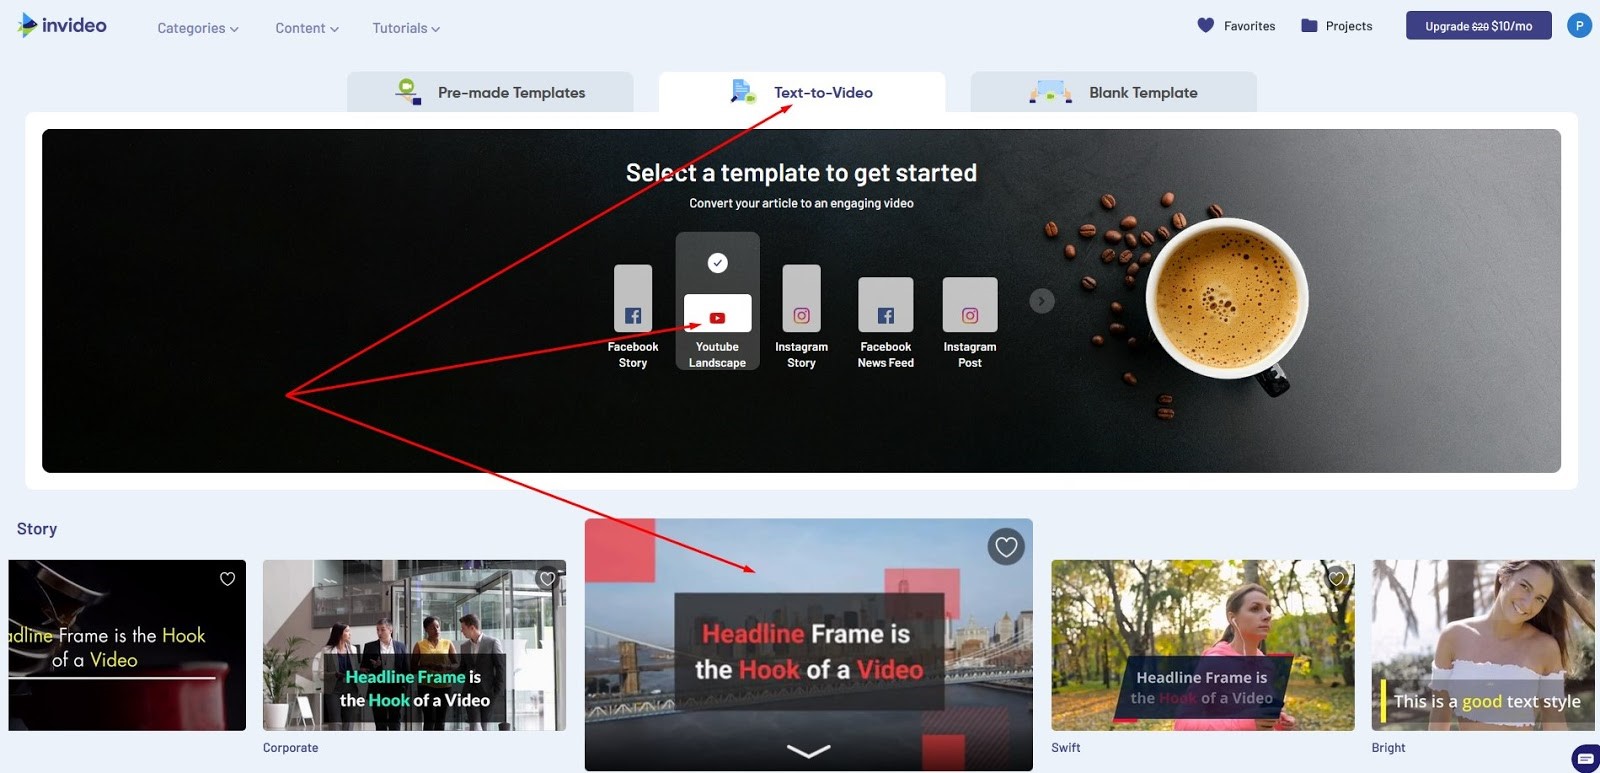
Using the Text-to-Video option, you can upload your selection of images and turn them into scenes based on a simple template. To start creating your video, you need to:
- Log in to your InVideo account
- Click on the Create button
- Open the Text-to-Video tab
- Pick the format for your video
- Select a template as a starting point
- Click on Use this template
InVideo Text-To-Video Upload Screen

You’ll be taken to the Upload screen. Choose the Add your media files here option and drag and drop your images to import them into InVideo.
Keep in mind that the maximum upload size for your files is 20MB. This is because we want to ensure that you can work on your project without experiencing any performance issues.
You can upload a variety of image formats, including:
- JPG
- PNG
- BMP
- RAW
- GIF
- TIFF
With the Text-to-Video option, you can work on your video in two modes:
- Storyboard
- Advanced editor
Making Videos With Pictures Using the Storyboard Mode
InVideo Storyboard

The Storyboard mode enables you to pay special attention to each of your scenes. You can view, arrange, delete, and duplicate them. If you want to replace an image, drag and drop it onto the designated field to the left of a scene.
You can add captions using the fields below the scenes. When you enter your text, it will appear in an element predefined by the template you selected. You can change the formatting of the text to:
- Headline
- Story
- Quote
- Question
- Social
To add music to your video, go to the Music tab. Use the Upload your own button to import a song that suits your concept. If you don’t have one, you can choose from our assortment of royalty-free melodies. Use the + symbol next to a song to make it the default music for your slideshow video.
We’ve also got an extensive library of over a million images and videos. Go to the Media tab and use the search bar to see if we’ve got something that can enhance your slideshow video. This includes a selection of premium media files that are of the highest quality.
Click on the Advanced Editor tab at the top of the screen to work on your video in the other Text-to-Video editing mode.
Making Videos With Pictures Using the Advanced Editor Mode
InVideo Advanced Editor

The Advanced Editor mode is more in line with traditional video editing interfaces. You can find all your scenes in a sequence by going to the timeline at the bottom. To change the duration of a scene, you need to grab an edge and drag it around.
You can find the bar with the music track that you added to the video at the bottom of the timeline. Click on the bar and go to the Edit menu on the right to set up the options for your song. You can:
- Trim or loop the song
- Set up the volume
- Add fade-in and fade-out effects
If you want to edit your images, click on an image element in a particular scene. The Edit menu for pictures provides options such as:
|
InVideo Image Editing Options |
|
|
Image Edit |
You can crop the frame for the original image and add a blur effect using a slider |
|
Image Resizing Options |
You have the options to crop and stretch an image element in line with the screen or set it up to fit with another element |
|
Filters |
This tab provides an extensive selection of filters, such as Amaro, Inkwell, Hudson, Ludwig, Mayfair, Brooklyn, Clarendon, etc. |
|
Image Animation |
You can add in, out, and in-place animations to your image and use the slider to set the duration for each of them |
|
Change Project Colors |
This option enables you to align the default template colors with your pictures |
You can edit other template elements by going to the Layers menu on the right or using the Advanced Timeline.
Editing Your Slideshow Video Using the Advanced Timeline
InVideo Advanced Timeline
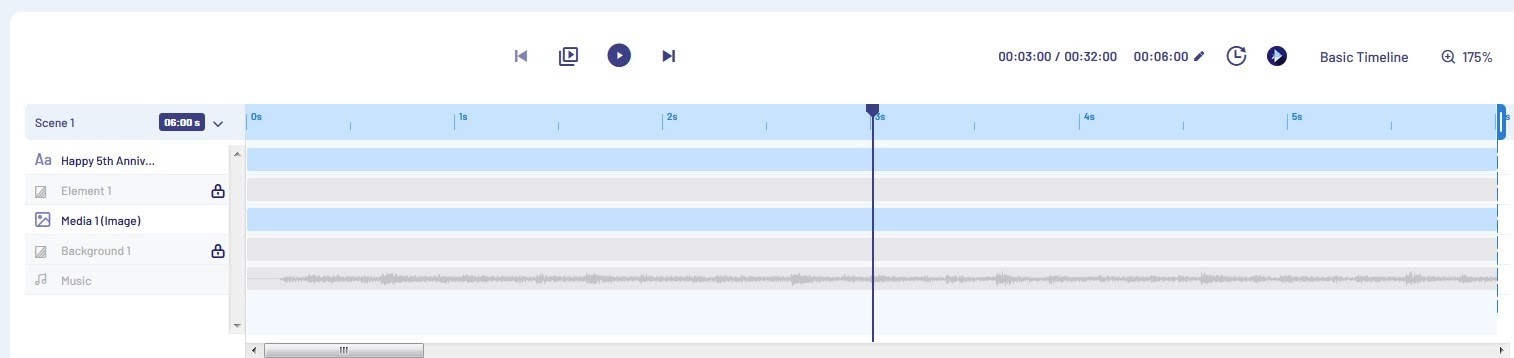
Click on the Advanced Timeline button in the top-right corner of the regular timeline. Here, you can view and edit all the elements in a particular scene.
Some of the elements are locked, so you need to click on the lock to be able to manipulate them. Move them up or down to change how they appear in contrast to one another.
InVideo Scene and Element Duration
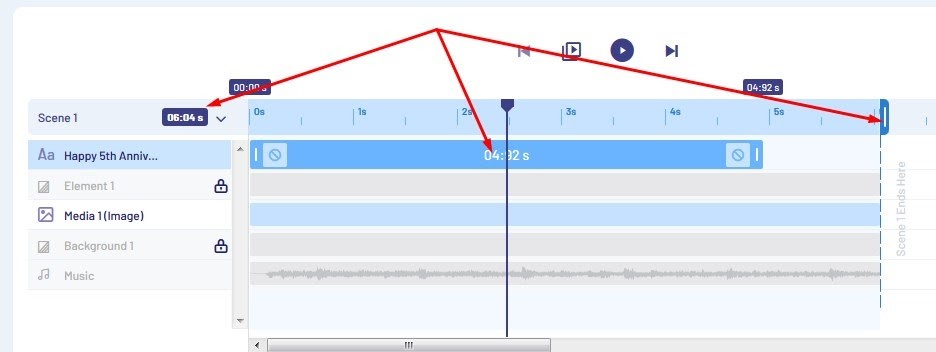
You can drag the edges to set up how long an element plays during a scene. When you select an element, you can see its duration on the bar.
If you don’t want to use a specific premade asset provided by the template you picked, you can remove it by clicking on it and pressing the Delete button.
Editing the Captions for Your Slideshow Video
InVideo Advanced Text Editing Options

In the Advanced Editor, you can set up your captions to fit the aesthetic of each scene. You can edit the text elements you’ve created using the Storyboard and add new ones.
Click on a text element and go to the Edit menu on the right. Here, you can set up a variety of advanced text editing options, including:
|
InVideo Advanced Text Editing Options |
|
|
Style |
Choose a suitable font for the text element and set up the size, style, and alignment |
|
Colors |
Change the colors for the text and the entire text box, and use the slider to set up the opacity |
|
Drop Shadow |
Add a drop shadow effect to the text and pick a color for it |
|
Animation |
Add animations for lines, words, sentences, or the entire text, and set up their duration |
|
Textbox Animation |
Add animations for the whole text element |
InVideo Text Boxes

If you want to insert additional text elements, go to the Text tab in the left panel. Here, can choose from three categories:
|
InVideo Text Box Styles |
|
|
Default template text boxes |
|
|
Standard text boxes |
|
|
Stylized text boxes |
|
Click on any text box to add it to a scene.
Adding a Voice-Over to Your Slideshow Video
InVideo Voice-Over Options

Aside from music and pictures, you can also add a voice-over to your slideshow video. To do so, click on the Add VO button in the top-left corner of the regular timeline. InVideo provides three options when it comes to voice-overs:
- Using the automated text-to-speech feature
- Recording a voice-over within the editor
- Uploading a file you’ve created in another program
If you don’t want to use your voice in the video, the text-to-speech feature provides a variety of professional-sounding options.
InVideo Text-To-Speech Feature

You can generate a voice-over based on your input or a particular text element in a scene. Select a language and pick one of the many voices from our library. Click on the play button next to each voice to hear what it sounds like. When you find the perfect voice for your video, click on the Generate VO button.
The generated voice-over will appear below. You can preview it and try other options before you decide to use it. Once you’re done creating the best voice-over for the selected video segment, click on the Add VO to Scene button.
InVideo Voice-Over Options
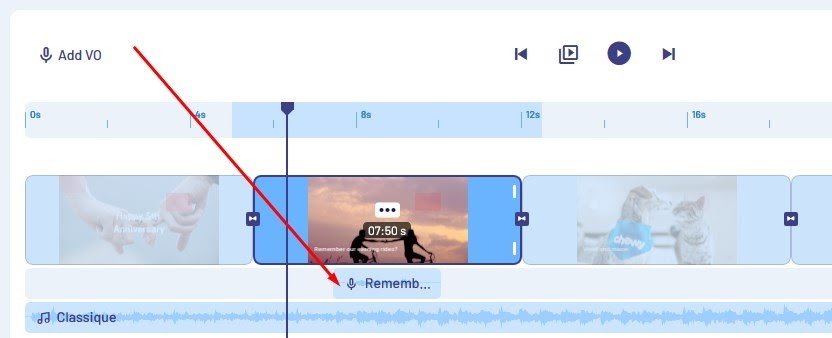
The generated voice-over will appear in the timeline below the scene. Click on it to set up additional options, such as:
- Trimming or looping the voice-over
- Adding fade-in and fade-out effects
- Setting up the volume for the voice-over and the background music
The default setting on the slider for the background music is ten percent. This means that the volume of the song will go down to that level when the video starts playing the voice-over.
Other Features That You Can Add to Your Slideshow Video
InVideo Effects
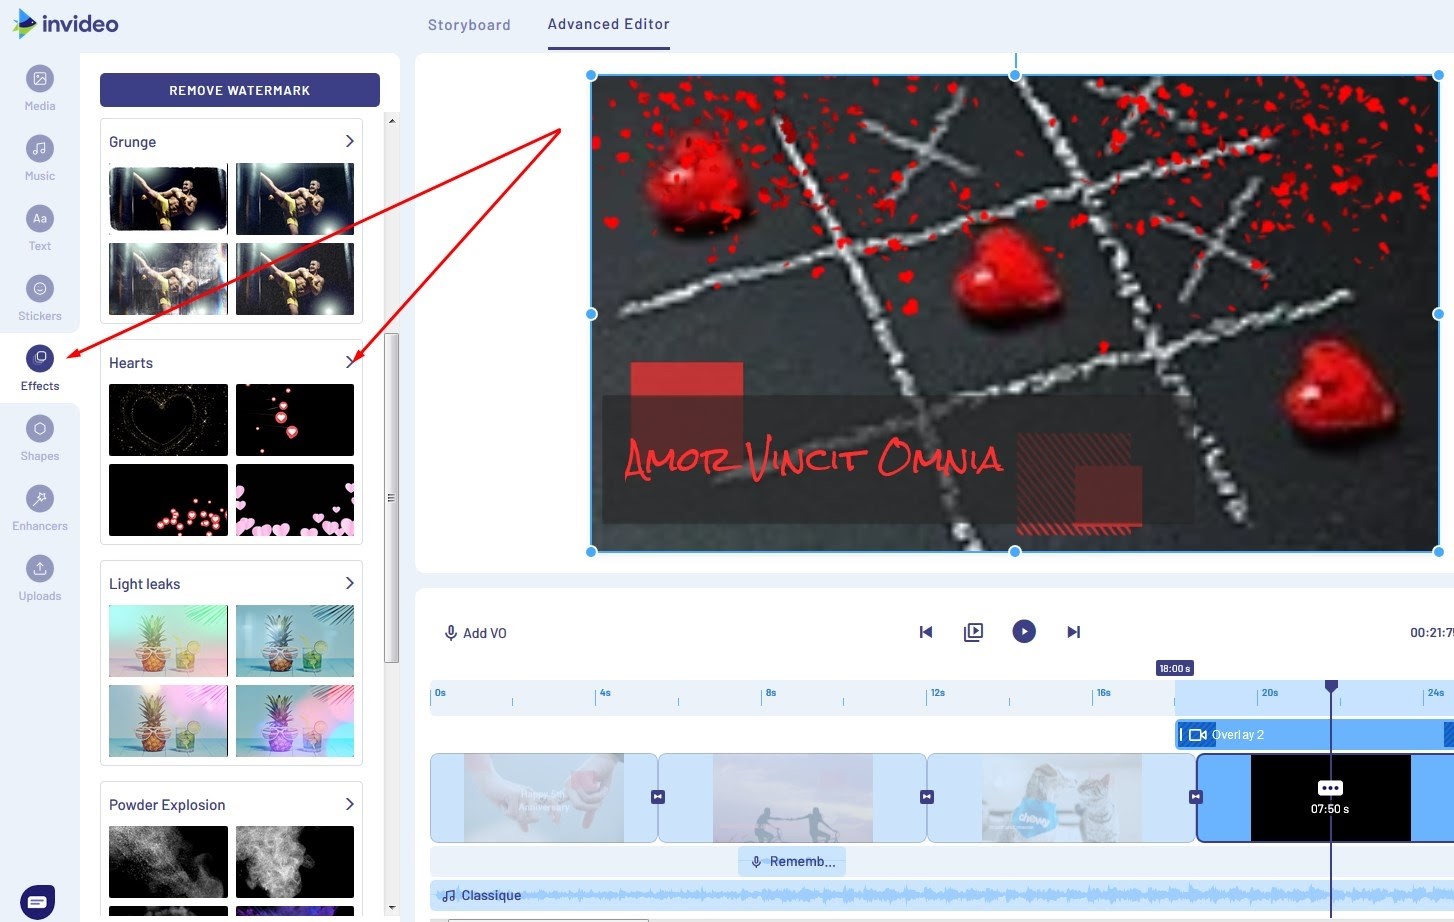
To make your slideshow video more engaging, you can add various kinds of effects. When you open the Effects bar in the left panel, you can find effect categories, such as:
- Confetti
- Hearts
- Grunge
- Light leaks
- Powder explosion
- Snow
- Smoke
- Fireworks
Click on the arrow next to any category to expand it and see all the options you can choose from. Add an effect to your scene by clicking on it.
InVideo Transition Effects

You can also add transition effects between your scenes. Click on the connecting arrows to open up the transition effects menu. Here, you can find a range of options, such as:
- Overlays—fan, disc, spin, tetris, circle, arrow, stripes, etc.
- Animations—blur, wiper, rewind, showtime, zoom in, curtain call, etc.
- Light Leaks—subtle, top flash, film burn, bold light, diagonal light, etc.
- Glitches—RGB glitch, flicker glitch, digital break, chromatic glitch, etc.
- Brushes—corner stroke, vertical stroke, center out stroke, etc.
- Shutters—black aperture, cross shutter, metallic aperture, etc.
Aside from effects, you can also add shapes, stickers, and enhancers. When it comes to the last category, it provides three creative solutions:
- Turn a scene into an animated collage layout made from one, two, or three images
- Pick one of more than a hundred masks to use as an overlay for a scene
- Insert a Twitter or Instagram post into a scene
Ensuring That Your Video Is Flawless
InVideo comes with a feature that enables you to ensure that your video doesn’t have any mistakes. You can use our Intelligent Video Assistant (IVA) to scan your scenes for errors.
InVideo Intelligent Video Assistant

IVA relies on artificial intelligence to help you fix issues that you might have overlooked while editing your video. Our video assistant pays the most attention to project colors, text alignment, and animation speeds.
You can use this feature by clicking on the blue button with a triangle in the top-right section of the timeline. Wait for IVA to finish scanning your video and see if it comes up with anything. If there’s a mistake, our AI-driven assistant will offer a solution. You can accept it by clicking on Resolve or find a way to solve the problem on your own.
Why You Should Use InVideo To Make Videos With Pictures
InVideo is the best video editing software solution for you because it comes with a range of fantastic features while being super easy to use. You don’t have to spend hours trying to figure out how to make a video using a complex video editor. Using InVideo, you can come up with high-quality results in no more than ten minutes.
While we’ve made our platform to be the perfect option for beginners, we’re aware that you might have questions about how to get something done. To help you find answers quickly, we’ve compiled a library of video tutorials that we update frequently.
If you can’t find what you need there, you can turn to our customer support team that is available 24 hours, every day of the week. You can find the chat in the bottom-right corner of your screen. Open it up, type in your question, and wait for one of our agents to show up—it will take less than a minute.
Another benefit of using InVideo is that it’s a browser-based solution. This means that all your video editing efforts happen in your browser and get stored on our servers. You can access your projects from anywhere easily and edit them on both Mac and Windows.
Aside from slideshow videos, you can use InVideo to create all kinds of projects—from enticing wedding invitations to engaging YouTube videos.
What Is the Price of InVideo?
Aside from being user-friendly and feature-rich, InVideo is also one of the most affordable video editing solutions on the market. When it comes to paid plans, we offer two options:
- Business
- Unlimited
Business Plan
If you choose the Business plan, you can use our video platform with only two monthly restrictions. You can’t export more than 60 videos and use more than 300 premium media files.
The price of the Business plan is $20 per month, but if you sign up for the annual plan, you can get it for $10.
Unlimited Plan
The Unlimited plan enables you to use all of our platform’s features with no limitations.
The regular price is $60 per month, but you can use it for $30 if you opt for the annual arrangement.
If you want to use our platform for free, you have the option to do so forever. Aside from the same limitations that the Business plan has, the free version also exports all your videos with an InVideo watermark on them.
Sign up for InVideo right now to start making top-notch videos quickly and easily!