


Picture this – you have a great concept for a video and your script is ready and you head out to shoot, spending an entire day getting the perfect shots for your video. Once you’re at the editing table, you realize you missed some very important shots that were central to the story.
This is not an uncommon scenario with beginner filmmakers and video creators. And if you’ve been in this situation before, you know how tedious it can get to go back and shoot again. An easy way to tackle this problem is to create a storyboard for your entire shot sequence.
A storyboard is a graphic representation of each shot you want in your script with notes about what is going on in the scene and how it will be shot. It is an important part of the pre-production process that shows everything that is going to happen in your finished piece.
If you’re new to storyboarding, don’t worry! We’ve got you covered. In this article, we will guide you on:
1. Why Is Storyboarding So Important
2. What Are The Different Types Of Storyboards
3. Components Of A Storyboard
4. How To Make A Visual Storyboard
5. How To Make A Text Storyboard
6. Things To Keep In Mind While Creating Your Storyboard
Not just this but we will also share with you templates and tools that we use at InVideo so you can get started with storyboarding for your next video right away!
Let’s get started!
1. Why Is Storyboarding So Important
While Storyboarding may seem like an extra step for making a video, it solves certain key issues.
- When you have a storyboard, it is much easier to explain your idea. Having a visual representation with the scenes mapped out can help others grasp your concept as well. Compared to just having a script, a storyboard can help you get your point across to your clients or investors to take potential feedback. It also lets your team or crew understand the kind of shots you want, camera angles, etc.
- It helps you work out details like the shots you need, what order they’ll go in, the props or tools you need, et al. It can also help you find missing components like a logic or dialogue in your script that doesn’t tie well into the next scene.
- You don’t waste time taking unnecessary shots or lose money in video production or special effects as storyboarding helps you understand which shots you need up front. It is also much easier to make edits on a storyboard than a video.
- Once you know the sequence of your video, it makes production much easier as well. You have a fair idea of how to place your shots, your script and everything you need to create an exciting video!
Now that you know how storyboarding can help you, let’s move on the different types of storyboards you can use to craft your video.
2. What Are The Different Types Of Storyboards
There are two types of storyboards you can use to create your video -
A. Text Storyboards
B. Visual Storyboards
A. Text Storyboards
A text storyboard is a written instruction that goes hand-in-hand with the script, detailing how you want your video to look like. You can use a text storyboard when you’re creating short, bite-sized content like a 30 second Instagram ad or a promo video for your brand.
Here’s an example of a Text Storyboard we created for a video last year.
As you can see, the voice over text, what the visuals will be and the supers are clearly written out to describe what happens in that particular scene.
Text Storyboards are easy to create and don’t take as much time once you have a basic idea of what you want to create. You can begin creating your own Text Storyboard by using this InVideo Storyboard Template.
However, text storyboards don't work very well for longer videos with multiple scenes. Here text-based instructions can often get confusing, which is why creating a visual storyboard works a lot better.
B. Visual Storyboards
Visual Storyboards are common among creators and filmmakers. They employ stick figures and illustrations to map out your scenes. These are often a lot more detailed as compared to text storyboards and can clearly help you illustrate your scenes.
If you’re thinking that it will be difficult to create visual storyboards if you don't know how to sketch, you should know that you don’t need to be a great artist to illustrate your ideas. You can use simple shapes and objects to denote your point.
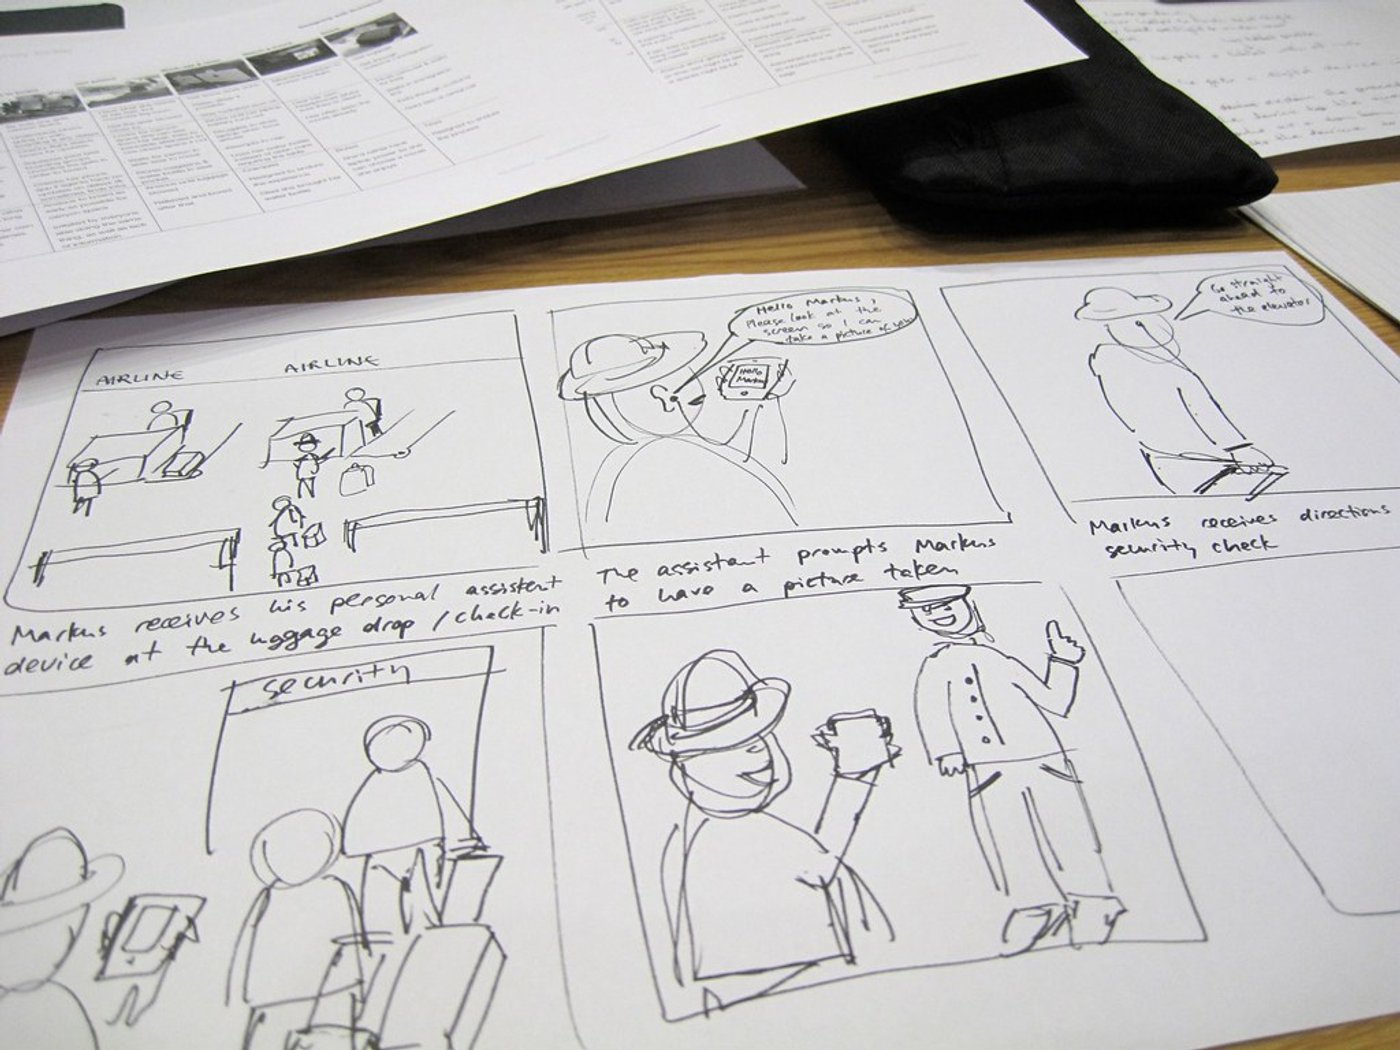
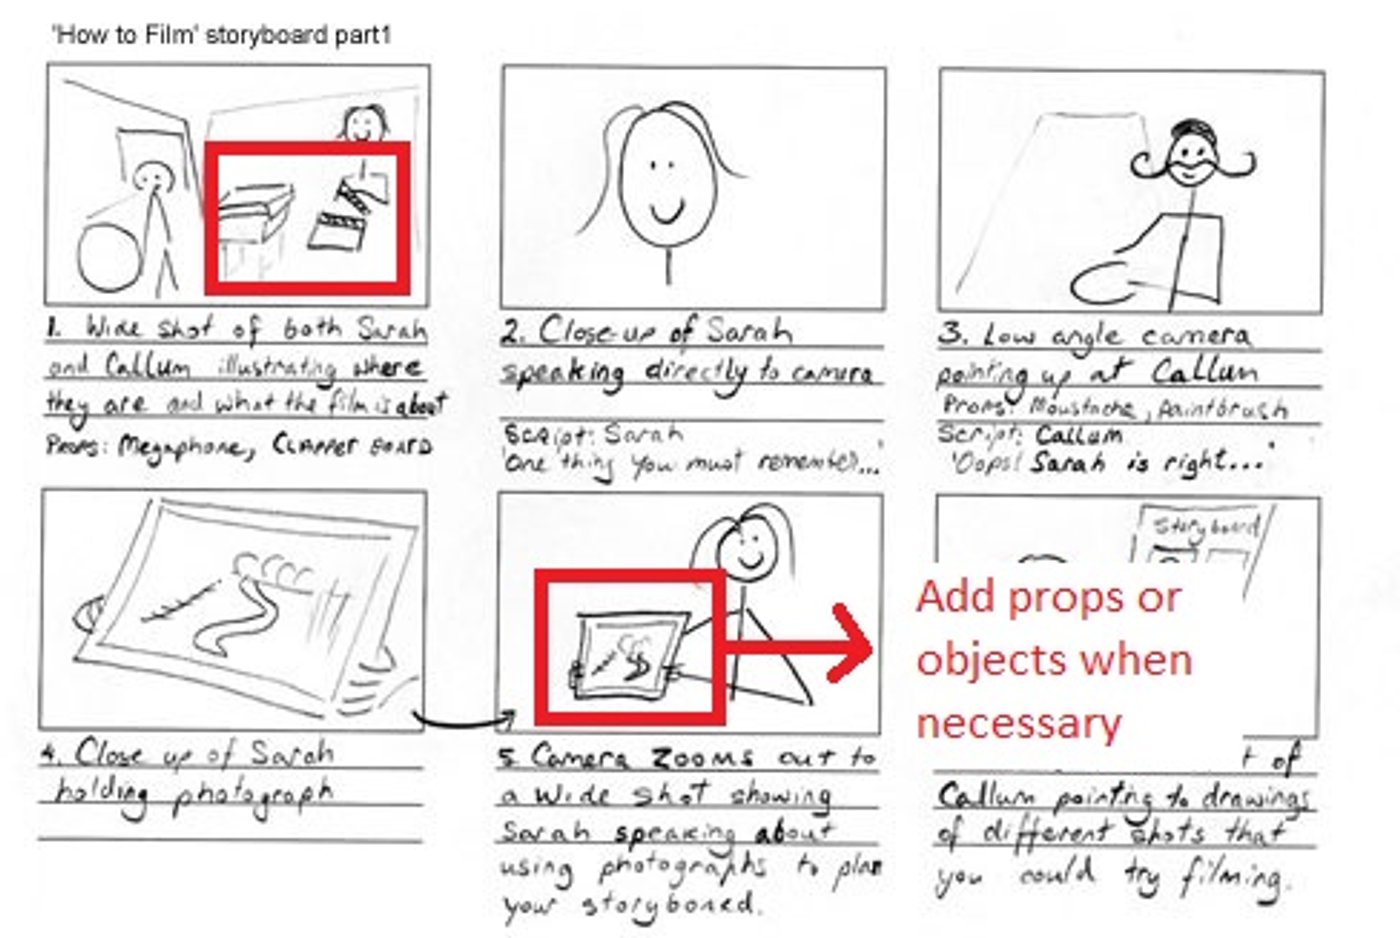
Here’s a visual storyboard for Tom & Jerry created by Joe Barbera in 1955. As you can see, the characters are just basic stick figures compared to the finished animated series.

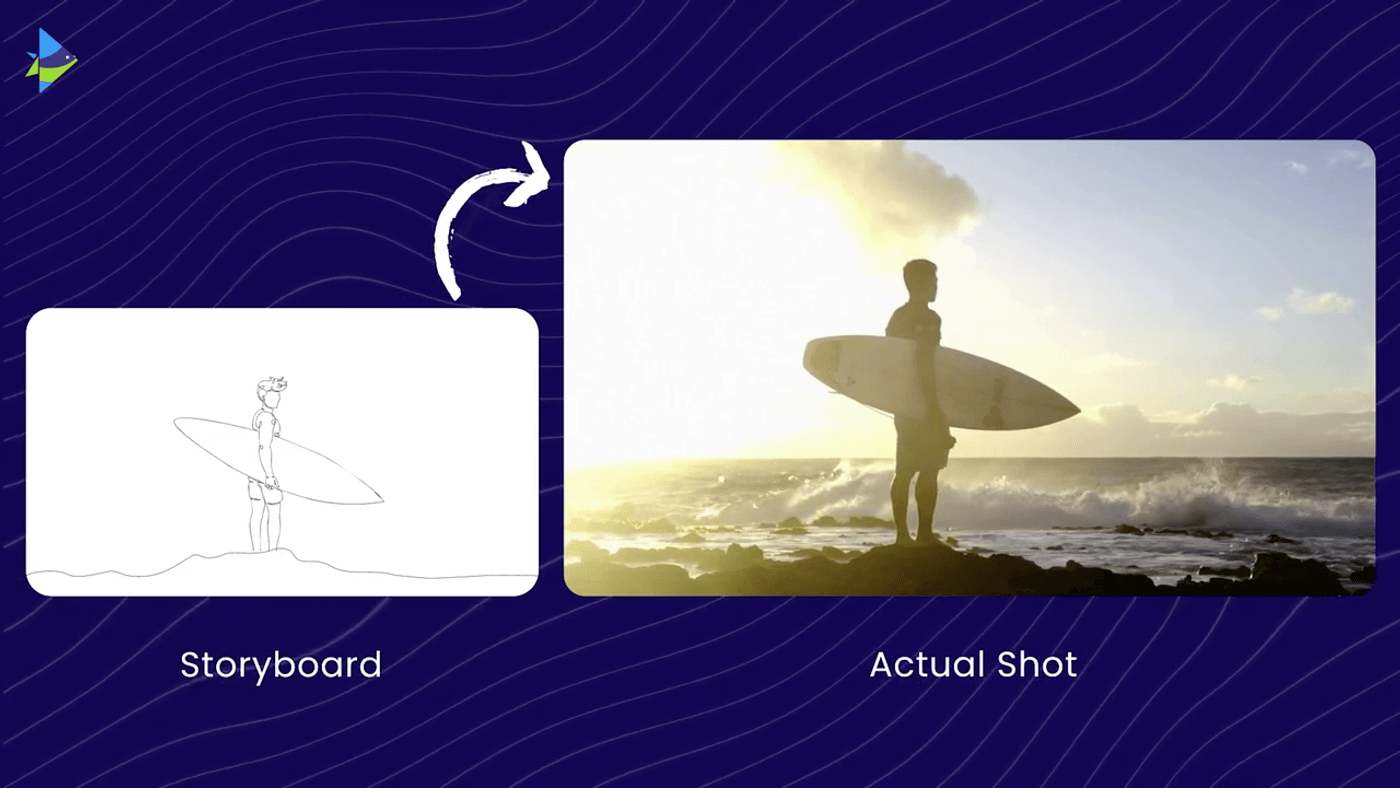
The principal goal of creating a visual storyboard is to convey the action happening in each shot. The frame doesn’t necessarily have to be detailed as it is just a mock up of what your shots will look like.
Although creating a visual storyboard is a time-consuming process, it is effective in outlining what your video will look like as well as helping you streamline your shooting and editing process. To begin creating your own visual storyboard, you can download free storyboard templates from Studiobinder.
3. Components Of A Visual Storyboard
Now that you know what a storyboard looks like, we need to go over some of the most important components of a visual storyboard. These are crucial to help you create the right kind of visuals for your videos.
A. Panel / Frame
This is the first step you need to take care of when you’re creating your storyboard. A panel or a frame is a rectangular proxy of what your audience is going to see. Panels come in different shapes or aspect ratios. You need to choose an aspect ratio in which you will shoot or edit your video.

You can also pick the panel size according to the platform you’ll be shooting for. For instance, if you’re storyboarding for a YouTube video, you would choose a wider frame i.e. 1920x1080p or 16:9 aspect ratio.
If you’re creating an ad for Facebook, you would choose a square frame i.e. 1080x1080p or 1:1 aspect ratio. For Instagram Reels or a TikTok video, you’d pick a vertical format i.e. 1080x1920p or a 9:16 aspect ratio.
B. Composition
Once you decide which frame you want to employ, it’s time to figure out how your subjects will fit into those frames. This is where the composition of your frame comes in. Sketching out the composition of your frame helps you understand the angles and shots you want to take while actually shooting your video.
For instance, if your character is sketched out to be really small in comparison to the landscape, this denotes a long shot.
Similarly, drawing the subject in a way that he/she fills up the frame will denote a close up. Or if you want to show someone talking to the camera in a vlog, you would have them filling up the frame to denote this and you would probably place them in the centre to show that they’re filming at eye-level.
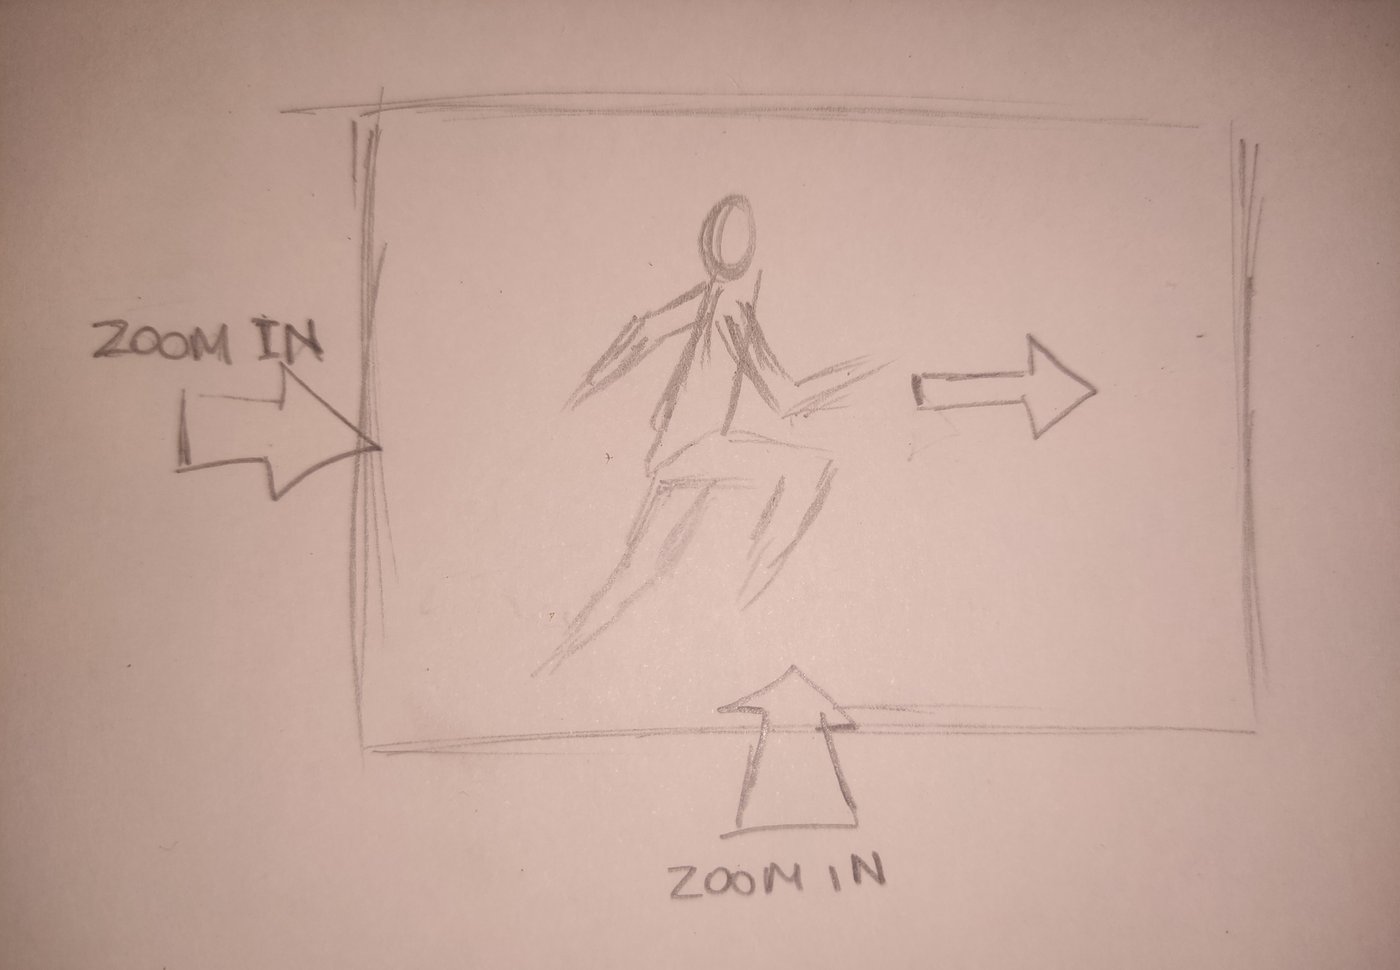
C. Indicating Motion
You can indicate motion in your panels or frames by using arrows. If you want to indicate that your subject moves from left to the right in the frame, you can draw an arrow pointing to the right next to your subject to show movement.

While there are no hard and fast rules to using arrows, you’ll want to ensure that your arrows are easy to read and they tell you the exact motion to expect in a scene.
For instance, you can use arrows inside your panel to indicate the movement of your subject or you can use arrows outside your panel to indicate camera movement such as a zoom in or a zoom out or a pan shot.
You can also detail this out by adding a text next to your arrow or below your panel to add more clarity and rule out any room for confusion while shooting your scenes.
Now that you’re familiar with the components of storyboarding, let’s move on to how you can make your own storyboard.
4. How To Make A Visual Storyboard
Follow these simple steps to begin creating your own visual storyboard.
Step 1: Break Your Script Down
Before you begin getting into panels, text, taking references or drawing, you need to break your script down to highlight all the key elements that will affect the storyboard. You need to consider every detail of your scenes like the physical space, setting, action, how you want to place your subject and the elements you will use.
Read your script and then break it down into sections by analyzing how you want each scene to look and how you want to shoot it. You don’t need to translate the entire script to the storyboard but just need to highlight key elements that get your plot moving such as the start, the turning point, important twists, and the ending.
The scenes you want to highlight or portray in your storyboard can vary. You can be incredibly detailed i.e. in a fight scene - highlight every kick and punch or be incredibly simple and write “They fight” - both are right as they both can be used to highlight the flow and direction of your concept.
Step 2: Make A Shot List
A shot list is a detailed list of every camera shot that needs to be captured in a scene, outlining the specifics of every shot. As you won’t be shooting all the sequences in order, having a shot list can help you save time by creating a specific shooting schedule, understanding the camera angles, deciding on the equipment and elements you need in your scene as well as the set up and props.
Step 3: Start Sketching
Once you have decided on the aspect ratio of your panels, draw them out and leave some space at the bottom for any additional information you want to add like a VO, super or movement of your subject or camera.
Here’s a sample of what a blank panel will look like:

You can also get blank, printable storyboard templates from Studiobinder which will look like the ones shown below. As mentioned before, don’t worry about your drawing skills as stick figures work just fine.

Make sure you capture your subjects and other key elements that will affect your concept or story. You don’t need to get into details. Objects or props can be highlighted only when they matter. If they don’t, you can keep them sketchy.
If you’re not a fan of using stick figures or sketching in general, you can also use cut-outs from magazines, newspapers, your own photos, etc. to create a visual reference. You might also want to add a background to your panels to show where your subject and/or objects are in relation to the space they’re placed in. Every panel doesn’t require a detailed, elaborate background. For instance, if you want to show the horizon, a simple line will also suffice.
With each panel, keep in mind the components of your storyboard i.e. composition and motion.
Step 4: Add Words
Once you’re done with your sketching process, it will definitely help to add additional information at the bottom of each panel. This will help you give more context to each scene. For instance, you can fill in details about how the camera will move, whether it will zoom in or out, the subject’s movement, will there be a voice over or a super, etc.

5. How To Make A Text Storyboard
To begin creating a Text Storyboard, follow these simple steps:
Step 1: Pen Down Your Voice Over
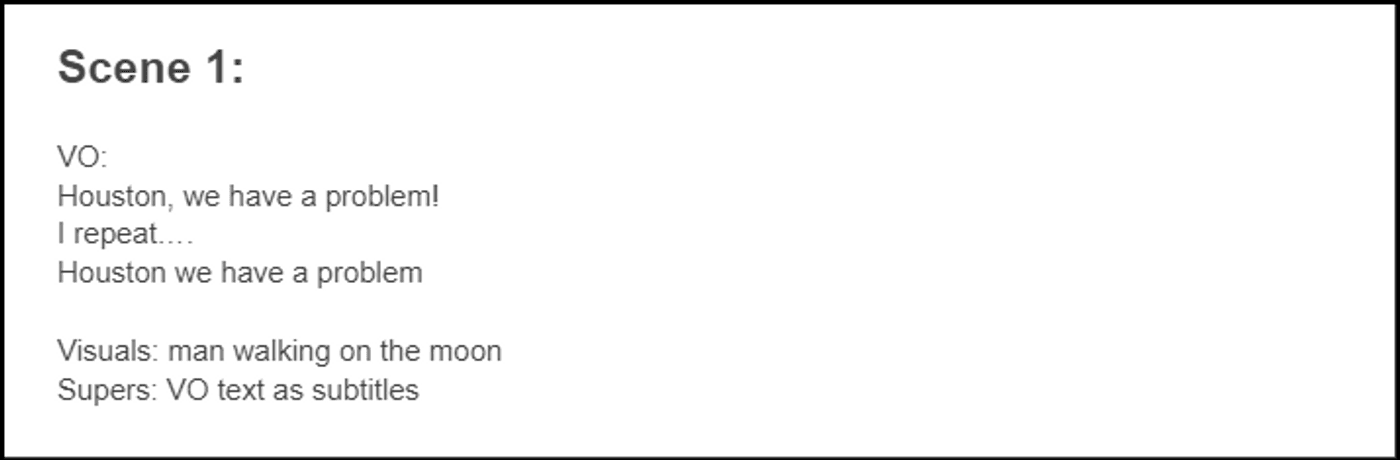
If your video has a voice over that forms your entire script, begin by fleshing out your voice over text as we did for our promo video. Writing down your voice over is really helpful in conceptualizing where you want your visuals to go as well.

Step 2: Split Your Scenes
Split your scenes based on when you imagine your visuals to change. For instance, in our promo video, we imagined the astronaut to be in the scene for the first 3 lines of our voice over - hence, those 3 lines were combined into Scene 1.

For the next line of the VO, we needed a separate visual to show that we got a few views on one of our videos. That became Scene 2.

Splitting scenes also gives you a fair idea of what you need to shoot and makes production that much easier.
Step 3: Adding Details
Once you have separated your VO script into Scenes, you can start adding more layers of details i.e. what the visual will be and if there are any supers, CTA, text or promo code that will appear in the scene.

Here, you can also add the camera angles you want to shoot from, whether the shot will pan, zoom in or out or how your subject will move or interact with an object. Another layer of detail you might want to add is the audio i.e. any music or sound effect you might want to add to the particular scene.
Penning down these details can give you a clear vision of what each scene will look like, how you want to shoot and edit it. Using the steps above, you can build each scene of your video. This framework can also be used when you’re creating a video based on stock footage or motion graphic based videos. All you need to do is change the details with regards to the visual imagery you want to use.
6. Things To Keep In Mind While Creating Your Storyboard
While storyboarding can be time consuming, once you get the hang of it, it becomes a fairly simple process. However, when you’re first starting out, it can be overwhelming to keep everything in mind, which is why in this section, we will take you through the most important things you need to keep in mind while creating your storyboard:
A. Add Shot Numbers
If you’re creating a visual storyboard, you need to label each panel or shot, ideally starting with 1. It can get difficult to reference specific shots if they are not labeled. If you’re using more than one storyboard for the same shot, label them with letters.
Let’s say the first shot has 3 storyboards, you can label them as 1A, 1B and 1C.

B. Set A Limit
When storyboarding, you don’t need to include every detail of your script. If you’re creating a visual storyboard, limit the number of panels you will use or if you’re creating a text storyboard, limit the scenes. This will help you keep your storyboard as crisp as possible with all the crucial details without getting derailed or adding information that isn’t necessary.
C. Accuracy Is Key
While we have already mentioned that the level of drawing skills don’t matter, the content of the drawings do! For instance, if you’re drawing a 2 person scene with many shot variations (extreme close-ups, POVs, etc.), drawing two identical stick figures will not cut it.
Here’s where you might have to tweak what you draw or elaborate more in text of what’s happening in the scene. Sharing as much information as accurately as possible can help you, your crew or your clients make better sense of your storyboard.
D. Be Open To Feedback
Once all your boxes have been ticked and you are satisfied with your storyboard, share it with your team, an acquaintance or a friend to see if they can make sense of it. Reviewing your storyboard will give you a fair idea of how comprehensive your storyboard is and how much more work it needs.
A storyboard isn’t created just for itself. It is created to share your vision with others - be it your team, crew or client. They need to understand it in order to execute it.
Wrapping Up
Storyboarding can seem like a gargantuan task but remember that it will help you bring your vision to life in a systematic, organized manner.
Did you find this article useful? If you’ve created your own storyboard and are heading out to shoot, try these 4 rules to get great cinematic composition.
If you prefer learning via videos, check out our YouTube Channel where we share content on the latest video trends, tips and tricks that can help you create better videos.
This post was written by Shayne and edited by Adete from Team InVideo