
Key Takeaways
-
Kling 3.0 Omni turns AI video from a “roll the dice” process into a reference‑driven system that understands characters, environments, and props as reusable elements.
-
The Kling 3.0 element library works best when each element is built from around four angles of the same subject, which gives the model a 3D sense of identity.
-
Once elements exist, kling omni ai no longer needs a custom start and end frame for every shot, because Kling 3 omni can reconstruct motion and camera moves from the elements and your prompt.
-
The most reliable workflow today is to design the subject with a strong image model, create a four‑image element, then switch to Kling 3.0 Omni video generation on invideo for multi‑shot scenes.
Kling 3.0 Omni lets you treat a character, a product, or a location as something you define once and reuse, instead of something you re-describe in every prompt.
For filmmakers and creators, this the mental model. Kling omni becomes less of a clip generator and more of a visual system you build on top of, whether you are developing a recurring character, a brand world, or a series of product stories that actually feel like they belong together. And with Kling 3.0 Omni available directly inside invideo, that system plugs into the same editor and workflow you already use for publishing.
What is Kling 3.0 Omni?
Kling 3.0 Omni is a unified, multimodal AI video model that combines text‑to‑video, image‑to‑video, reference‑to‑video, and native audio in one system, with up to ~15‑second cinematic clips, multi‑shot storyboards, and character‑consistent elements that let it act more like an AI director than a one‑off clip generator.
If you have used earlier versions of Kling, you can think of the “kling 3 vs kling 3 omni” decision like this:
- Kling 3.0 focuses on strong text‑to‑video and image‑to‑video, with basic reference support.
- Kling 3.0 Omni focuses on tight control. It adds elements, better multi‑shot logic, and richer audio so you can direct sequences instead of single clips.
In practice, that means Kling 3.0 Omni video generation can:
- Keep a specific character consistent across multiple angles.
- Reuse a product or set design in several scenes.
- Follow a rough storyboard with separate prompts per shot.
The key difference is that Kling 3.0 Omni is built for controlled, repeatable storytelling rather than one‑off experiments.
How Kling Omni elements work
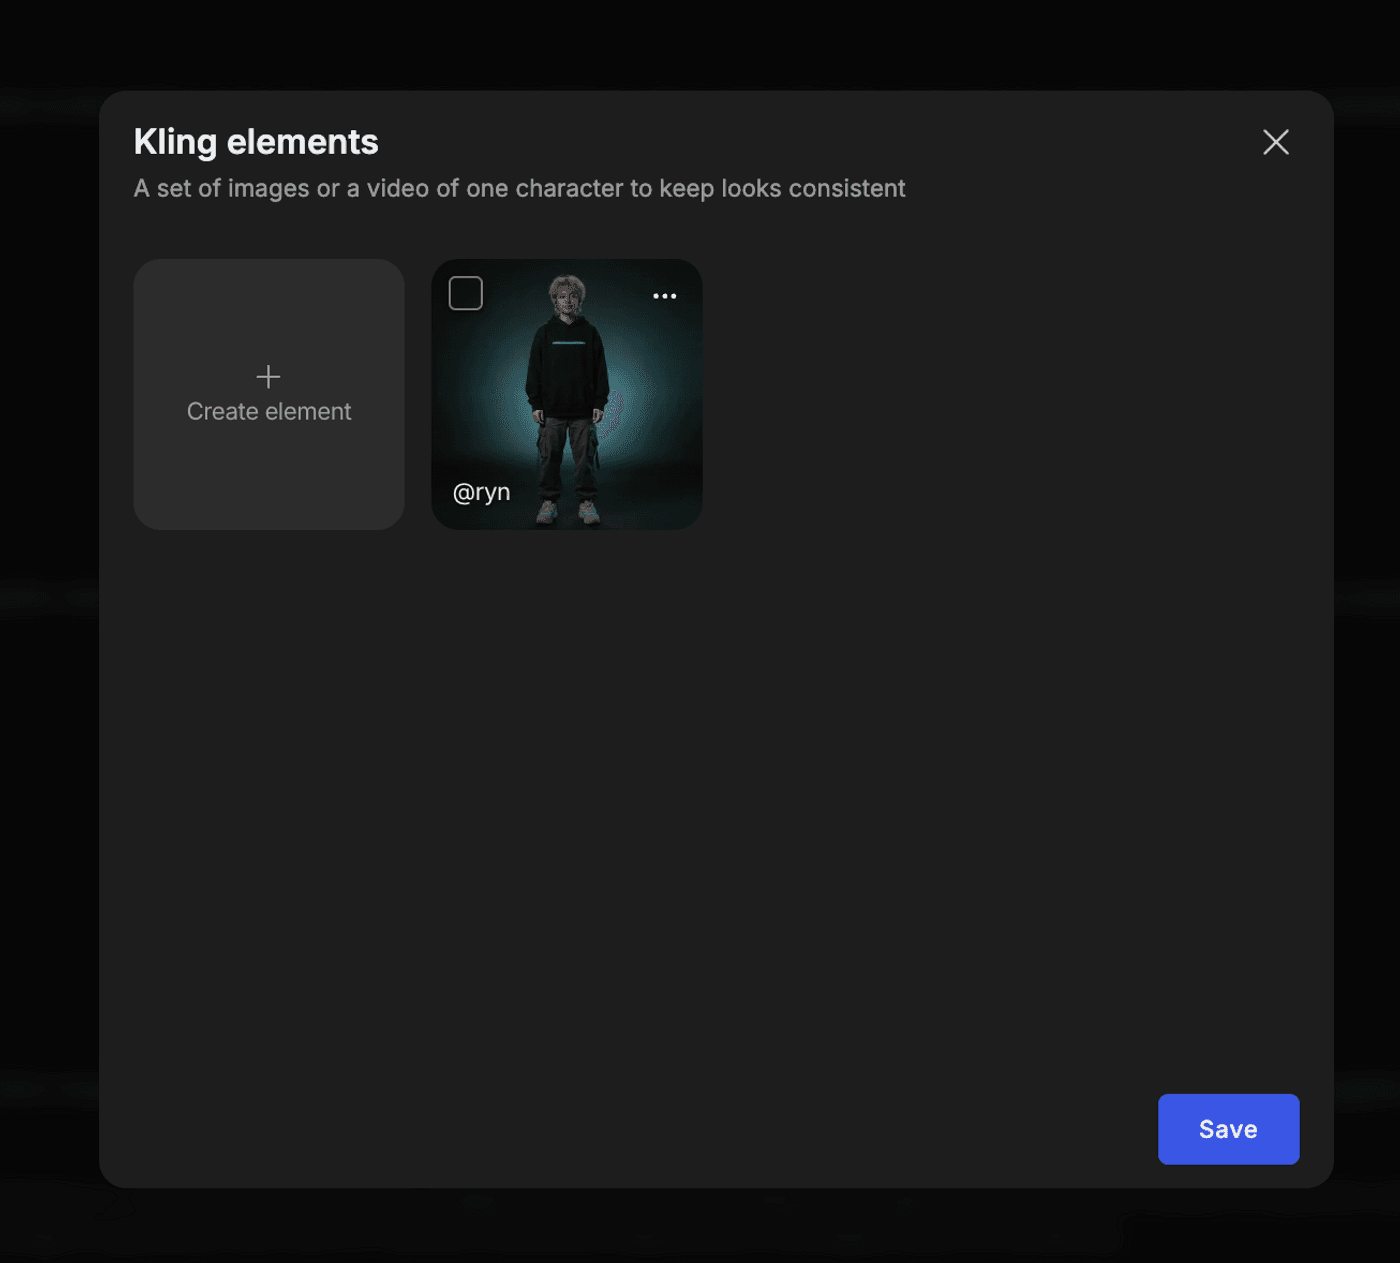
The standout feature in Kling ai 3.0 omni is the element system.
A Kling Omni element is a small, learned image profile that represents one subject. You store it in the Kling 3.0 element library, and Kling 3.0 Omni uses it whenever you generate a shot that references that element.
You typically create elements for three kinds of things:
1. Characters
Faces, bodies, outfits, and silhouettes that need to stay identical across shots.
2. Environments
Locations you want to revisit, like a lab, a living room, or a spaceship bridge.
3. Props and products
Objects that must look the same in every shot, such as devices, food items, or packaging.
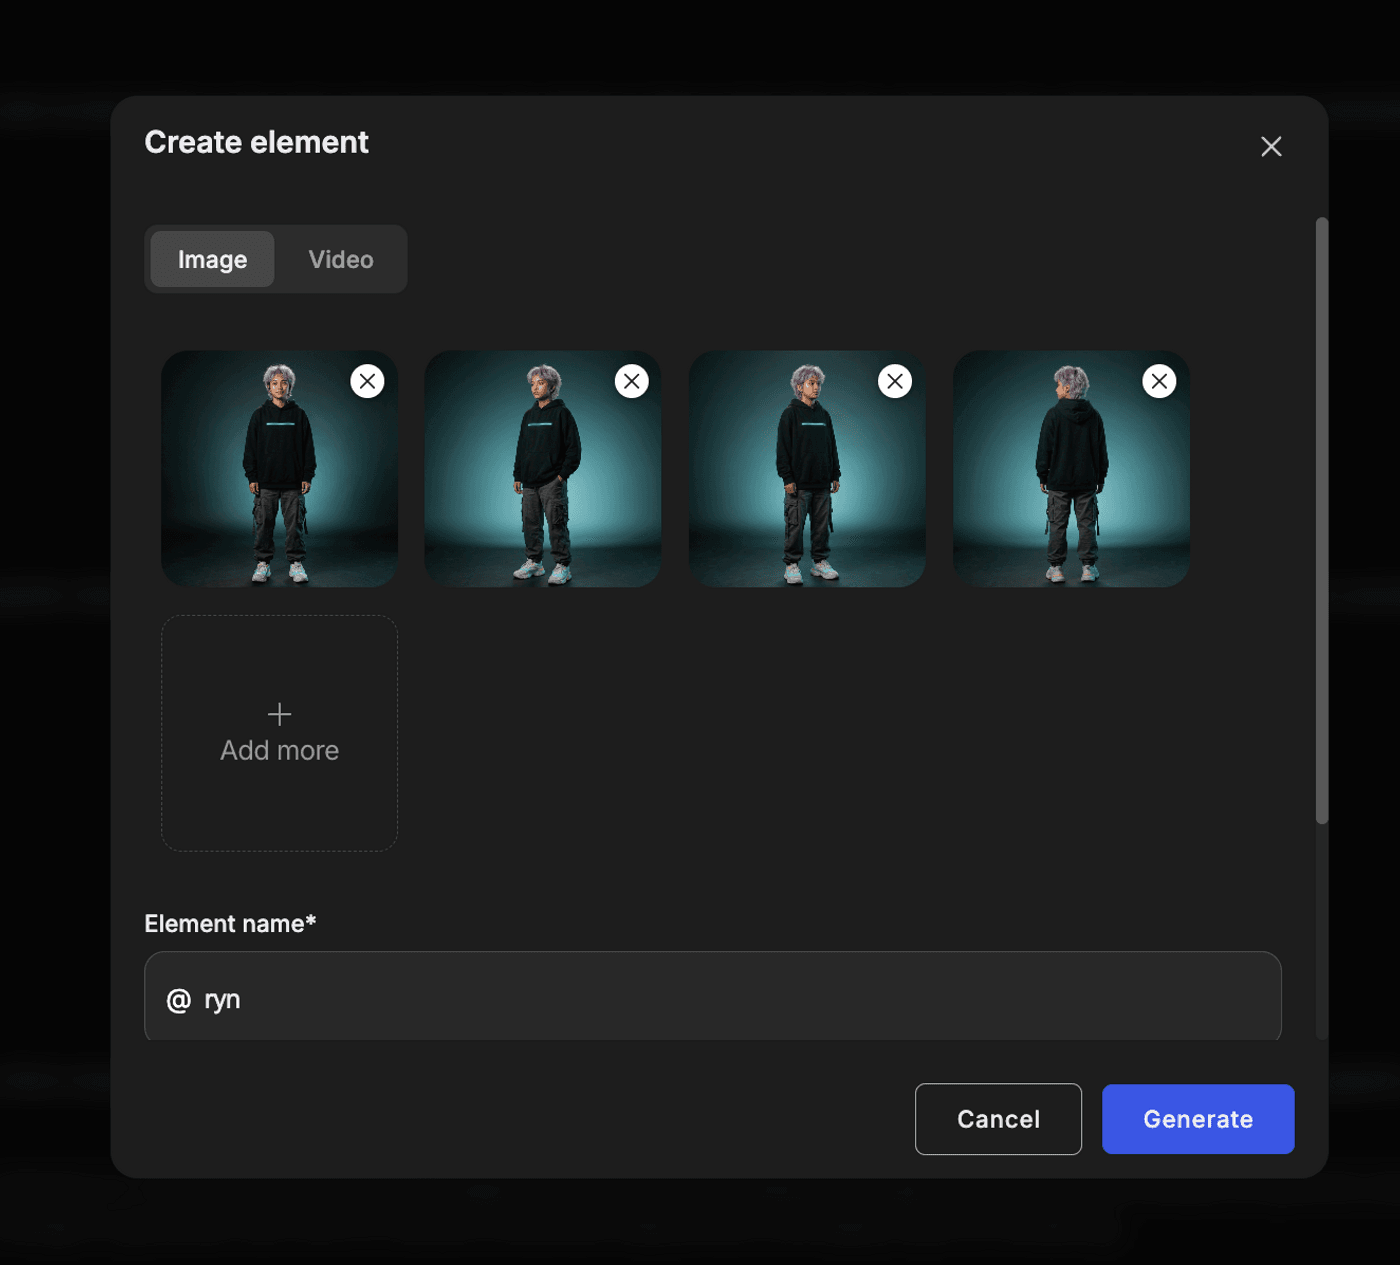
When you build an element, you do not just upload one hero picture. You need to upload a small set of images of the same subject taken from different angles. Kling ai 3.0 omni use those views to learn the subject’s identity. Once the element exists, you can call it into any new scene.
Inside a prompt, you stop re‑describing how your hero looks. Instead, you focus on what happens, where it happens, and how the camera moves. Identity lives in the element. Behavior and cinematography live in the text.
That separation is the foundation of element‑based AI filmmaking.
Why Kling Omni reduces the need for start and end frames
Before Kling 3.0 Omni, most high‑control workflows relied on start and end frames. You generated a still image for the beginning of a shot, sometimes another for the end, and asked the model to animate between them.
This worked, but it forced you to design a new image for almost every shot. If you wanted a character “halfway out of a spacecraft hatch,” you had to pose them exactly that way in a still image first.
With Kling 3.0 Omni and elements, that pattern starts to fade.
You can define:
- A character element for the person.
- An environmental element for the spacecraft interior.
Then you write a prompt like:
NoneCharacter steps halfway out of the hatch, looks down, and the camera cranes up behind them while the stars move in the background.Kling 3.0 Omni knows what the character and environment look like from the elements. It uses your text to decide the pose, motion, and camera path. It no longer depends on a handcrafted start frame for that exact pose.
This applies to many everyday cases:
- A presenter walks from the whiteboard to the window.
- A product sits on a table while the camera orbits around it.
- A creature turns toward the viewer in a forest scene.
You can still use start or end frames when you need a frame‑perfect match to live action or layout, but you do not have to. For typical sequences, Kling 3.0 Omni in ai video generation can infer the in‑between from elements and prompts.
The benefit is speed and focus. You spend less time posing stills and more time designing the reusable cast and sets that matter over the entire project.
The four‑image workflow for strong elements
Kling 3.0 Omni performs best when each element comes from a small set of angles, not a single shot. A simple way to think about it is the “four image workflow.”
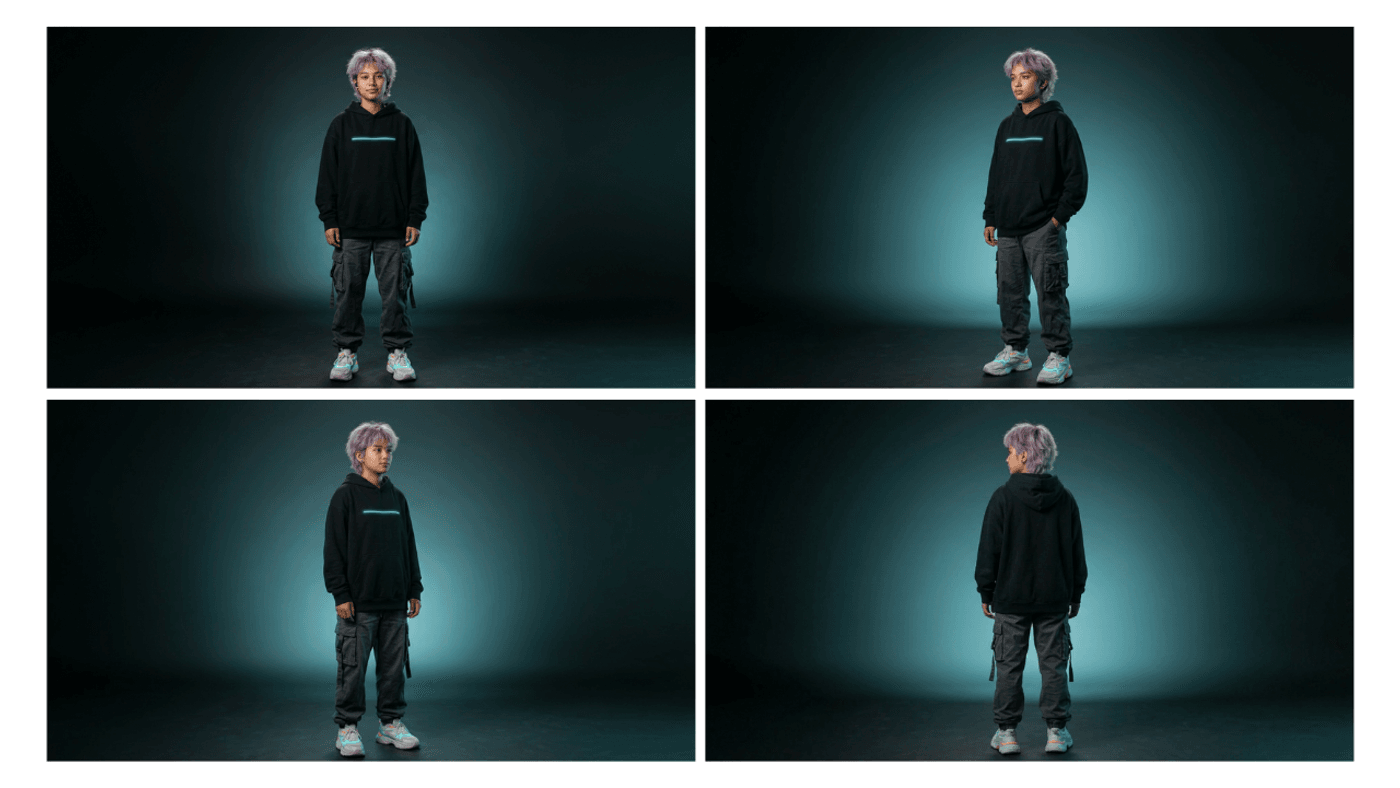
For a character or product, you aim to capture:
1. A clean front view that shows face or front label.
2. A three‑quarter left view that reveals depth and contour.
3. A three‑quarter right view for symmetry and detail on the other side.
4. A back or over‑shoulder view so Kling understands hair, clothing backs, or rear packaging.
Those four images give Kling omni enough information to treat your subject as a three‑dimensional identity rather than a flat picture. When the camera pans or orbits, it knows what to reconstruct.
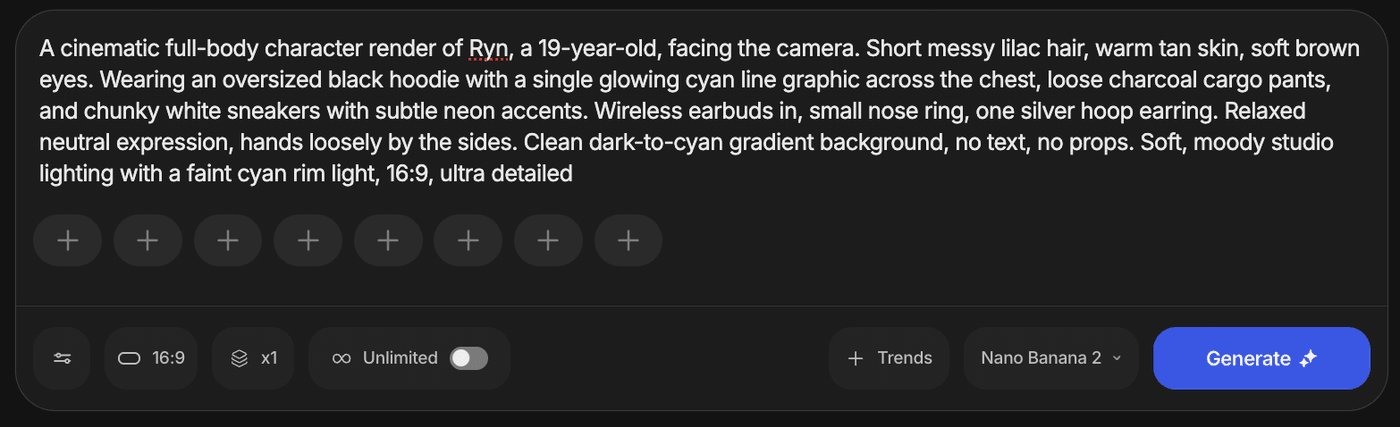
If you do not have all angles, you can generate these four angles with an image model like Nano Banana 2 first, then use them to build the element.
A common pattern is:
1. Write a detailed text description of the character or product.
2. Generate a full‑body or full‑product front view.
3. Adjust only the pose or camera instruction and re‑render for the three‑quarter views.
4. Repeat for a back or over‑shoulder shot.
You then upload these four outputs into the Kling 3.0 element library as one element.
If you notice issues later, such as the jacket changing when the character turns, you often find that one of these angles is missing or weak. The workaround is simple. Go back to the image model, generate the missing view, and update the element.
You do not need ten versions of the same front view. You need a few angles that actually differ.
Step‑by‑step: How to use Kling 3.0 Omni
Here is how a practical pipeline looks when you combine elements with Kling 3.0 Omni on invideo.
1. Design the subject in an image model
Use a strong image model like Nano Banana 2 in invideo to create your character, product, or set. Generate the four angles you need using the workflow above.
2. Choose Kling 3.0 Omni for video generation
Invideo lets you pick which video model to use. Select Kling 3.0 Omni rather than the standard Kling 3.0 model so you can use elements and multi‑shot control.
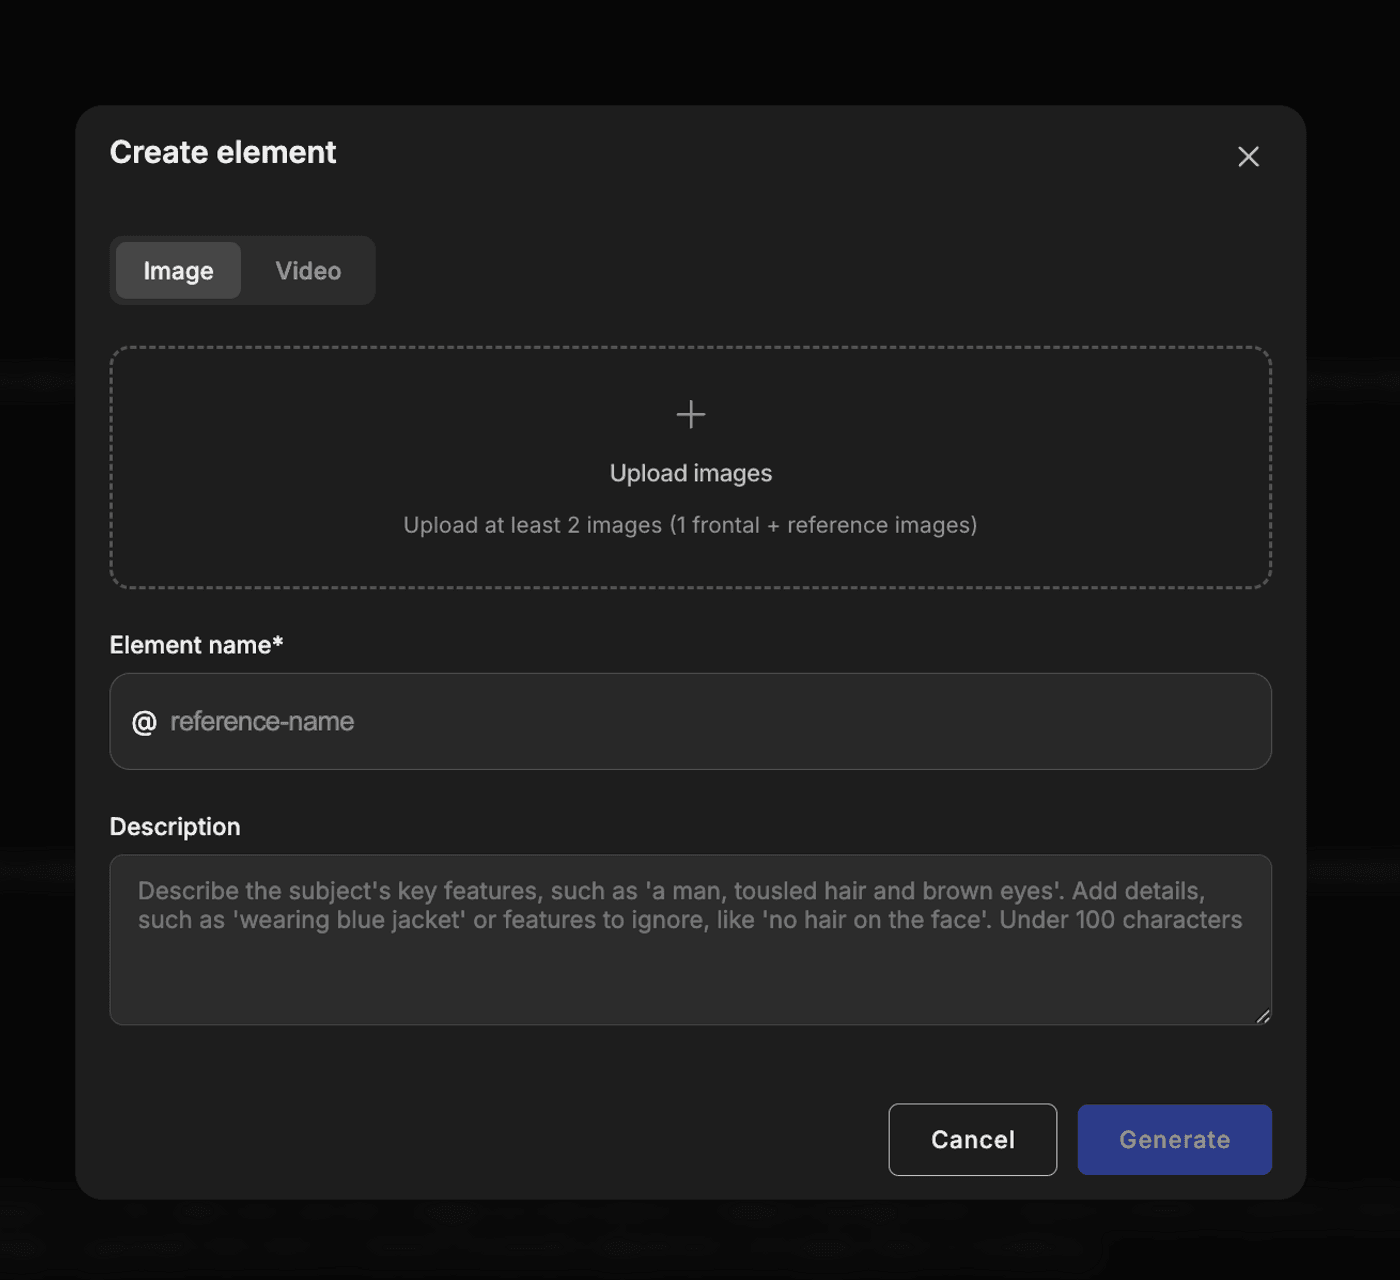
3. Create the element in the Kling 3.0 element library
Inside the promptbox, open the element library and create a new element. Upload the four images of the same subject and give the element a clear name. This is now your single source of truth for that subject.
4. Attach elements to your shot
In the shot settings, bind the relevant elements from the library. For a simple clip, that might be one character element and one product element. You are telling Kling Omni which identities must stay stable.
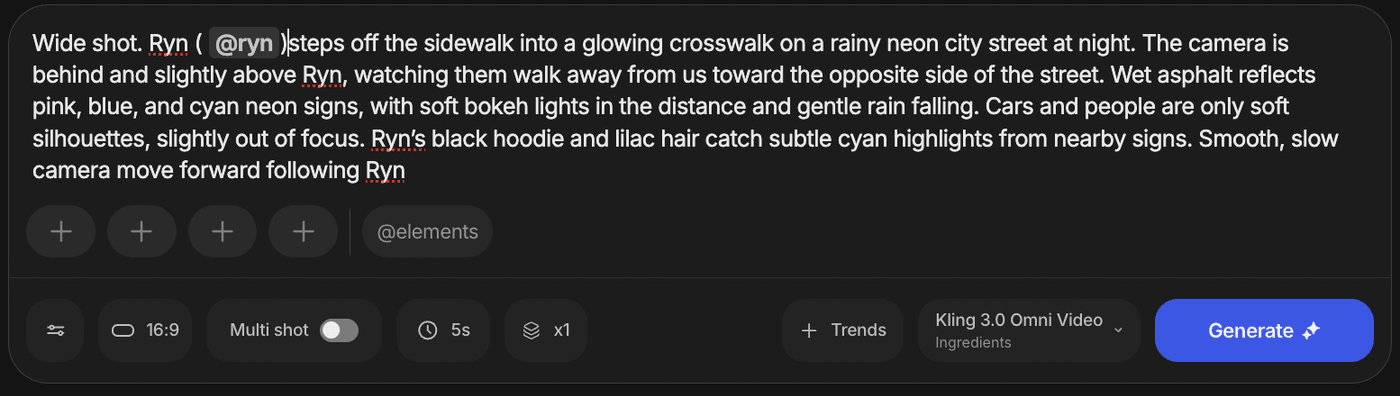
5. Write a prompt that focuses on action and camera
In the prompt field, describe what happens and how the camera behaves, not how the subject looks. Let the element handle appearance.
6. Generate a short test clip
Start with a three to five second shot. Check whether the character or object matches your expectations from different angles. If the identity looks good, move on. If not, fix the angles in the element.
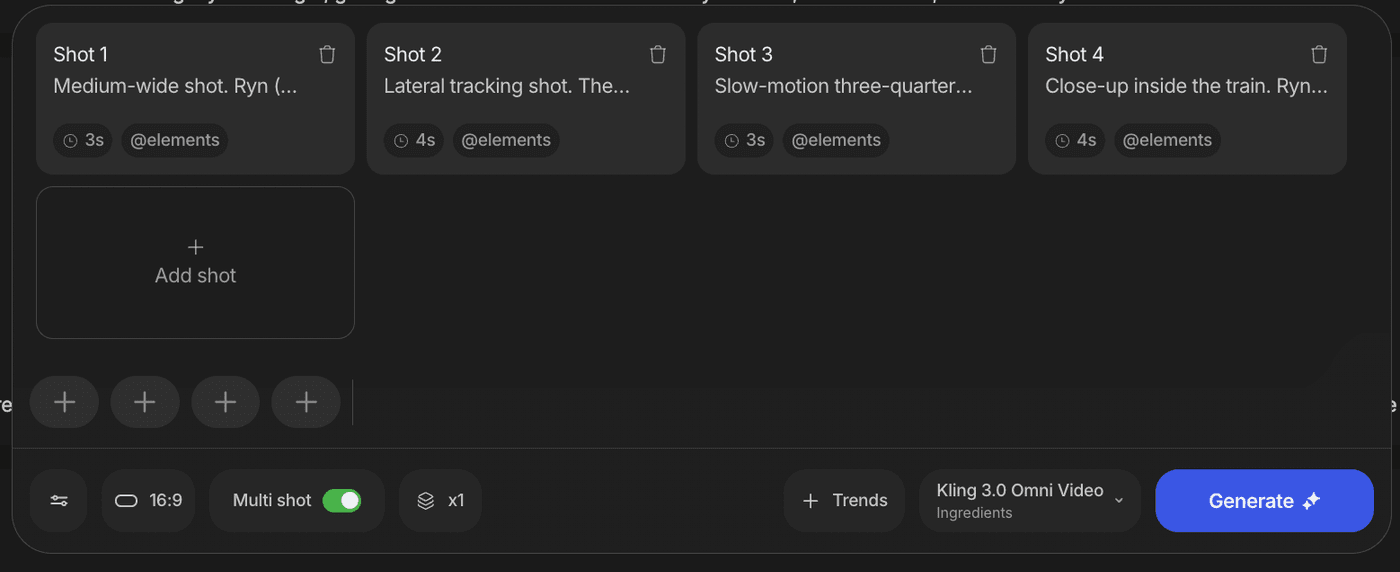
7. Expand to a multi‑shot sequence
Once a single shot works, use Kling 3.0 Omni’s multi‑shot features to create several shots in one pass. Each shot gets its own action and camera prompt, but they all draw from the same element library. That is where the consistency payoff appears.
This is where Kling 3 vs Kling 3 omni becomes a real choice. If all you need is a single nice clip, standard Kling 3.0 may be enough. If you want a character or product to survive across multiple shots, Kling 3.0 Omni is the better fit. Here’s the sample video.
Limitations and simple workarounds
Kling 3.0 Omni is powerful, but it still has limits. Knowing them up front saves time.
1. Incomplete angles
If your element only includes a front view and one side view, Kling may guess the unseen parts. That can cause clothing, hair, or labels to change when the subject turns.
Workaround: Make sure your element includes at least four distinct angles. If you see drift, generate the missing angles and update the element.
2. Very wide shots
In extreme wide shots, your hero becomes a few dozen pixels tall. At that point, no model can preserve precise facial details or tiny logos.
Workaround: Use wide shots for mood and context. Keep key identity moments in closer shots where the model has more pixels to work with.
3. Crowded scenes with similar subjects
When several similar characters share the frame, Kling 3.0 Omni may blur the line between them if they do not each have their own element.
Workaround: Focus on one or two fully defined elements in each shot. Treat the rest as background silhouettes or less critical actors.
4. Early stage quirks
Kling ai 3.0 omni features are still evolving. Multi‑shot logic and audio will keep improving, but you may see occasional odd transitions or hallucinated details.
Workaround: Keep prompts grounded, review results shot by shot, and lean on elements for identity rather than clever text tricks.
None of these issues removes the value of Kling 3.0 omni ai video generation. They simply define the boundaries. Within those boundaries, you get a level of repeatability that earlier generations of AI video did not offer.
AI-generated video is no longer just about what a model can produce in one lucky render. It is about how reliably you can build and reuse visual ideas across time.
Kling Omni elements give you a clear path to that future. You define your cast and props through the Kling 3.0 element library. You use Kling 3.0 Omni to move them through scenes. You stop rolling the dice on character consistency and start directing like you would on a real set.
Start small. Pick one character or product. Build a solid four‑image element. Generate a few short clips that reuse it in different angles. Once you feel how different that process is, you can build longer pieces with much more confidence.
FAQs
-
1.
What is Kling 3.0 Omni, and how is it different from regular Kling 3.0?
Kling 3.0 Omni is a multimodal AI model that adds element-based control on top of standard text to video and image to video. In the Kling 3 vs Kling 3 omni comparison, Omni is better for consistent characters, products, and environments across multiple shots.
-
2.
What are the key Kling ai 3.0 Omni features for filmmakers and creators?
The most important Kling ai 3.0 omni features are elements, multi-shot control, and stronger identity consistency across angles. These make Kling 3.0 omni ai video generation more reliable for series, campaigns, and product demos.
-
3.
How do elements improve Kling 3.0 Omni video results?
Elements let you define a character, product, or environment once and reuse it across different prompts and scenes. This helps Kling 3.0 Omni video stay visually consistent instead of reinventing your subject in every clip.
-
4.
What is the best workflow for Kling omni ai using the four-image rule?
Create four clean reference images of your subject from the front, three-quarter left, three-quarter right, and back, then build a single element from them. Use that element with Kling 3.0 Omni inside invideo to get a stable identity while you focus your prompts on action and camera moves.
-
5.
Can Kling 3.0 Omni be used for full sequences, not just single clips?
Yes, Kling 3.0 omni ai video generation is designed for multi-shot workflows where the same elements appear across several scenes. This is ideal for recurring characters, branded worlds, and product stories that need to look like one continuous universe.
-
6.
How can filmmakers get real continuity between AI-generated shots?
Filmmakers can use Kling 3.0 Omni on invideo to build elements for key characters, locations, and props so they stay visually consistent across shots. Kling omni uses these elements as a stable reference while the prompts focus on action and camera moves.