A Guide to Rough Cut Editing with AI: From Raw Footage to First Draft
Last updated September 22, 2026
AI-powered rough cut editing helps creators turn hours of raw footage into an organized first draft faster. By analyzing footage, selecting usable takes, and removing repetitive sections, AI speeds up the editing process while leaving room for creative control.
Creating a rough cut is often one of the most time-consuming stages of video editing, requiring editors to review hours of footage, select the best takes, and remove unnecessary sections before shaping the final story. This guide explores how AI is changing rough cut workflows by analyzing footage, understanding context, and assembling an editable first draft. With tools like invideo Editor, creators can speed up the first assembly process by letting AI help select clips, remove retakes and fillers, and build a timeline that can be refined further by the editor.
A Guide to Video Editing with AI: From Raw Footage to Rough Cut
Every editor knows how much work goes into a rough cut before the video even starts taking shape. Scrubbing through hours of footage, trimming pauses, removing repeated takes, and lining up clips. It’s familiar work, but doing it for the hundredth time doesn’t make it any less tedious.
There are silence-removal plugins, transcript-based or prosodic editing tools, and AI integrations that can handle some of that work. But cutting around what’s been said only tells part of the story. What’s happening on screen matters when choosing which takes to keep.
That’s where invideo Editor is different. Its built-in AI editing assistant watches your footage, selects the strongest takes, removes retakes and fillers, and assembles a base cut on an editable timeline.
This guide will walk you through building your first rough cut, from uploading your recordings to refining the assembled edit.
Transcript-based vs. Speech-based vs. Semantic editing for rough cuts: When to use which?
|
Editing method |
Transcript-based editing |
Speech-based analysis |
Semantic editing |
|
How it works |
Converts speech into text and connects each word to the corresponding footage. Removing text from the transcript removes that section from the timeline. |
Studies how something is said, including pace, pitch, pauses, emphasis, and vocal energy. It can help identify stronger deliveries and sections that need tightening. |
Analyzes the complete video, including spoken words, visuals, sounds, lip movements, on-screen actions, the script, and the editing brief. It then selects and arranges footage based on the intended story. |
|
Works best for |
Video podcasts, interviews, talking-head videos, webinars, and other speech-led content. |
Presentations, speeches, interviews, voice-led explainers, and videos where delivery and emotion matter. |
Product demonstrations, tutorials, documentaries, wedding videos, event recaps, multicamera recordings, courses, narrative videos, and projects that combine main footage with B-roll. |
|
Example |
Removing filler words, long pauses, repeated sentences, or an unwanted topic from a recorded podcast. |
Comparing several versions of an introduction and selecting the take with the clearest, most confident delivery. |
Building a wedding film by identifying key moments, matching speeches with relevant B-roll, choosing the clearest reactions, and arranging the footage into an emotional story. For a product video, it could match each spoken feature with the correct demonstration footage and remove failed takes. |
|
Tools |
Descript works best for transcript-based editing. |
For prosodic analysis Threadline is a great choice. |
If you are looking for a tool that combines transcript and speech based editing, along with meticulous pixel-by-pixel analysis of videos, go for a semantic editor like invideo.io. |
How to Turn Raw Footage into a Rough Cut with AI
1. Upload your raw video
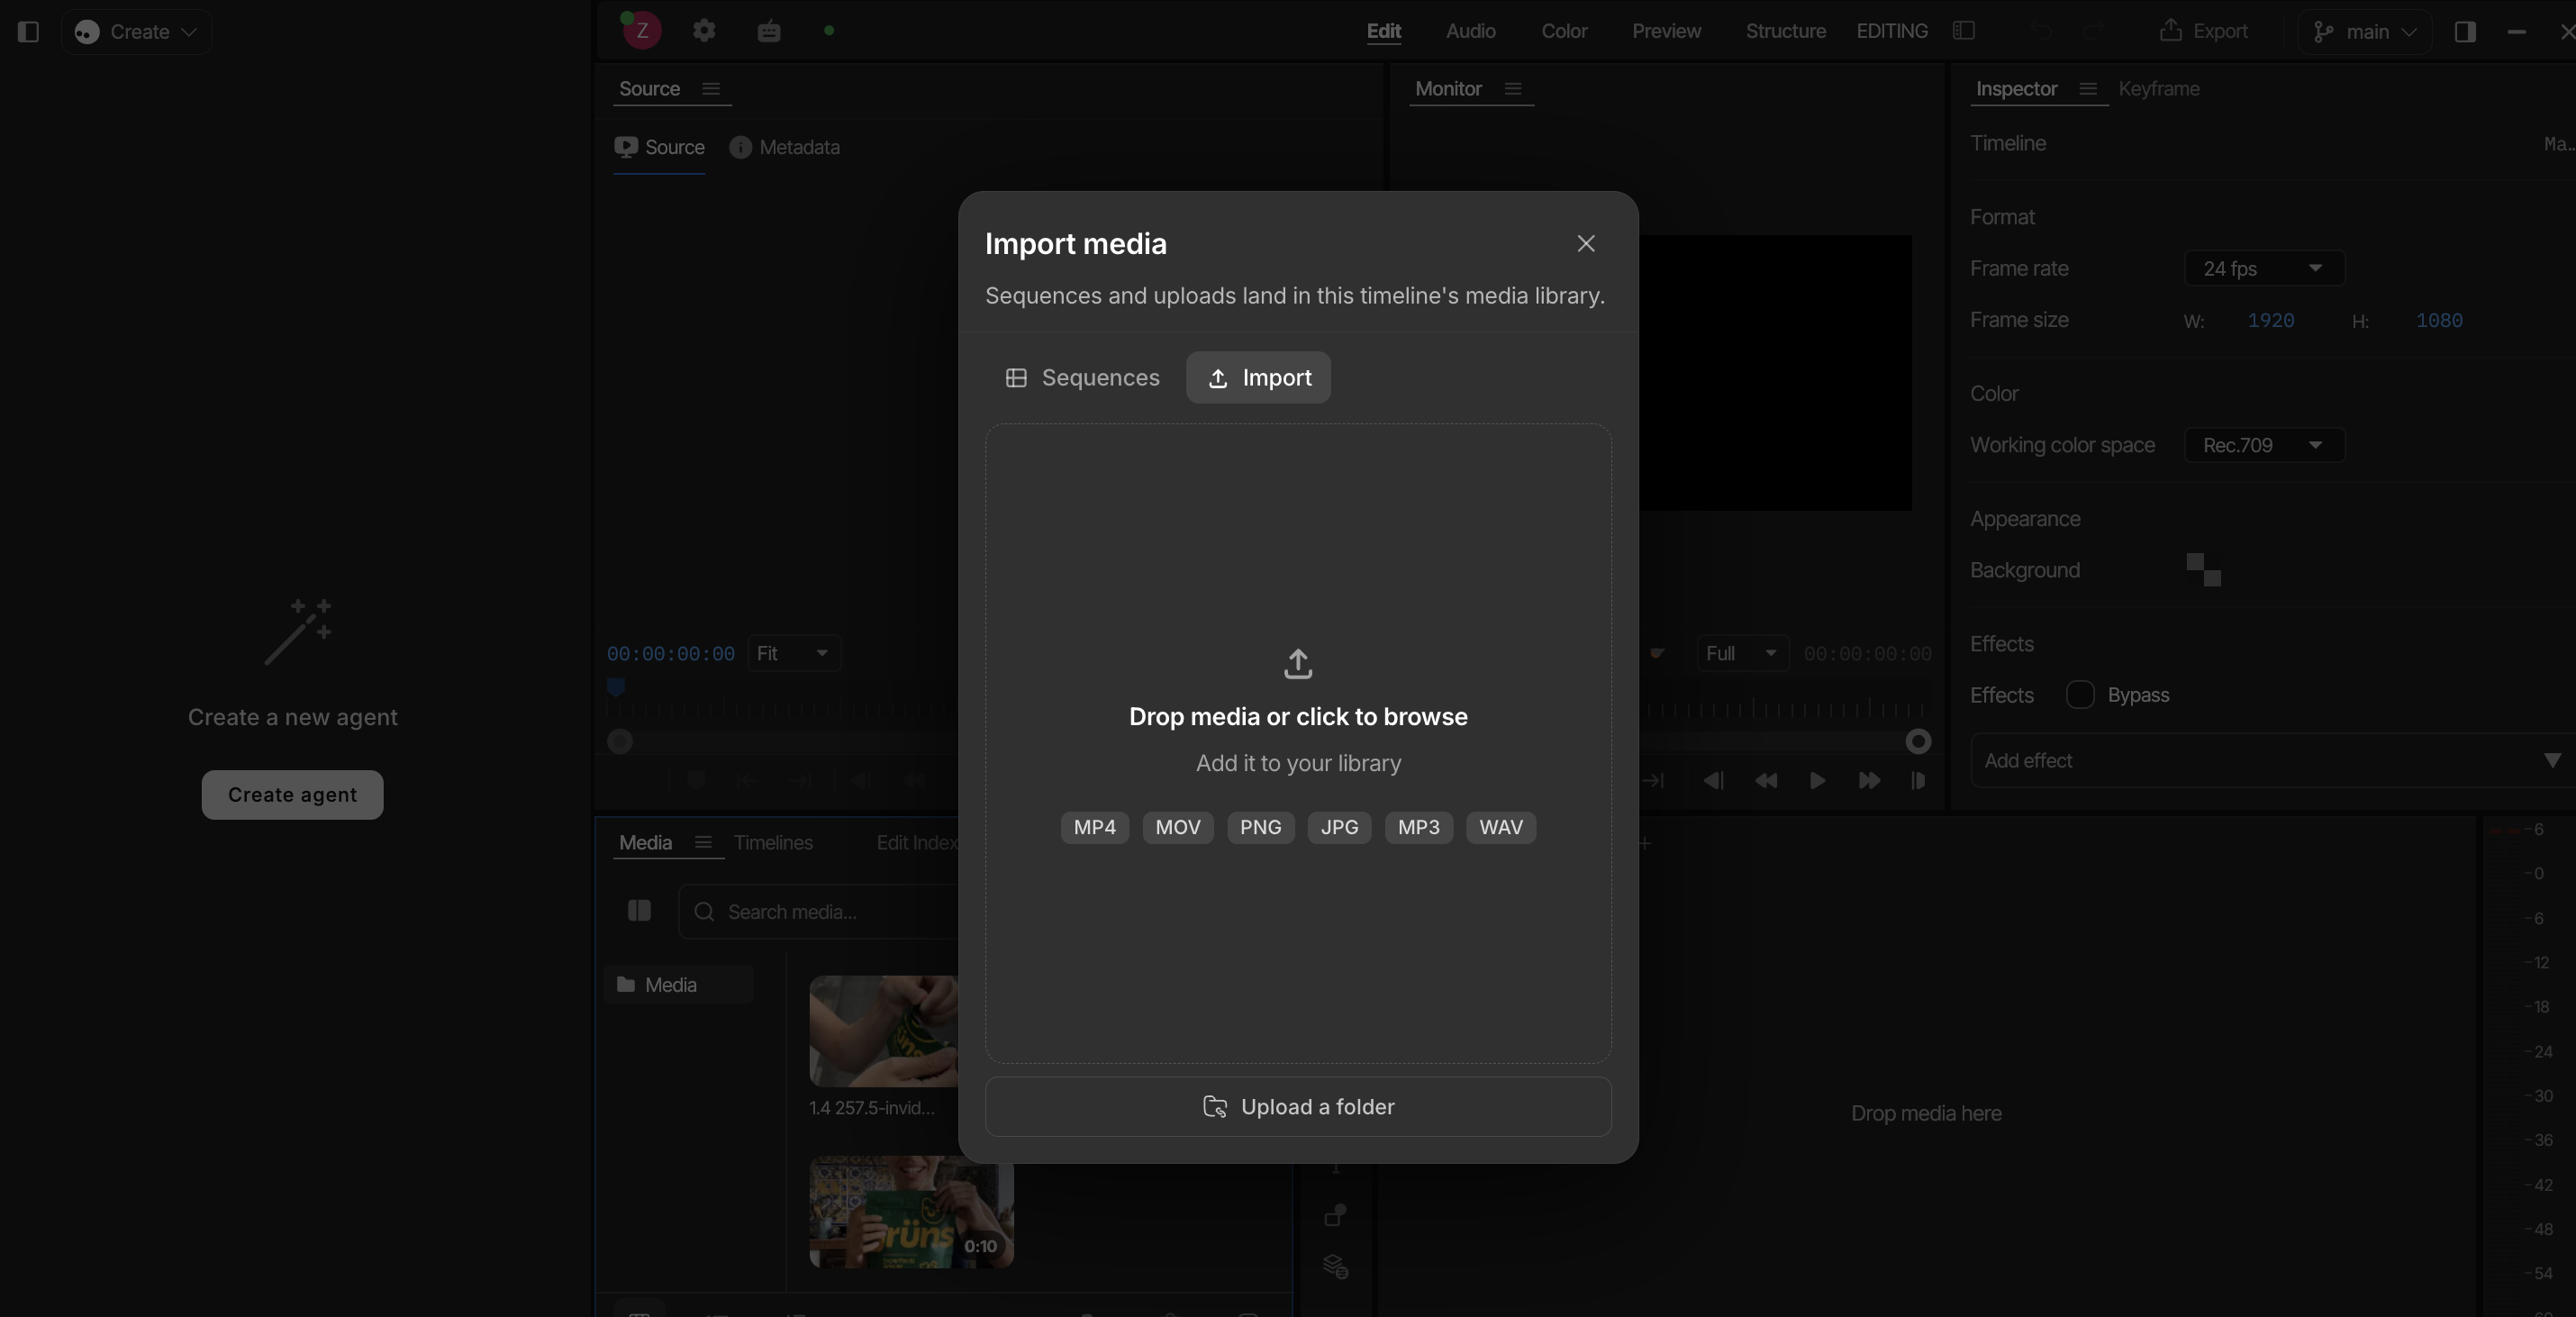
Bring the recordings for your edit into invideo Editor. If you have a script, include it as a reference. You can also work without one and describe the story you want the footage to tell.
Make the source material easy to identify. Use clear filenames and distinguish the main recordings from supporting footage. If one recording contains your preferred delivery, mention it in your instructions.
You don’t need to decide every cut in advance, but it helps to establish:
- Who the video is for.
- What viewers should understand by the end.
- Which points or lines must stay.
- The approximate length you’re aiming for.
These choices give your AI agent a direction before it starts assembling.
2. Define the narrative and ask to remove retakes and fillers
Your AI agent inside invideo Editor can select takes, remove fillers and silences, and assemble a base cut. Your brief tells it what to prioritize. See the first-draft capabilities.
“Remove the bad takes” leaves a lot open to interpretation. Explain what makes a take worth keeping: a complete answer, a confident delivery, or wording that follows the script.
Here’s a prompt you can adapt:
Build a rough cut from these recordings for a product walkthrough. Start with the problem, follow with the demonstration, and finish with the next step.
Keep one complete, clear take of each point. Remove false starts, abandoned sentences, repeated attempts, and long pauses. Preserve the full explanation of how the feature works, including any qualifications.
Aim for about three minutes, but prioritize a complete explanation over hitting the exact duration. Keep natural pauses where they help the delivery. Leave music, B-roll, and visual effects for a later pass.
Watch the assembly workflow:
The important choices are what to preserve and how aggressively to shorten the recording. A promotional video might need a quick opening and tight delivery. A training video may need more room for explanations and examples.
If the recording follows a script, use that to define the order. For unscripted footage, describe the narrative you want, such as the problem, the guest’s explanation, a practical example, and the takeaway.
3. Review and refine the cut on your timeline
Once the first assembly is ready, watch it for the story. Does the opening get to the subject? Do the ideas follow naturally? Does the ending deliver what the opening promised?
Then look more closely at take selection and pacing. You might want a different delivery, more space around an important point, or a shorter introduction.
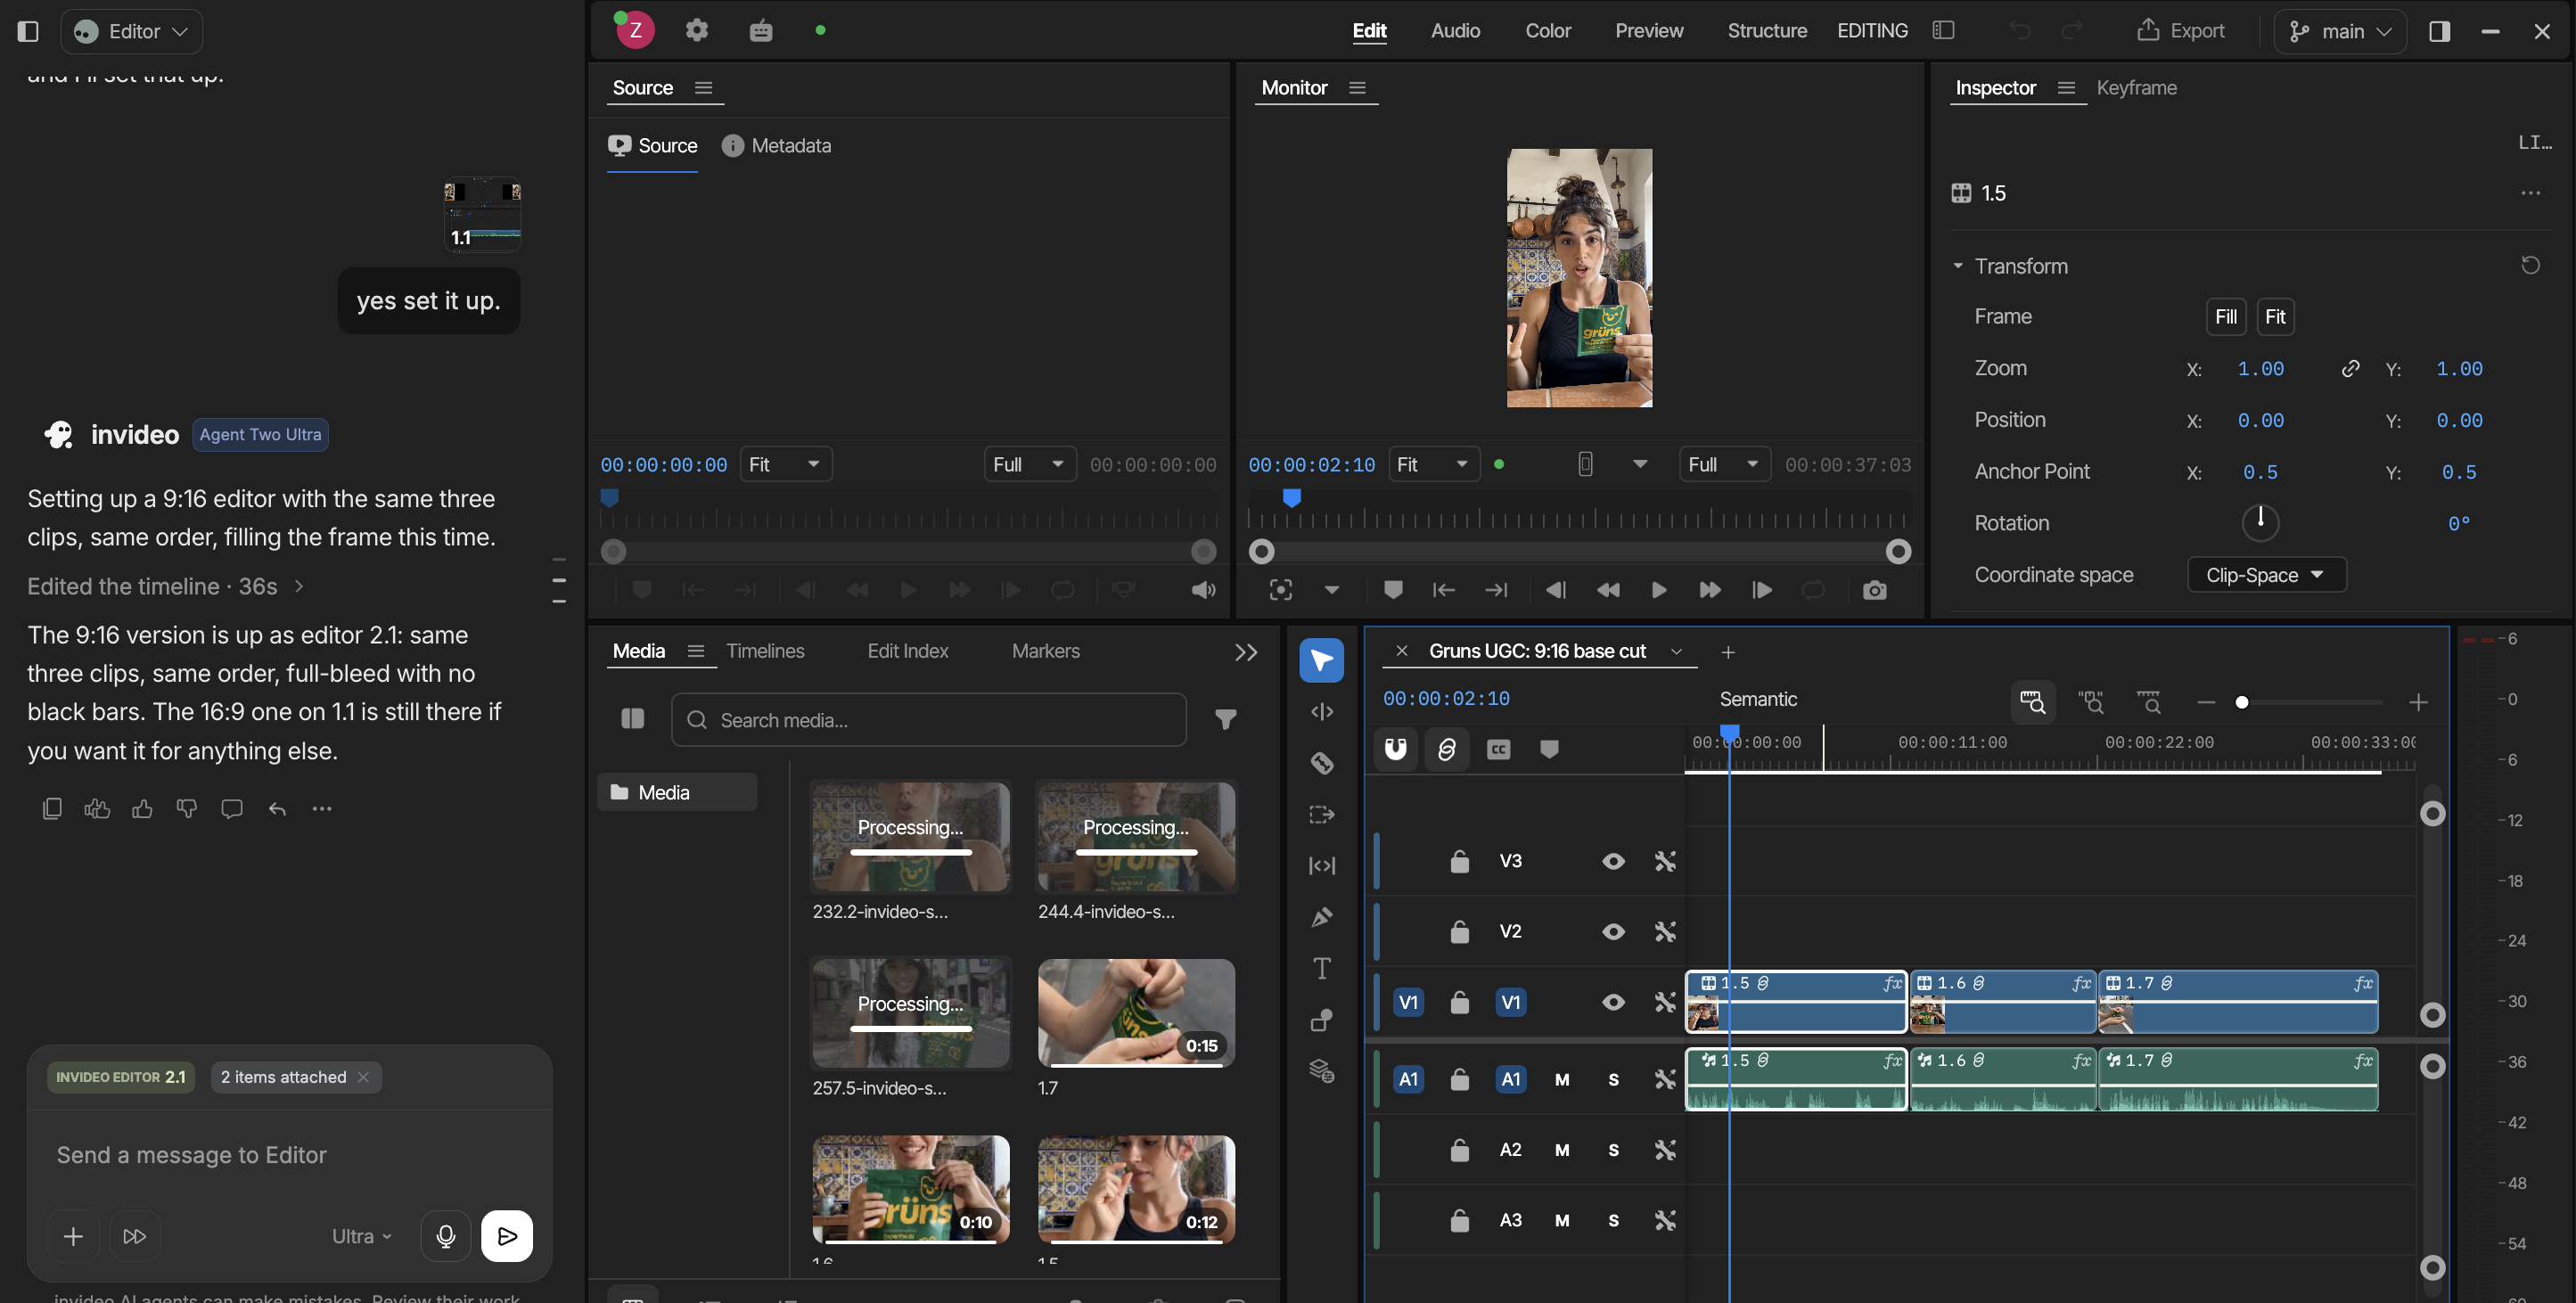
Everything your AI agent assembles stays editable on invideo Editor’s timeline. You can make changes yourself or give it instructions for another pass.
Remember to keep your revision instructions focused:
Shorten the opening by removing the second explanation of the problem. Keep the example that follows and leave the demonstration section unchanged.
Watch BMF MEDIA request a tighter opening at 04:22.
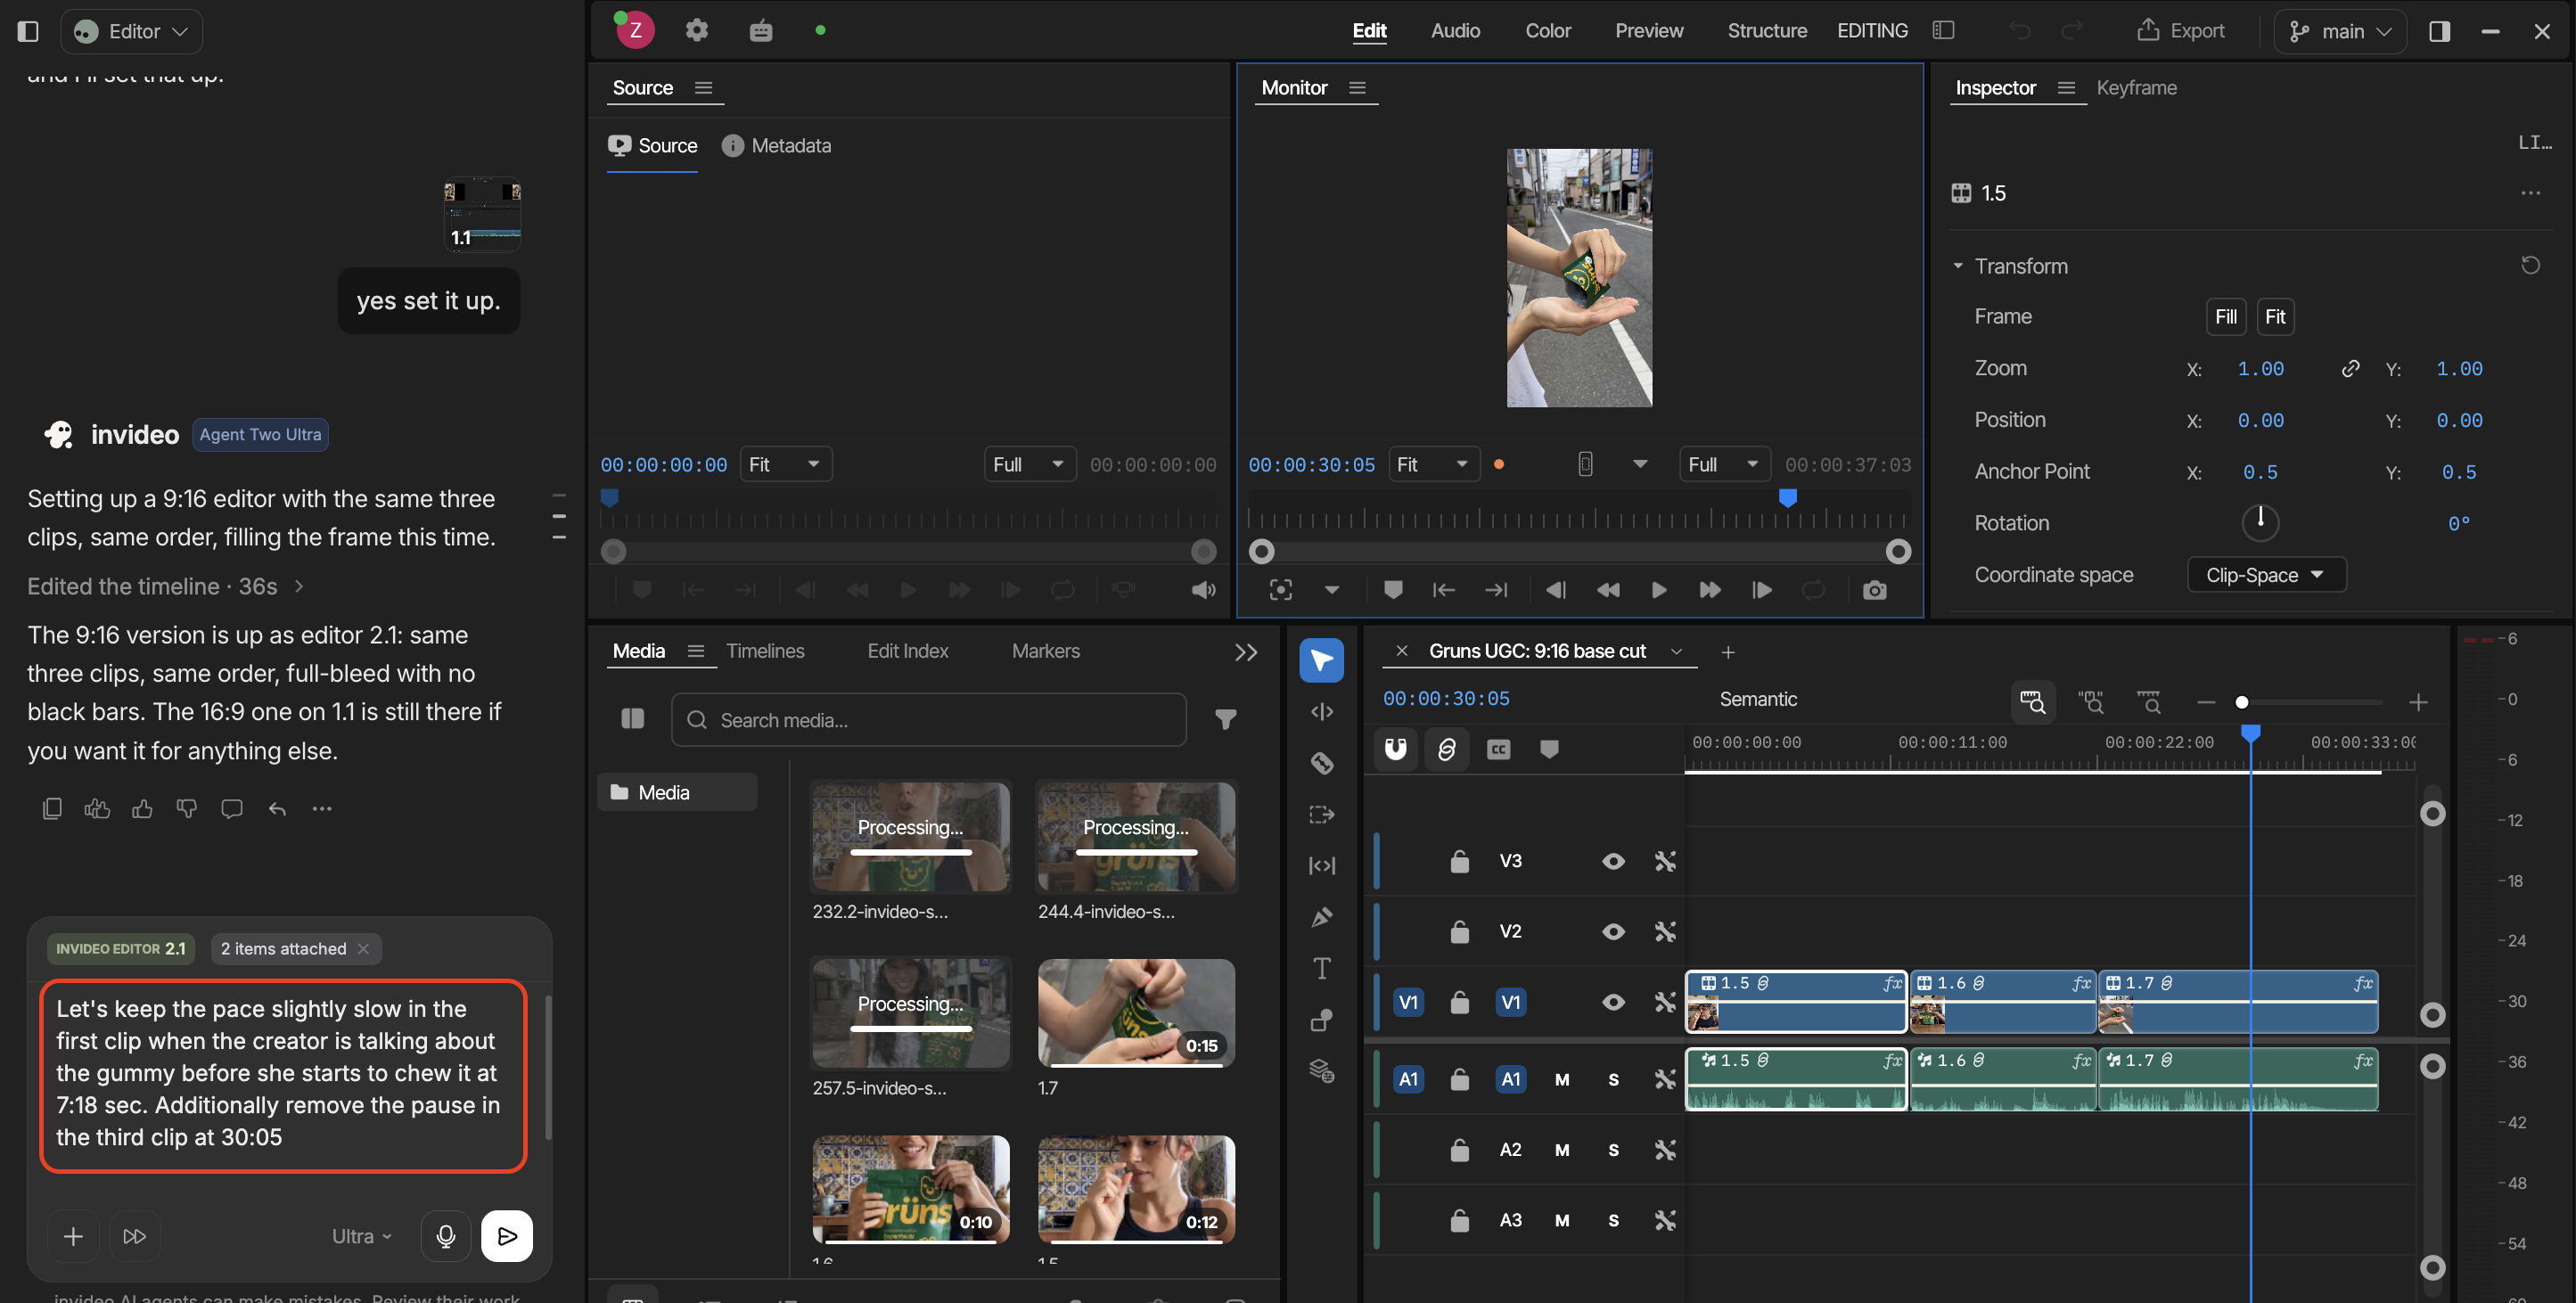
Listen across changed edit points, too. A repeated thought may still need removing, or a cut may need a little more breathing room around a word. These are specific adjustments you can make while shaping the first assembly into your preferred cut.
Once the rough cut is in place, you can keep working in invideo Editor, adding B-roll, music, colour grading, keyframe animations, and transitions, or take the assembled timeline into your preferred editor.
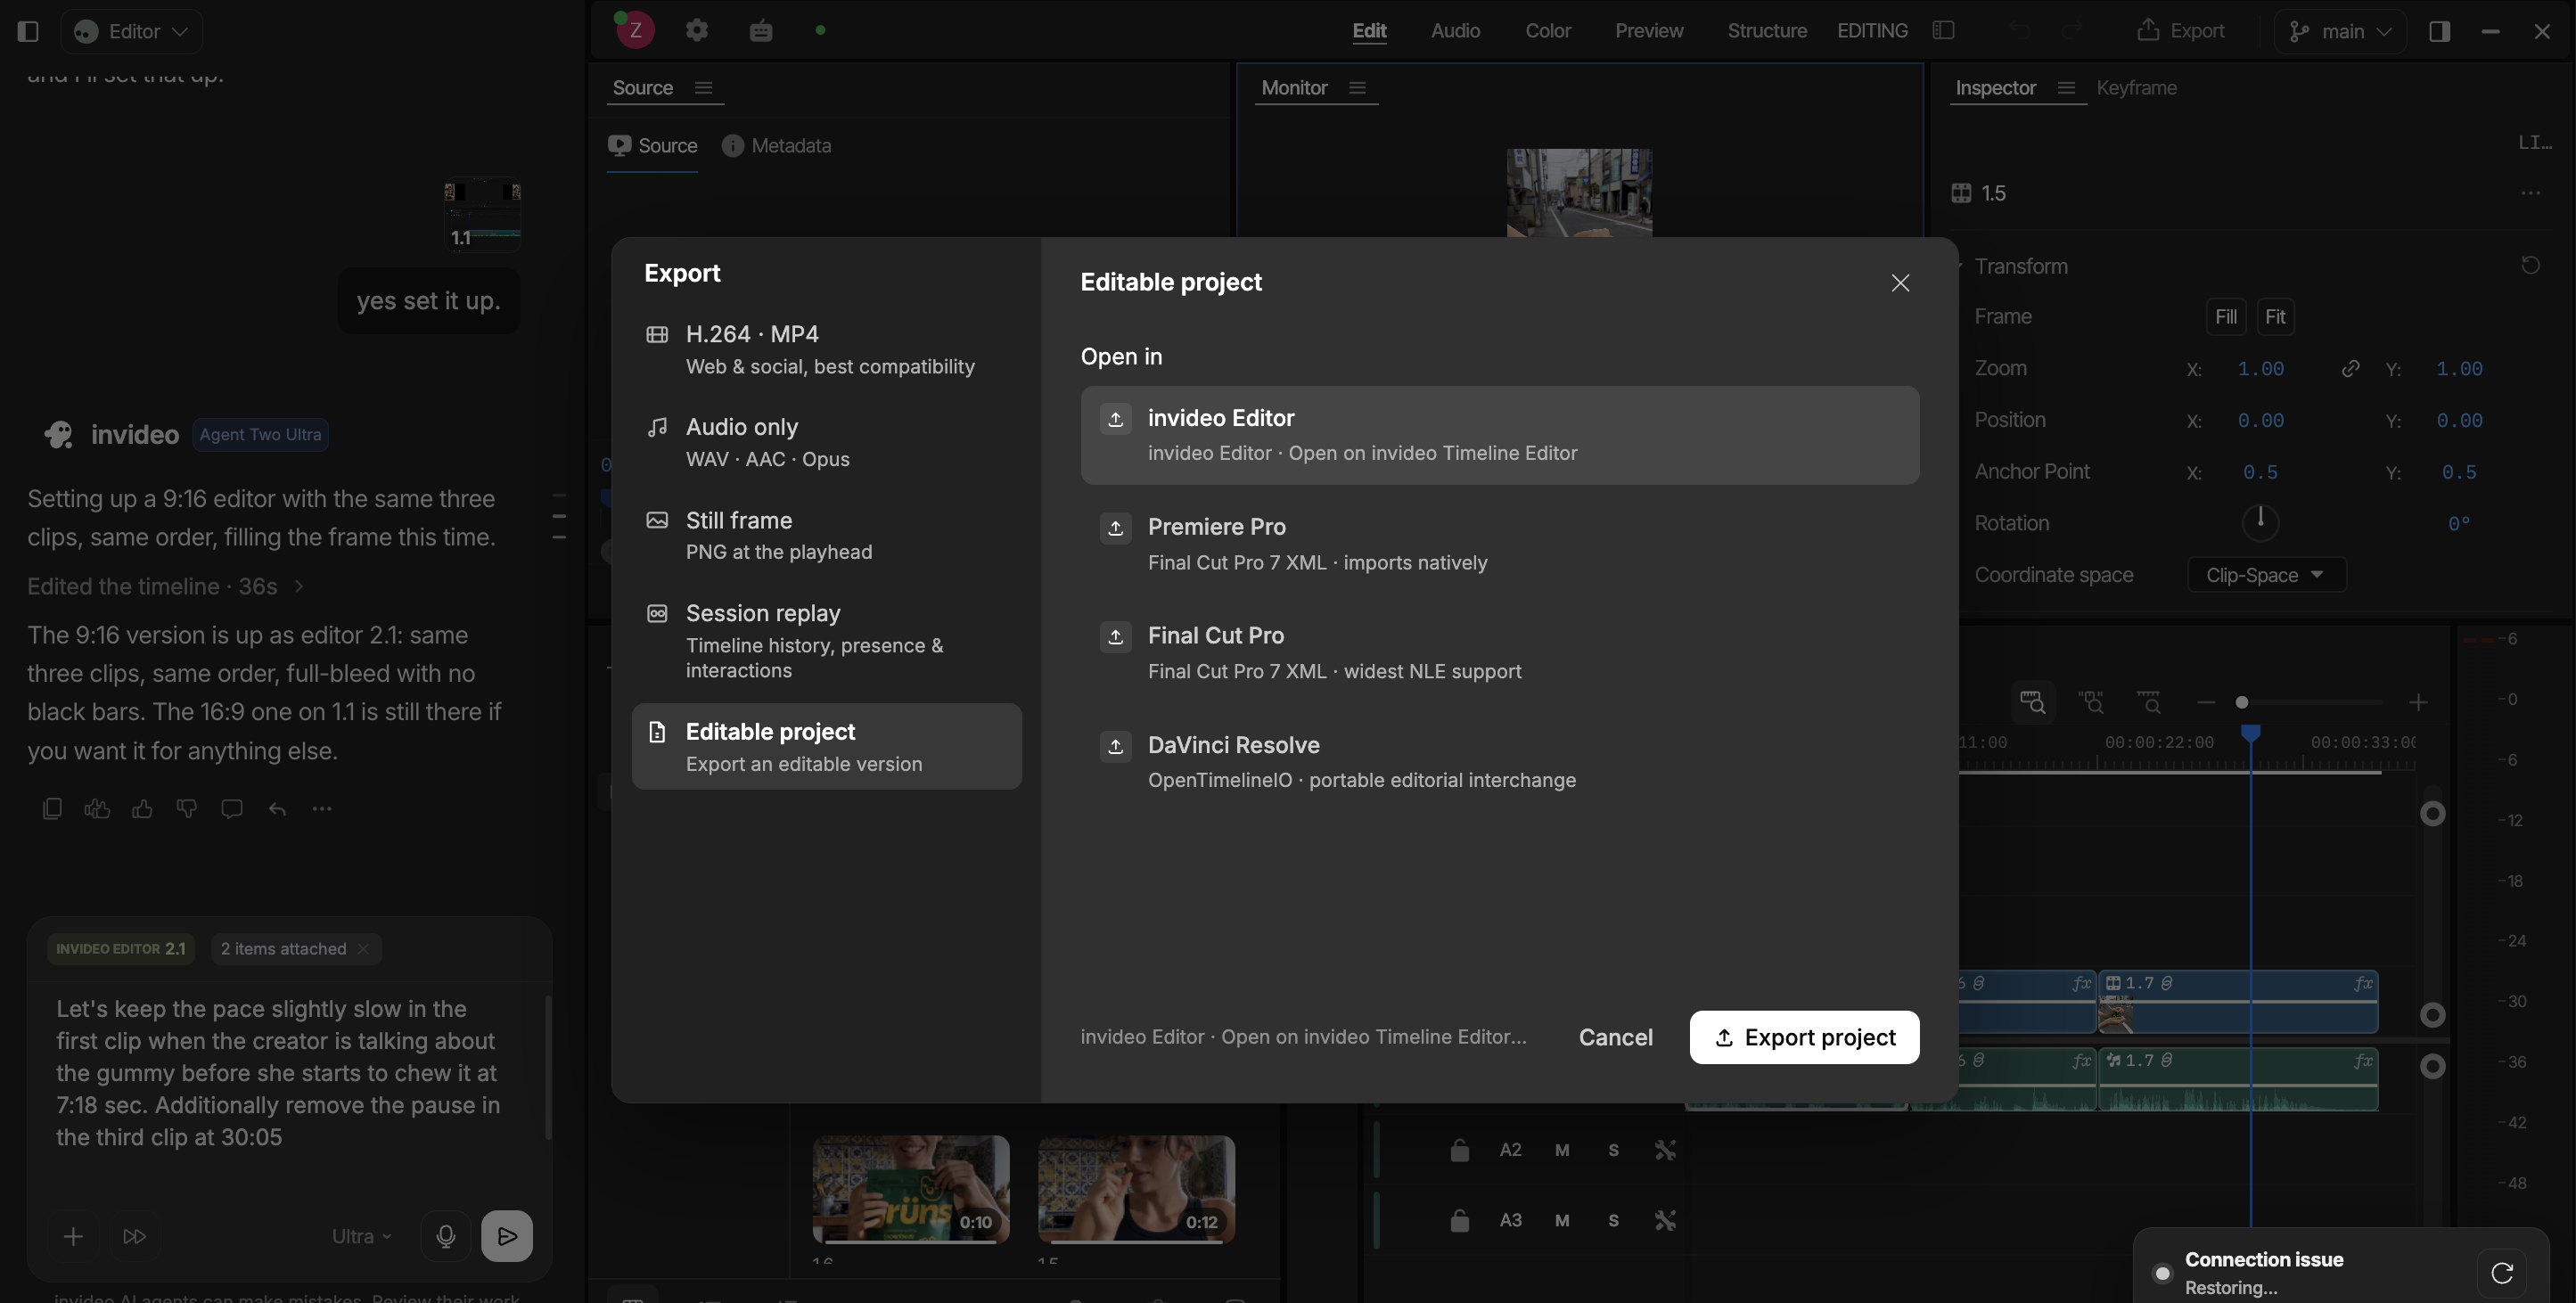
4. Export to the editor of your choice
If you prefer to finish in Premiere Pro, Final Cut Pro, or DaVinci Resolve, you can export an editable project with your timeline and media properly linked to pick up from the assembled cut and continue with your usual finishing workflow. See supported export options.
Watch Zane Hoyer select editable-project export at 02:03.
What this workflow is best used for
Editing a video podcast
A long podcast recording can leave you with setup chatter, restarted questions, extended pauses, and entire tangents to cut. Working through the episode to remove each one can mean dozens of small edits before you get to pacing the conversation.
Your AI agent inside invideo Editor can assemble a first pass around the topics you want to keep and remove unwanted sections and long gaps. Tell it which exchanges to preserve so the episode retains the conversation’s personality.
Cutting an interview
Interview footage often contains several versions of the same answer, with useful material scattered across the recording. Building a rough cut means locating those passages, removing abandoned answers, and bringing related points together.
In invideo Editor, you can brief your AI agent on the themes or answers you need and ask it to assemble them into a sequence. Include any questions or qualifications that must stay with an answer to preserve its context.
Editing YouTube videos
A talking-head video, explainer, or review can involve multiple takes of every section. Even with a script, you still have to work through the recordings, remove restarts, and line up the selected takes.
Give your AI agent the script or outline and ask it to build a base cut with one complete delivery of each point. That gets the repeated assembly work underway while leaving you an editable sequence to refine for the opening, pacing, and overall flow.
Assembling tutorials and product demos
Recording a demonstration often means repeating a step, waiting for something to load, or restarting an explanation. Cutting that material down takes care because removing too much can leave viewers missing an action they need to follow.
Ask your AI agent to assemble the walkthrough in order, removing restarts and unnecessary waiting time while preserving each essential step. Specify which actions and results must remain visible, then review the sequence for continuity.
Preparing training and course videos
A course can leave you with hours of recordings spread across lessons, including repeated explanations, pauses, and replacement takes recorded later. Assembling each lesson means matching that material to the outline and repeating the cleanup across the course.
Work lesson by lesson in invideo Editor, giving your AI agent the outline and identifying any replacement takes. It can build a first assembly and remove repeated material, while you check that the examples, explanations, and learning points remain complete.
FAQs
- What does an AI first draft include?
Your AI agent assembles selected takes into a base cut and removes repeated lines, flubs and filler. The resulting sequence gives you a starting point for refining the story, pacing, and visual treatment.
- Can I fix an AI edit manually?
Yes. The result stays editable on invideo Editor’s timeline, where you can trim clips, change their order, and adjust the sequence. You can also give your AI agent a focused revision to make.
- Will AI remove every repeated take correctly?
Your AI agent can remove repeated takes, but it can sometimes miss a repeated idea when it’s phrased differently. Review those passages and ask it to remove the duplicate or trim it yourself.
- Do I need a script to build a rough cut with AI?
No. You can describe the sequence you want and the points to keep, and your AI agent will use those instructions to assemble the footage. If you have a script, include it to guide the order and take selection.
- Can I continue editing in another editor?
Yes. Export an editable project for Premiere Pro, Final Cut Pro, or DaVinci Resolve and continue working from the assembled timeline. This lets you incorporate AI assembly into an existing editing workflow.
- What is free, and when are credits used?
The manual editor is free. Assigning work to your AI agent and using generative models consumes credits, so check your current allowances when planning assembly and additional AI passes. See availability and credit use.