


Time-lapse videos are one of the most dynamic and eye-catching ways of presenting the passing of time for a particular event.
A time-lapse video consists of a series of images—or frames—that play in a sequence and create an effect where it looks like time is moving faster. This approach is used by various kinds of artists and content creators.
You can create an amazing video of a city rush or a natural phenomenon. You can also craft a sped-up presentation of your creative process while painting or sculpting. A how-to video can benefit from a time-lapse demonstration of how you put together a particular gadget or piece of furniture.

Source: Jake Blucker @Unsplash
How Does a Time-Lapse Video Work?
When you record a regular video, you usually do so at about 24 frames per second. Such a recording plays every frame in a way that looks like what we see in real-time.
When you create a time-lapse video, you “manipulate” time by using a lower frequency for shooting frames. You can record a frame every few seconds, minutes, our hours, depending on how long of an event you want to capture. This results in a video that makes it look like the long scene you’ve recorded is happening in a matter of minutes.
Methods for Making a Time-Lapse Video
Depending on the camera you’re using and the preferred approach, there are two ways you can create time-lapse videos:
- Capturing and editing a series of images
- Using the built-in time-lapse feature
Making a Time-Lapse Video by Capturing and Editing Images
Many people still stick to the traditional method—capturing a series of still photos with the help of an intervalometer and putting them together to create a time-lapse scene.
While this approach comes with a variety of benefits, such as being in control of every image that takes part in your video, it is also a time-consuming process. You need to edit the photos and ensure that they can create a consistent visual experience.
If you want to create stunning time-lapse videos faster and with less effort, there is an alternate solution.
Making a Time-Lapse Video Using the Built-In Time-Lapse Feature
Time-lapse videography has gone a long way since its inception, thanks to the unstoppable advancement of technology. Plenty of cameras have a built-in feature that enables you to set up and record time-lapse videos straight away.
You can focus on being an amazing storyteller and let your camera do the job for you. If you know how to make a video, you can come up with amazing results with your time-lapse recordings using a handy video editing app.
Let’s take a look at how you can record your time-lapse videos using modern cameras and features.
How To Record a Time-Lapse Video
To start recording a time-lapse video, you need to set up your camera. The specific steps differ depending on the device you’re using, but what you need to do is:
- Switch to the mode for recording time-lapse videos
- Set up the frequency by picking a specific interval number
- Choose how many shots you want to take in total
- Compose the perfect shot for your time-lapse video
- Press the record button
Setting up the interval times depends on what you’re recording. If you’re capturing a subject that is moving slower, such as a flower blooming or a cloud drifting in the sky, you’ll require about 20–30 seconds between frames. If your video is focused on a street crowded with cars and people, your intervals should be shorter—about 2–3 seconds between shots.
Choosing the number of shots defines how long your video is going to be. Each project requires different settings, but if you’re looking for a reference point, you should keep in mind that most YouTube videos play at about 24 fps. In that case, you need 24 shots for each second of your video. You can calculate the total number of frames using the following formula:
Framerate X Clip duration in seconds = Total number of frames
Tips for Making a Time-Lapse Video
If you want to create the best possible time-lapse video, you should:
- Use a tripod—When you compose your shot, you need your camera to remain as steady as possible. Set up your device onto a tripod to ensure that you’re getting consistent frames
- Pick an appropriate lens—You need to choose the type of lens that fits the type of scene you’re recording. If you’re shooting a smaller object, you should use a macro lens. A prime lens can help you get optimal results in a low-light setting, such as capturing the sunset. To get the most out of larger scenes with plenty of movement, you can use a wide-angle lens
- Use slow shutter speeds—If you want to make your time-lapse video look smooth, you should use a slower shutter speed, like 1/50 or 1/60
- Record in manual mode—When recording in Automatic or Semi-Automatic mode, your camera will change the exposure in line with what’s going on in the scene. This often results in some of the frames flickering, which can ruin your recording. You should shoot in Manual mode so that the entire recording has the same settings
Finally, you should keep in mind that it takes a while to shoot a time-lapse video. This means that you need to be prepared before you start recording. Make sure that you’ve got plenty of battery time and storage space for this kind of project.
Once you’re done shooting, your camera will convert your shots into a time-lapse video automatically. With the right video editing software, you can turn your recording—or more of them—into an engaging video for your YouTube, Instagram, and Facebook audiences.
How To Create a Video Using Your Time-Lapse Footage in InVideo
InVideo Text-to-Video
InVideo is our feature-rich video editor that you can use to create videos for a wide range of purposes. It’s a fantastic solution for combining your time-lapse footage into an amazing video project. You can create an eye-catching compilation with an engaging voice-over or make a music video for one of your favorite songs.
InVideo provides three distinct methods for creating videos:
|
InVideo Video Editing Options |
|
|
Text-to-Video |
Upload your footage and let InVideo turn it into a series of scenes that you can customize |
|
Blank Templates |
Start with a stripped-down template and craft an amazing video from scratch |
|
Pick a template from our extensive library of over 2,000 unique options and customize any element to your liking |
|
You can edit your time-lapse footage with the Text-to-Video option and make use of its two editing modes—Storyboard and Advanced Editor. To start using this option, you need to:
- Log in to your InVideo account
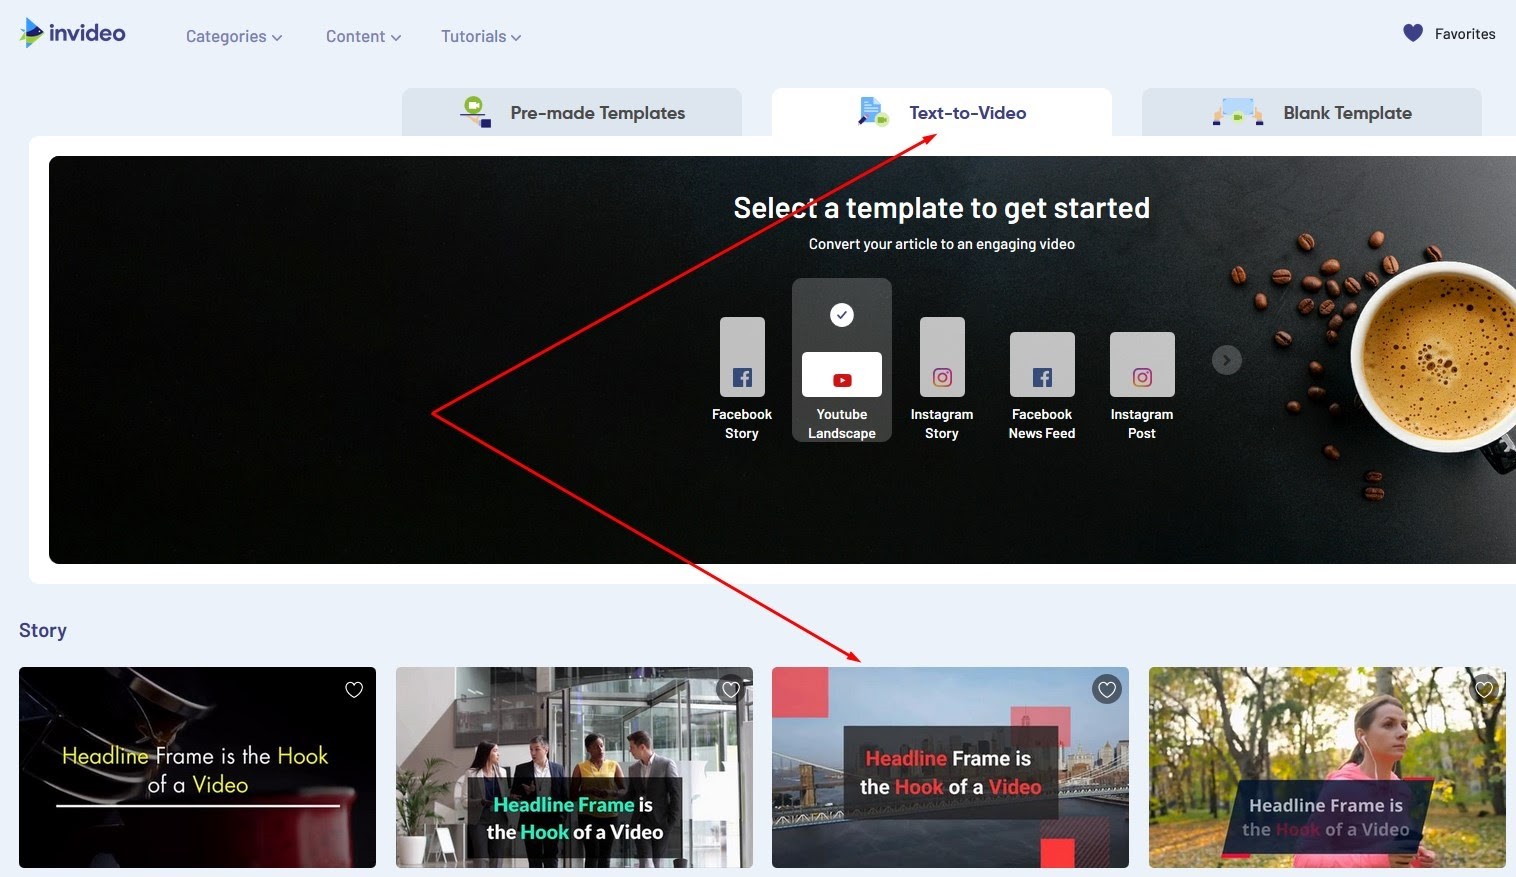
- Open the Text-to-Video tab
- Pick a type of social media video formatting for your video
- Choose a template of your liking
- Click on the Use this template button
InVideo Text-To-Video Media Upload

The next screen is where you need to upload your footage. You don’t need to have a full script prepared, and you can always add text to your video later from the editor. To upload your footage, navigate to the Add your media files here tab. Here, you can import files by clicking on the Upload media button or by dragging and dropping them onto the screen. InVideo supports a variety of formats, including:
- MP4
- MKV
- WMV
- AVI
- MOV
Keep in mind that you can’t upload files that are bigger than 200MB. If the time-lapse videos that your camera rendered are larger, you’re going to have to convert them before importing them into InVideo.
Click on Next when your files are done uploading, and you’ll be taken to the Storyboard mode screen.
Editing Your Video Using the Storyboard Mode
InVideo Storyboard
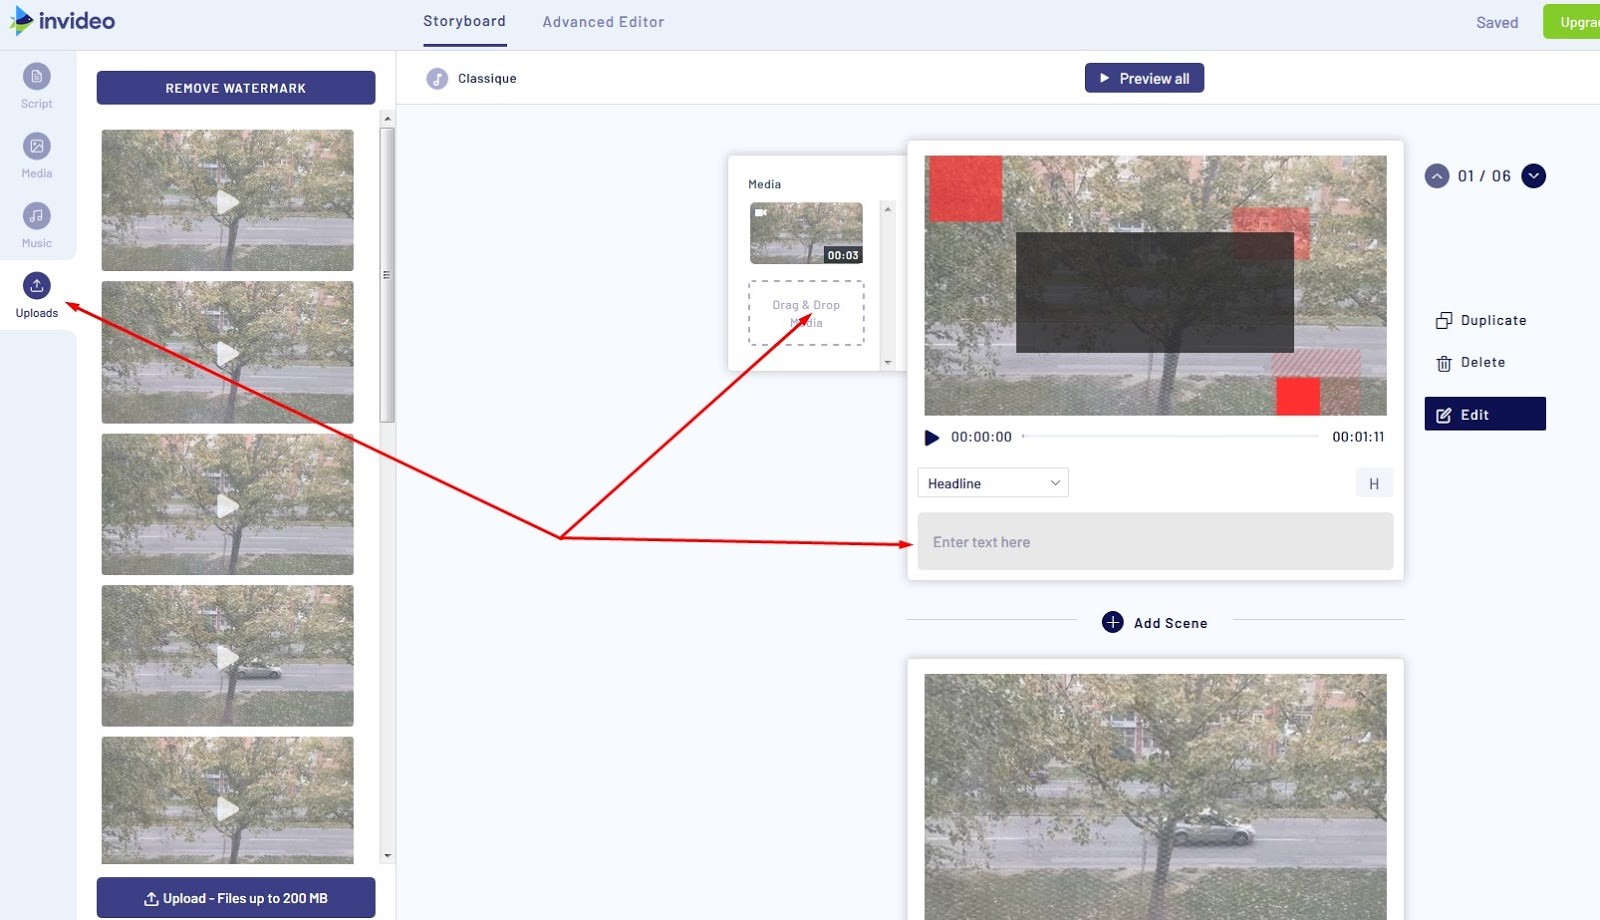
You can preview all your scenes in Storyboard mode. Rearrange them, add new ones in between, and delete any that you don’t want to use in your project. You can also duplicate scenes if necessary.
You can find all your recordings by going to the Uploads tab in the left panel. Use the Upload button at the bottom if you want to import any additional files. To replace media files, drag and drop a new file onto the designated field to the left of each scene.
You can add captions to your scenes by typing them into the fields below. Set up whether the text appears as a:
- Headline
- Story
- Quote
- Question
- Social
Adding textual elements to your video can make your video more engaging. You can find out more about how to add captions to YouTube videos if you’re interested in that. To view all the captions you’ve created, go to the Scripts tab. You’ll be able to customize your captions further in the Advanced Editor mode.
To add audio files to your video, go to the Music tab. You can choose from our extensive collection of royalty-free songs or upload a tune yourself. Click on the + symbol next to a song to add it to the project.
Editing Your Video Using the Advanced Editor Mode
The Advanced Editor mode provides you with more extensive video editing options and gives you access to all the features that InVideo has to offer. This includes:
- Text
- Stickers
- Effects
- Shapes
- Enhancers
InVideo Video Options

Click on any video element in a scene and go to the Edit menu on the right. Here, you can set up a variety of options, including:
|
InVideo Video Editing Options |
|
|
Video Edit |
Here you can crop the frame and trim the video element. You can also set it up to loop during the scene and use the slider to apply the desired amount of blur |
|
Volume |
Use the sliders to adjust the volume for the background music and the audio in the recording |
|
Fade |
Add a fade in and fade out effect for the video element |
|
Playback Speed |
Use the slider to change how fast you want the video element to play |
|
Video Resizing Options |
Resize the video by cropping, stretching, or fitting it together with another element |
|
Video Animation |
Add a starting and ending animation for the video element |
If you add an image to any scene, you can apply one of the many filters, including:
- Aden
- Amaro
- Clarendon
- Gingham
- Mayfair
- Perpetua
- Reyes
Using the Timeline
InVideo Timeline

The timeline is where you can view and edit your entire project. Drag and drop the edges of any scene to set up their duration. You can also grab any scene and move it around if you change your mind about how it fits the sequence.
If you’re making a cool compilation of time-lapse videos—such as a detailed presentation of how you’ve painted a piece of street art or a cinematic sequence of cityscape shots with soothing background music—you can add transition effects. This way, you’ll ensure that instead of abrupt cuts between the scenes, there are dynamic transitions that make your video play like a smooth visual experience.
Click on the connecting arrows and choose from one of the transitions that InVideo has to offer, such as:
- Overlays
- Animations
- Shutters
- Glitches
- Light leaks
- Brushes
Aside from captions, you can add a captivating voice-over to the video. Click on the Add VO button and pick whether you want to record a voice-over, import an audio file, or use the automated text-to-speech feature.
Click on the Advanced Timeline button to view your video elements as layers. Move them around to change how they contrast with one another. You can also set the duration for each element here easily.
Customizing Your Captions
InVideo Text Customization Options
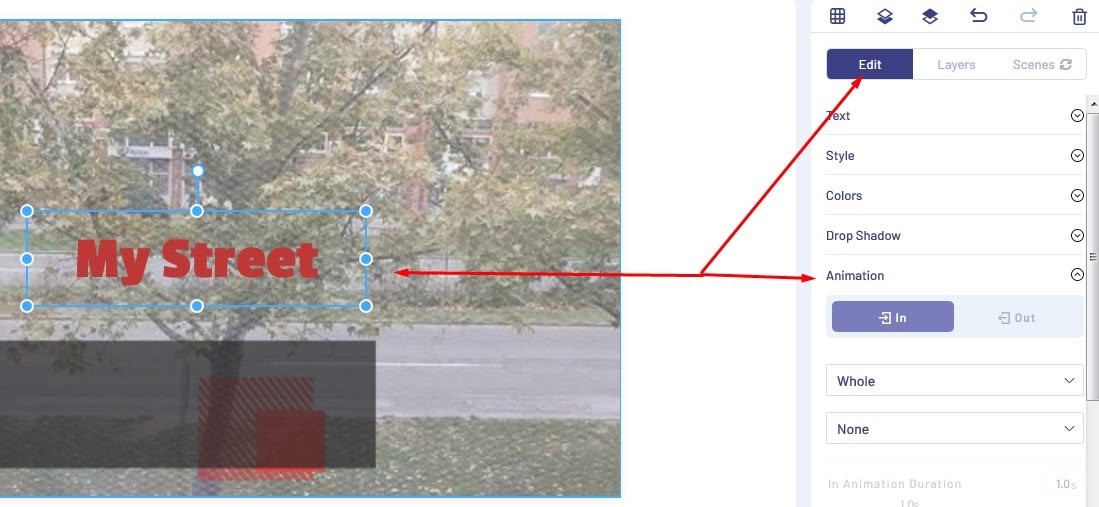
Click on any text box in a scene and go to the Edit menu. Here, you can add various customization options to your captions. Aside from setting up the font and text color, you can also add a drop shadow effect and animate letters, words, or entire lines.
InVideo Text Boxes

You can add additional text boxes by going to the Text tab. The options you’ve got are:
- Default text boxes for your template, such as the story and headline box
- Standard text boxes, including headings, subheadings, and body text
- Stylized text boxes, such as classic, modern, astons, location boxes, and social media credits
Click on any of the text boxes to add them to your scene.
Getting Help From Our Intelligent Video Assistant
InVideo’s Intelligent Video Assistant

InVideo enables you to check your video for mistakes by using our Intelligent Video Assistant (IVA). It’s an AI-driven assistant feature that analyzes your scenes for different types of errors. It specifically focuses on:
- Project colors
- Text alignment
- Animation speed
Click on the blue button with a triangle to activate IVA. After it scans your scene, the assistant will offer the best solution to fix it. You can choose Resolve if you want IVA to take care of the issue, or click on Ignore to look for a solution yourself.
Why InVideo Is the Best Solution for You
One of the main reasons why InVideo is a fantastic solution for creating videos is that it’s easy to use. Even if you’ve never edited videos in the past, you’ll get acquainted with our platform’s user-friendly interface in no time. Unlike many other tools that require hours, you can come up with astounding results with InVideo in less than ten minutes.
Even though it’s a software solution made for beginners, InVideo provides plenty of features for creating professional-looking videos. You can fully customize our templates made for various purposes, including Instagram ads, YouTube videos, and Facebook stories.
Our platform is a browser-based solution that can be used on different operating systems, such as macOS and Windows. Everything that you do is saved online, so you can access it from anywhere at any time.
If you ever need any help figuring out how InVideo works, you can contact our customer support team. Our agents are available 24 hours, every day of the week. You can find the chat icon in the bottom-right corner of the screen. Submit your inquiry, and we’ll be there to help you as soon as possible. You can also rely on our database of tutorials that cover almost every aspect of using our software.
How Much Does InVideo Cost?
Another aspect that makes InVideo particularly appealing is how affordable it is for such a feature-rich video editor. We offer two paid plans that allow you to use all of InVideo’s features:
- Business
- Unlimited
Business Plan
The Business plan costs $20 per month and enables you to export up to 60 videos. You can also use no more than 300 premium media files from our library. If you sign up for the annual arrangement, you get InVideo for $10 per month.
Unlimited Plan
The Unlimited plan removes all restrictions from using our platform. The monthly price is $60, but you can use our platform for $30 if you sign up for the annual plan.
We also provide a free version of our video editor. There is no trial—you can use it as long as you want. The restrictions are similar to the Business plan, with the addition of a watermark on every exported video.
Sign up for InVideo and start creating top-notch videos as of today!