
Lighting is one of the most important elements of your video creation process but unfortunately, very few creators understand how to ensure good lighting in their videos.
With the right lighting, you can get super cinematic videos using just your smartphone and without investing in expensive filming equipment.
That’s why in this article we’re taking you through seven lighting basics you should master if you want to create better videos.
Here are the tips we’ll be covering:
1. Lighting The Subject Well
2. Steer Clear Of Overhead Lighting
3. Position The Camera To Capture The Dark Side Of The Subject’s Face
4. Use The 3-Point Lighting Setup Method
5. Avoid Too Much Lighting
6. Use Soft Lighting From Diffused Light Sources Instead Of Harsh Light Sources
7. The Subject Must Have A Catch Light Or An Eye Light
Let’s jump right in!
Tip #1 - Light The Subject Well
Let's start with the most basic but important tip of them all. When filming a video, you want to ensure that your subject and the scene are well lit. This does several things, like drawing the viewer’s attention, establishing the mood of the shot, and also ensuring the audience has enough visibility.
But how exactly do you light the subject well? You can do that either using natural light or by creating a lighting setup that puts enough light on your subject. In either case, you want to take a test shot after your frame is set to determine how it looks on camera.

Once you take the test shot you will know whether the camera sensor is picking up enough light. Since cameras don’t perceive light like our eyes do, you will likely have to make some adjustments in order to get the perfect lighting in your frame.
You can check out this guide to figure out how to change your camera settings to adjust the light. Another way to adjust lighting is by moving your subject or your light source around.

- If the subject is exposed to too many harsh shadows, move them closer to a natural light source like a window that provides diffused light.
- On the other hand if the subject is overexposed, you need to move them farther away from a light source or dim the light by using blockers like blankets or curtains.
When starting out, begin by understanding how to use natural light to your advantage. But if you can’t plan your shoot in advance or at a well-lit time, you can start by investing in a pair of ring lights which you can get for as low as $29.
Tip #2 - Steer Clear Of Overhead Lighting
Have you ever noticed the shadows that fall when the sun is right overhead? They’re harsh and often create unflattering angles, which is exactly what happens when you shoot video in overhead lighting.
Most rooms are fitted with ceiling lights and newbie video creators often make the mistake of using these as their only light source. That often leads to the entire scene being colored in a similar tone and unflattering shadows being created on the subject’s face.

Instead of using overhead lighting, you want to switch to adjustable lamps, LED lights or ring lights that can be placed in front of your subject. You can even use these to supplement the overhead light by using them to project light from the opposite direction in order to minimize shadows.
Tip #3 - Position Your Light and Camera To Accentuate Shadows and Create More Depth In The Frame
While you don’t want your frame to be underexposed, the right use of shadows in your scene can give your videos a lot of depth and make them look super cinematic.
In order to achieve this, you want to create a setup where the camera and the light source are both placed on the opposite side of the subject at around 45° angles – think of your subject, the camera and the light source, each placed on the three ends of a triangle.
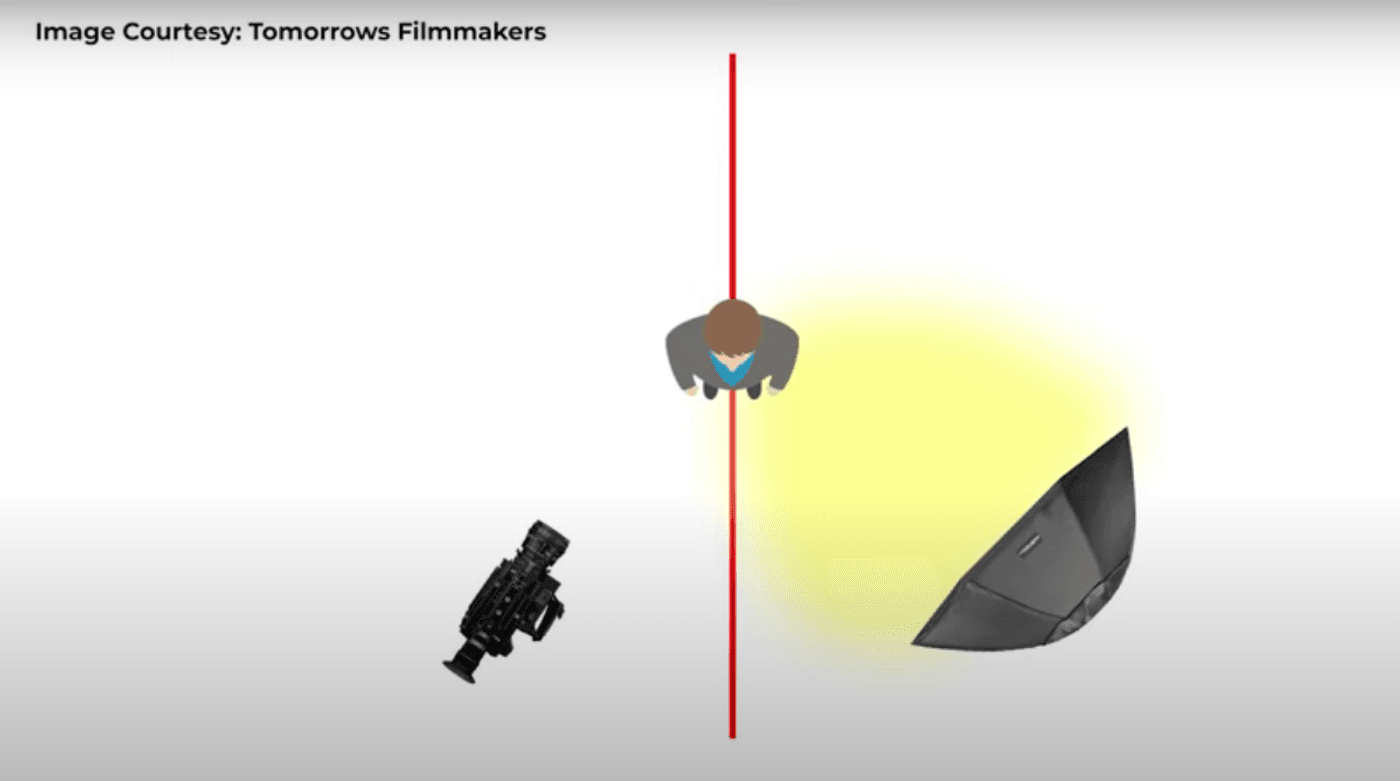
This is a very commonly used lighting setup and technique in filmmaking.Here are two examples from iconic movies showing the positioning of the light at an angle to accentuate shadows, while the camera is placed at the angle where it captures both the light and the dark side.

We tried this lighting tip for the videos on the InVideo Youtube channel and here are the results we got:

It is very evident from this side-by-side comparison that the frame looks a lot more cinematic when shooting from the dark side.
Tip #4 - Use A 3-Point Lighting Setup
This is one of the most common lighting setup used in professional videos. To create a 3-point lighting setup, you’ll obviously need three lights – a key light, a fill light, and a backlight.

To illustrate this setup, imagine that your subject is at the center of a clock and the camera is placed at 6. The key light will be located approximately at 4, the fill light at 8 and the backlight is located somewhere between 1 and 2.
Let’s take a look at each of these lights and what they add to the setup to understand 3-point lighting better.
1. Key Light: The key light is your primary light source for the video. It gives your subject exposure and creates depth and dimension. This light is set up in front of your subject at 45 degrees to create amazing shadows.
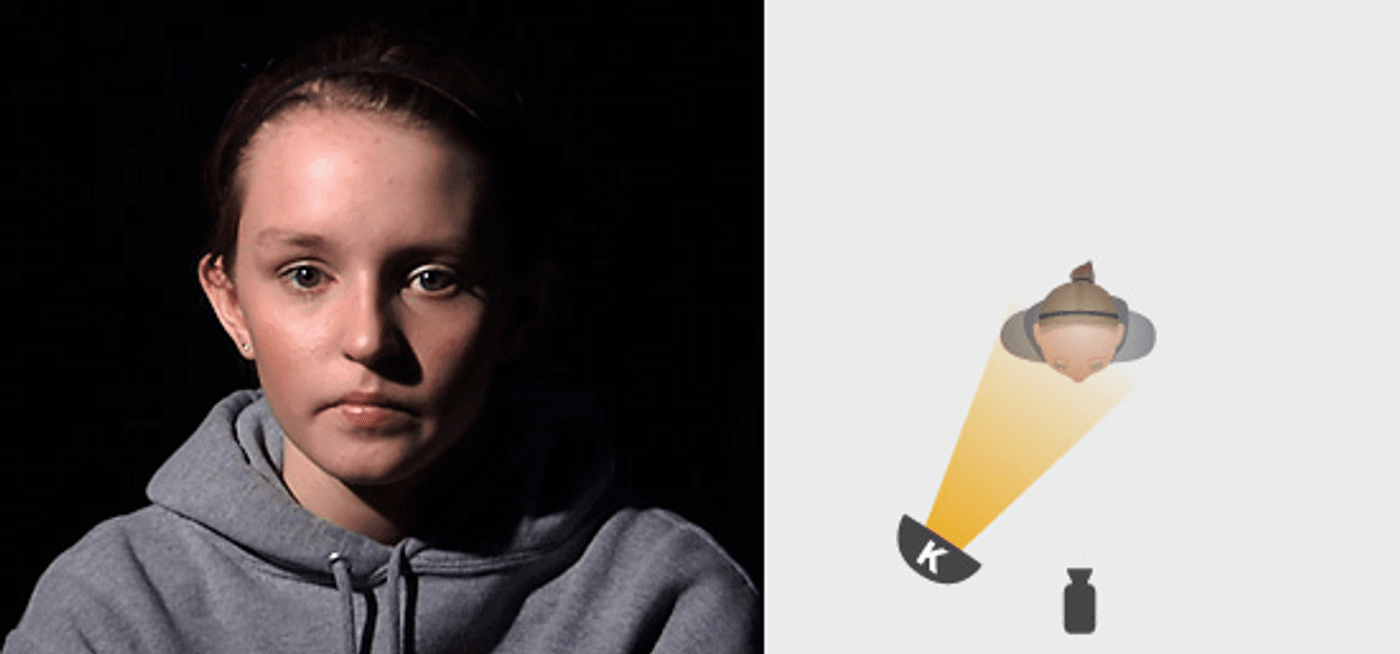
Image Source: Student Film Club
2. Fill Light : The fill light is used to balance out the shadows created by the key light. You can achieve fill lighting either by using another, less brighter light source or by using reflectors such as walls and fabrics to bounce off light onto your subject.

Image Source: Student Film Club
3. Back Light: As the name suggests, a back light is a light source put behind the subject to make them stand out from the background. These are often placed opposite the fill light and can be a boon for those shooting with mobile phone cameras that lack an aperture range to create depth of field.
As you can see in the image below, the backlights increase the contrast between the subject and the background and help create separation.

Image Source: Student Film Club
In fact, if you pick up any video from our YouTube channel, you will see that we have used the same exact setup in all of them. We have the key light on the right, a fill light on the left and a backlight that lets you differentiate between the outline of the speaker’s hair and the background.

Tip #5 - Avoid Mixing color Temperatures
Using lights with different color temperatures, such as warm light from a tungsten lamp and cool light from a fluorescent lamp, can often be quite tricky and something even experienced video creators have trouble with. So if you’re just starting it is good to avoid varying color temperatures.
Mixed lighting can be rough on your camera sensors as they try to adjust the white balance in your frame. Depending on how your sensors perceive this, you can end up with either very warm and yellow shots,or very pale or blue ones.
Here’s an example of how the camera can fail to adjust to change in colour temperature

Unless you have a better grasp of your camera’s capabilities and how it captures light, it is better to stick to using light with a singular color temperature to get cinematic shots.
Tip #6 - Use Soft Lighting From Diffused Light Sources
While harsh lighting has its place in filmmaking to create dramatic effects, if you’re filming professional videos or are just starting out, it’s a lot easier and often a lot more flattering to use soft and diffused lighting.
Let’s understand the difference between soft and hard lighting and the kind of effects they help achieve:
Soft Light: This light is evenly spread out and creates soft highlights and shadows, giving your frame and subject a more even and less moody look. The perfect example of soft lighting is outside on a cloudy day without any direct sunlight. You can achieve this indoors by using diffusers or softboxes over your studio light source.

Image Source: Premium Beat
Hard Light: Hard light on the other hand is great if you want to create a dramatic effect in your videos. It creates hard contrasts with bright highlights and very dark shadows. Hard lighting is often used in filmmaking, however, it is not preferred for professional videos as the results can be difficult to manage while editing.
 Image Source: Expert Photography
To understand the difference between soft and hard lighting, check out the portraits below. The portrait on the left was shot in bright sunlight (a source of hard light), which is why you can see strong shadows and highlights.
On the other hand, the portrait on the right was shot with soft diffused studio lighting - ensuring only soft shadows and a more evenly lit subject.

Image Source: Click Love Grow
Tip #7 - Pay Attention To The Catch Light
A catchlight is the reflection of the light source in the subject’s eyes. It’s a tiny detail but makes a huge difference as it makes the person look human and alive in the video.

Image Source: Picture Correct
So, you can position your lights in a way that your subject mimics the same look and feel when you’re shooting indoors. This is easily achievable with a 3-point set up.
Summing Up-
That’s a round-up of seven super-easy but super-effective video lighting tips that you can use to instantly make your videos look better and super-cinematic without having to buy or invest in a fancy camera or expensive lighting equipment.
You can now go ahead and shoot some cinematic videos and seamlessly edit them with InVideo’s online editor. If you’re serious about creating videos, you must check out our guide on 13 video transitions that will take your video edits to the next level.
And if you prefer learning via videos, you definitely should check out our YouTube channel, where we share daily video creation tips and tricks, the latest video trends and ideas and help you make more money as a video creator.
This post was written by Mrignayni and edited by Adete from Team InVideo