


Have you ever recorded a video with your phone, only to have it come out vertical when you wanted it to be horizontal? Or maybe it’s the other way around? More often than not, when shooting something as it’s happening, we don’t really have the time to stop and think whether “landscape” or “portrait” orientation is the best call for the moment, right?
Either way, it can be difficult to watch a video that has the wrong orientation. This is why It’s good to know how to rotate a video. You’ll need to especially know this if:
- you’re bringing in footage that is incorrectly aligned from your phone,
- looking to rotate your YouTube video,
- looking to flip or rotate a video for social media,
The good news is that it’s super easy to rotate or flip a video. In fact, with InVideo, you can do it in under 5 minutes!
In this guide, find out how you can rotate videos in Windows or Mac OS, on iPhone or on Android phones. Let’s dive in!
(1) The easiest way to rotate videos- online
(2) How to rotate a video in Windows
(3) How to rotate a video on Mac
(4) How to rotate a video on iPhone
(5) How to rotate a video on Android
(1) The easiest way to rotate videos- online
Whether you want to repurpose your YouTube video or just need to change video orientation in a jiffy, you can do it all online for free with InVideo. Just follow these simple steps to rotate your videos in mins:
Step 1: Sign up or log in to your InVideo account, here. Now you need to select the “Blank Canvas” Option. Next you need to select the aspect ratio that best fits your video. So if you want to rotate your video to portrait or vertical orientation, you need to select the 9:16 option. If you want to rotate your video to horizontal or landscape orientation, you have to select the 16:9 option. Finally, click the “Make a Video” button to launch the InVideo Online Editor.

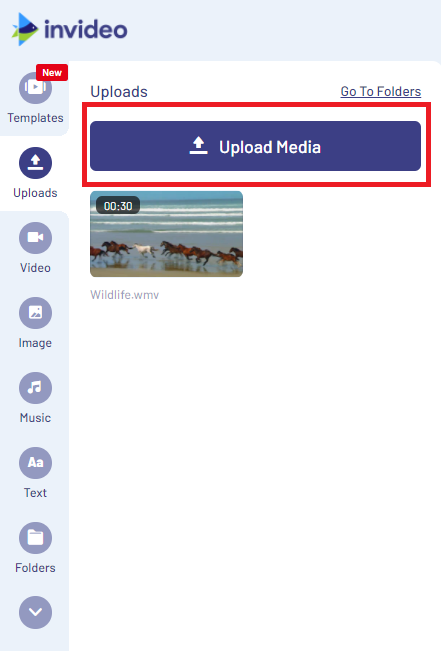
Step 2: Now that you have launched the InVideo editor, click on the “Upload Media” button on the left side of your screen and upload the video that you need to rotate.
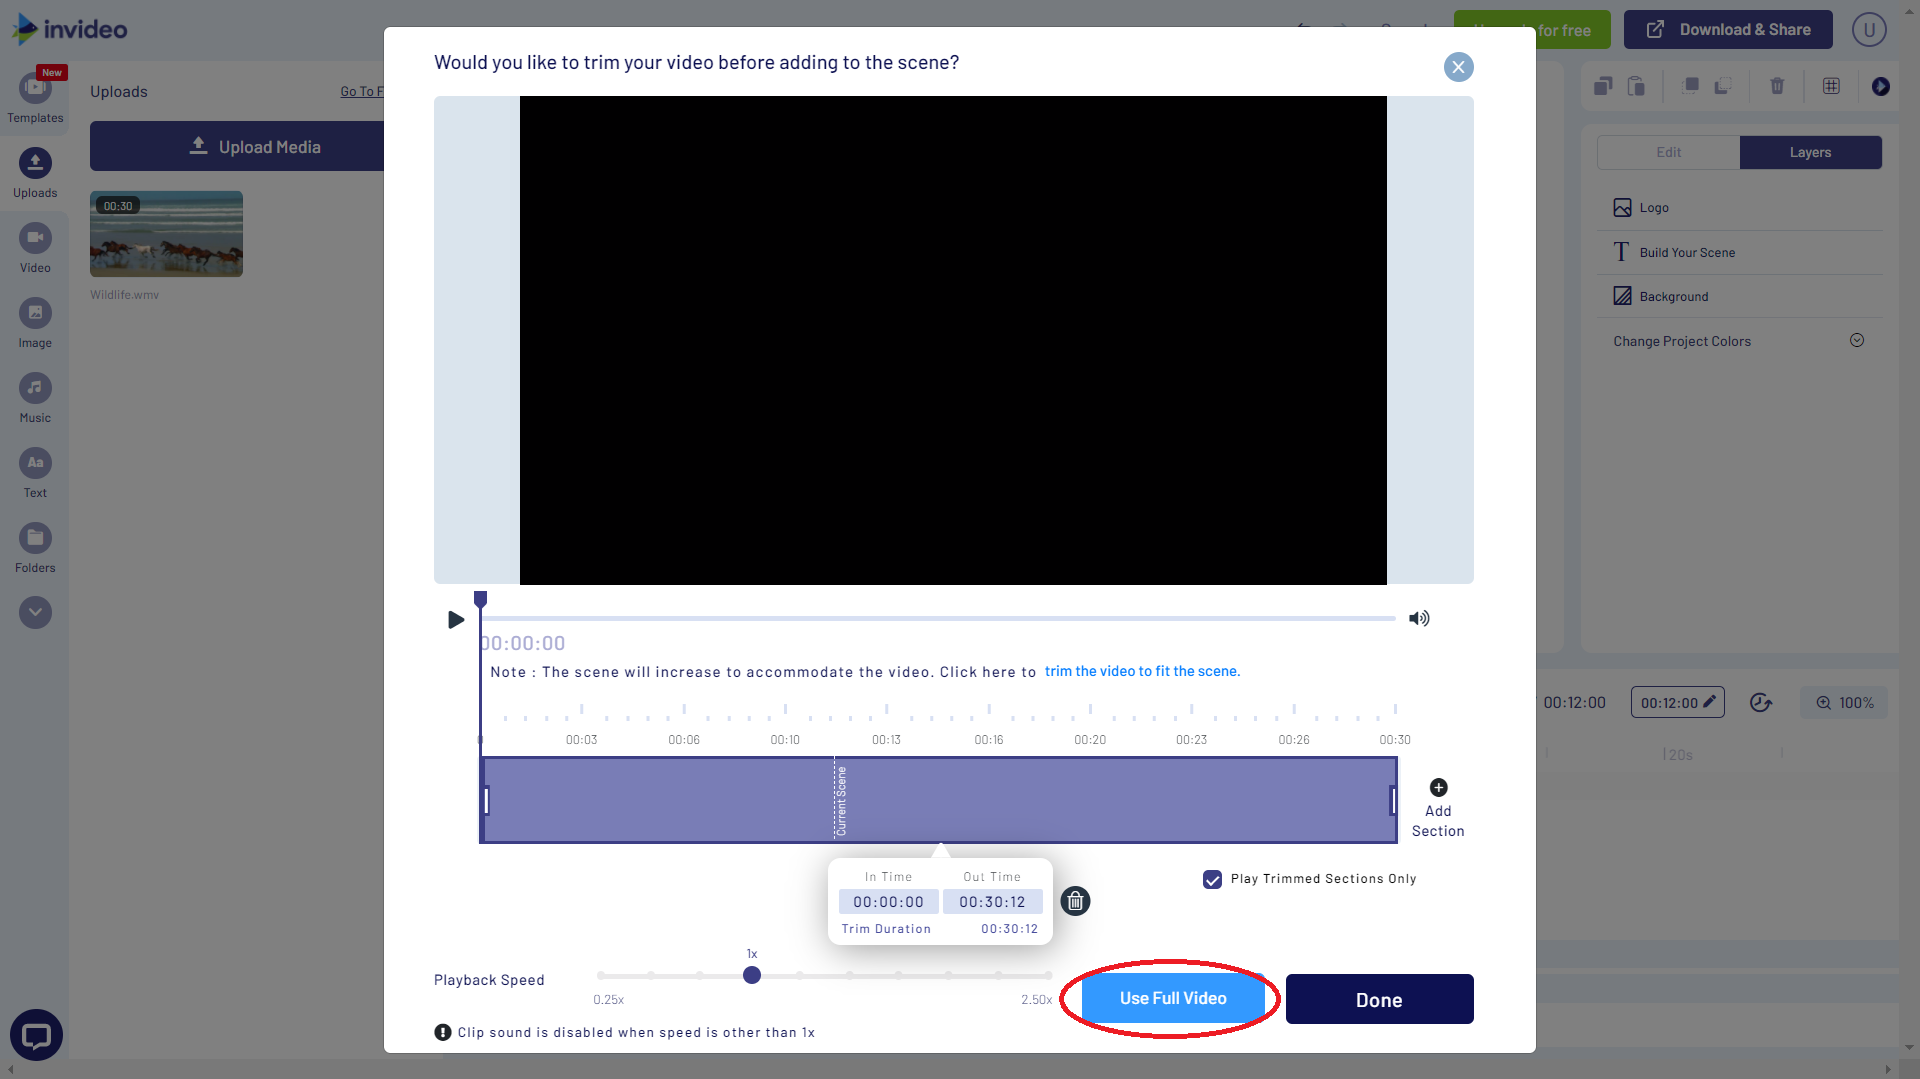
Step 3: Once uploaded, click on your video to add it to the timeline. You will now see the “trim video” window. You can just click on the “Use full Video” button to add your video to the timeline.
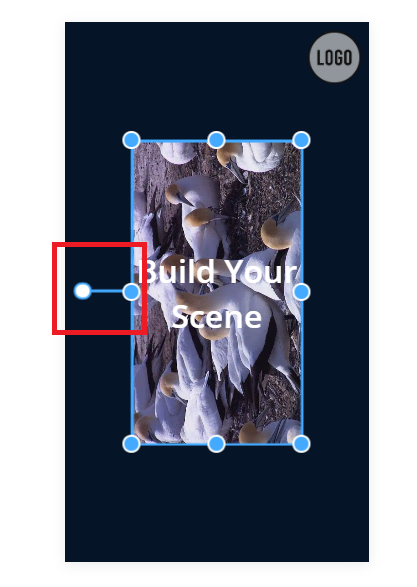
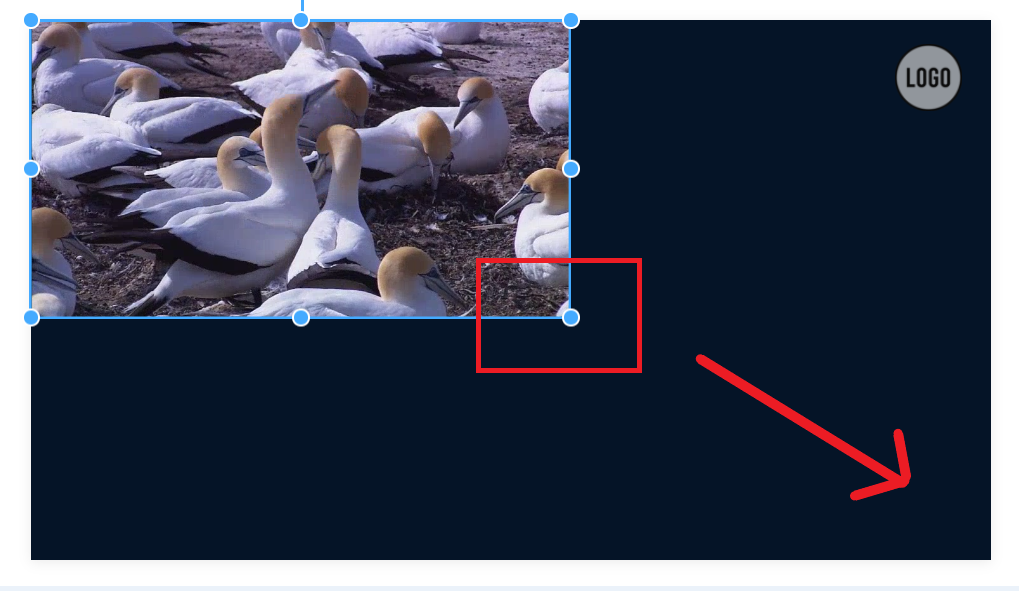
Step 4: Now you will see your video displayed in the timeline and on screen. You need to click on the video to select it. You’ll see a white dot above your video. Click on the white dot and rotate the video to whatever angle you want.

Step 5: Once you have dragged your video to the desired position, it will look like this.
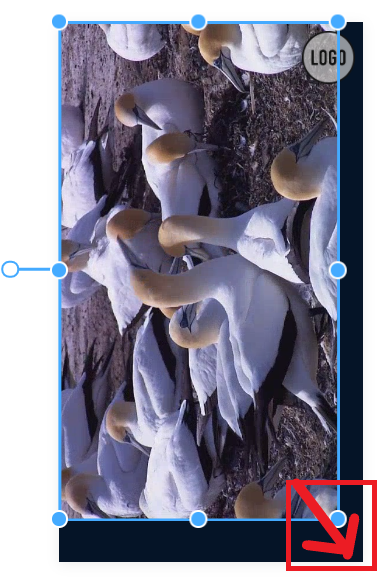
Step 6: Once you are satisfied with your rotation, you can then drag the edges of your video to fit the entire canvas so as to ensure there are no black bars on either sides of the video.
If you want to rotate your video to landscape (or horizontal) view, it will look like the image below.
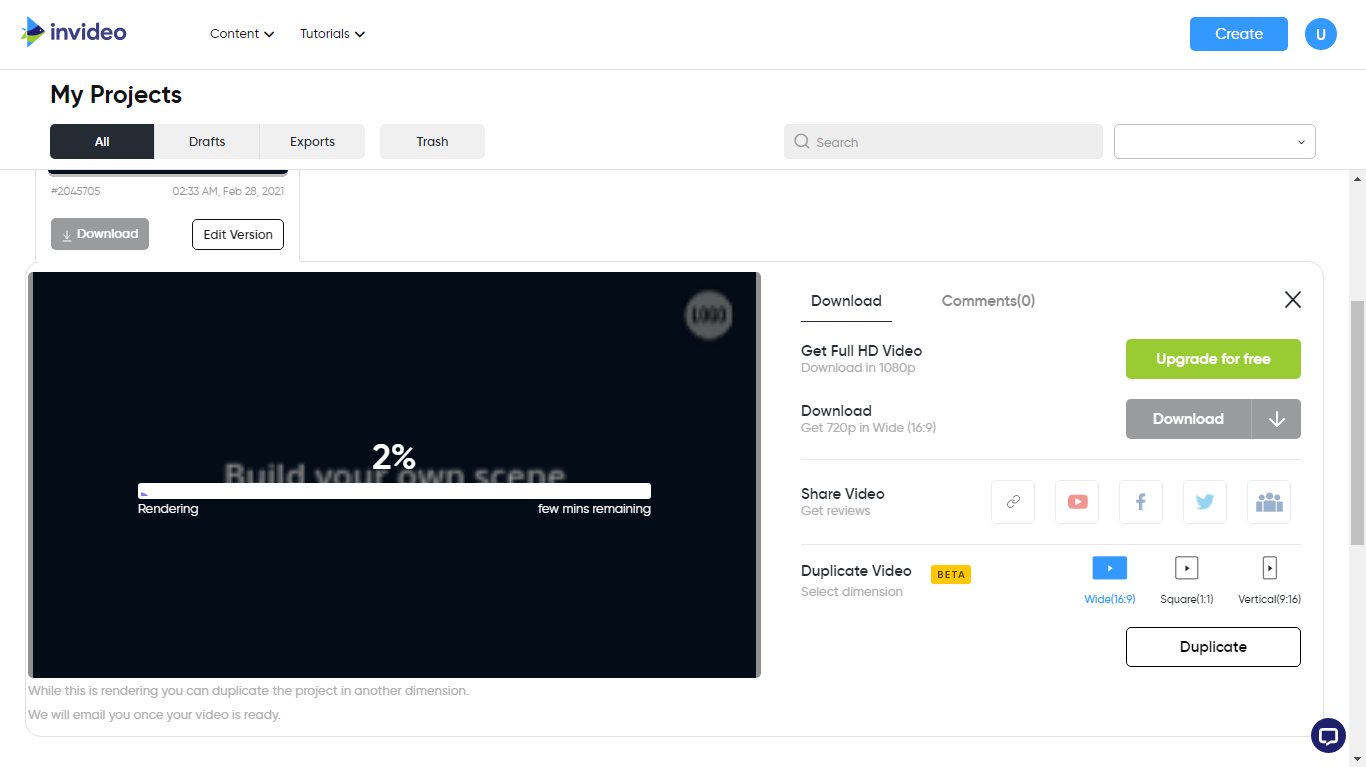
Step 7: Once done with your rotation, you can then click on the “Download & Share” and then “Export” buttons to download your video.

Step 8: On clicking the “Export” button, your video will start to render. You will see a page with various share and download options (as shown in the screenshot). Click on the “Download” button to download your rotated video. Or share it via social media through the many plugins provided. That’s it.
This is the simplest way to rotate your videos without having to learn any pre-installed software. However, in the event you are offline or don’t want to use an online tool, read along to find out how you can rotate videos on Windows and Mac using locally installed softwares.

(2) How to rotate a video in Windows
There are few ways to rotate a video on Windows, depending on your system.If you are using a Windows 10 system, you can rotate a video quite easily using the in built video editor – a part of the Windows photos app. Windows 7 users can rotate video using Movie Maker. Finally, you can also use the VLC player to rotate a video. Let’s dive into each method.
1. How to rotate a video in Windows 10 using Video Editor
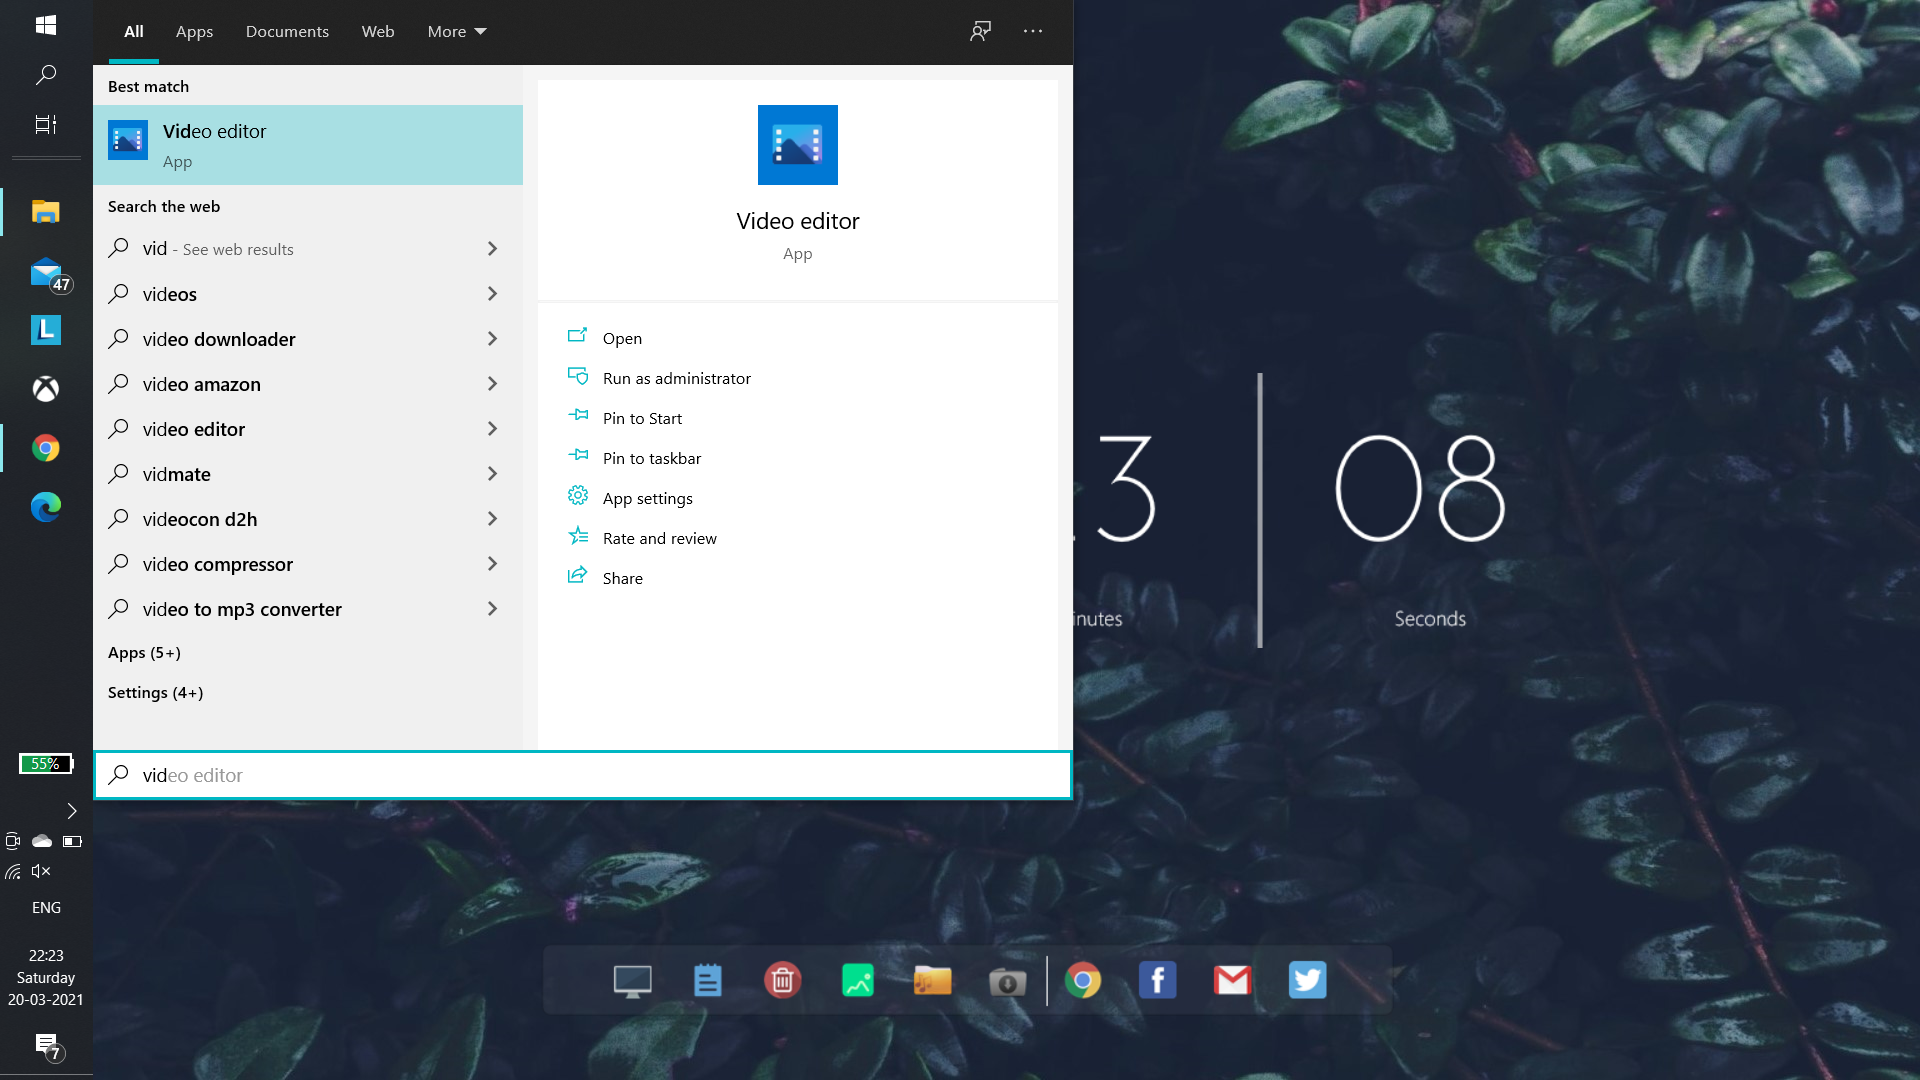
Step 1: Launch the Video Editor app on Windows. You can go to the windows start menu and type “video editor” to launch this app.
Step 2: Once launched, click on the “New Video Project” button to start.

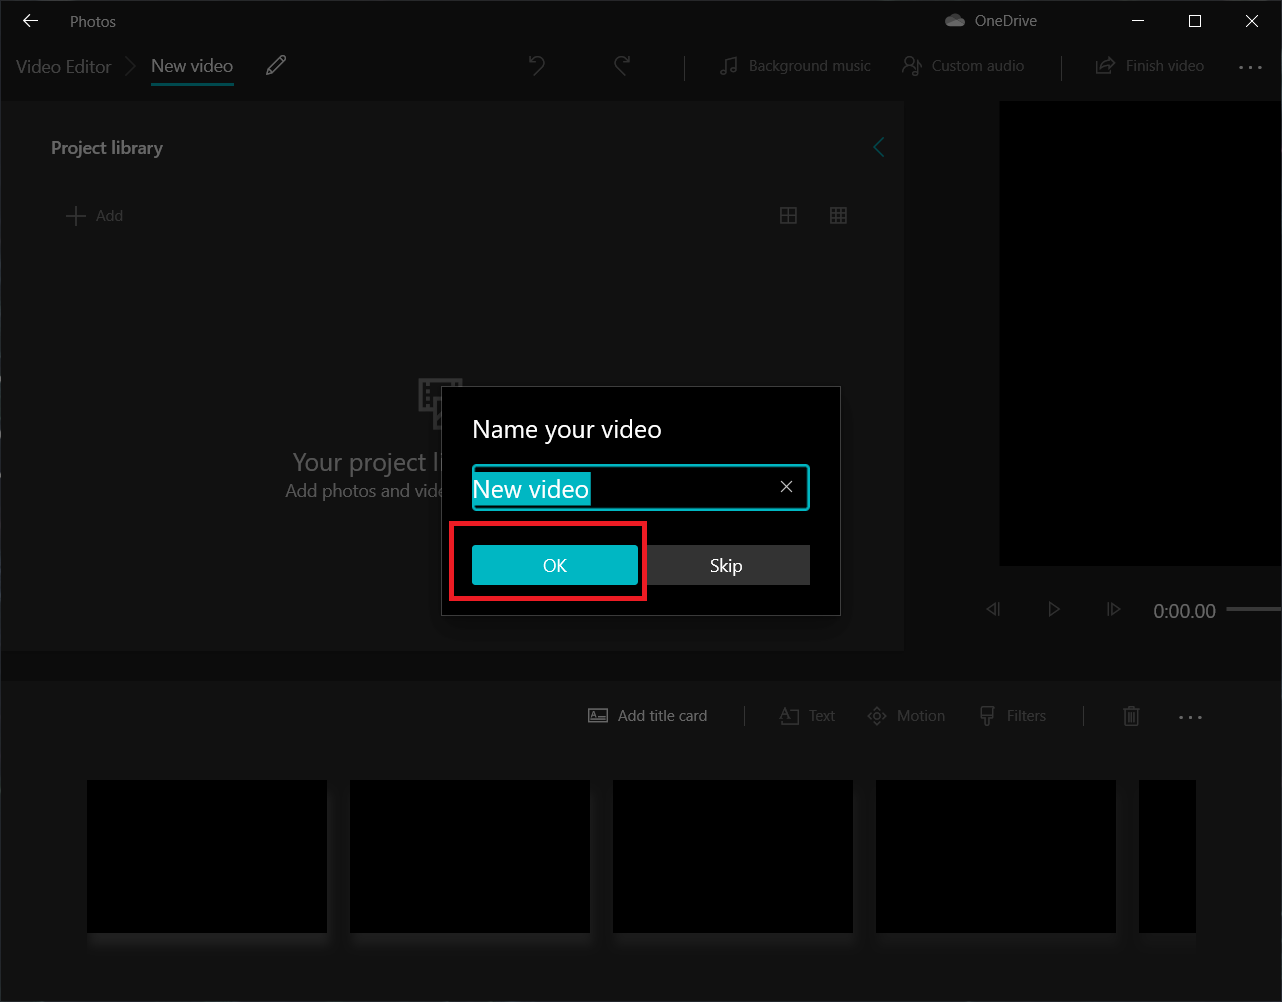
Step 3: Save the name of your new project and click “Ok.”
Step 4: Next click on the “+” sign or the “Add” button and add/ import the video you wish to rotate. You can also drag and drop a video file into the workspace (top left empty space) in the video editor to import your video.

Step 5: Once imported, you’ll see your video file in the top left part of the screen. You need to add it to your editor storyboard. You can do this by clicking on the “Put in the storyboard” button or just dragging your video file into the first square box in the bottom of your video editor.

Step 6: You will now see your video in the viewer on the top right side of the editor screen. Next you need to click the rotate button from the tools section.

Step 7: Your video will now be rotated 90 degrees. You can rotate it as you wish.
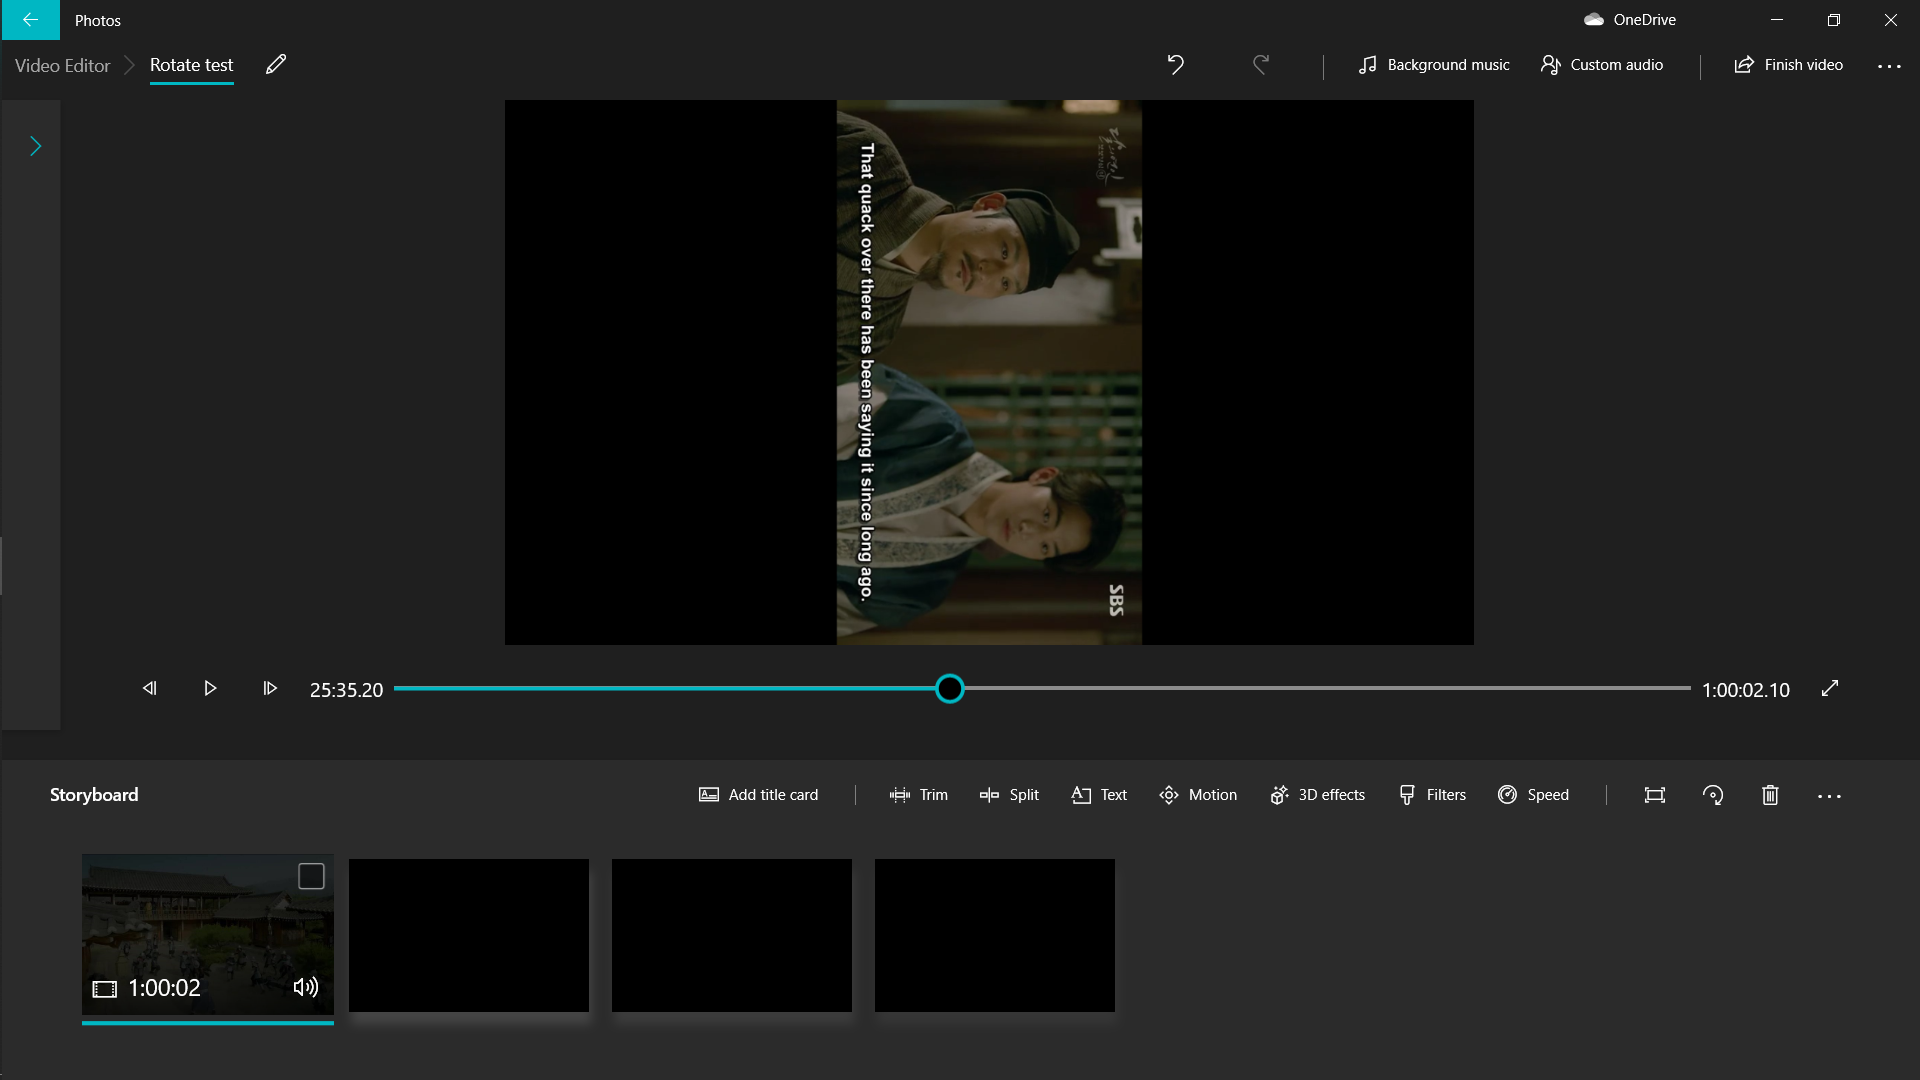
Pro Tip: Note that if your video is originally in the landscape or horizontal orientation and you rotate it 90 degrees to change it to vertical or portrait orientation, your final video will have black space on both sides of the screen, as shown in the image. If you want to avoid this and optimise your video for Instagram, TikTok or any vertical viewing platform, the InVideo Online Editor offers a much better solution.
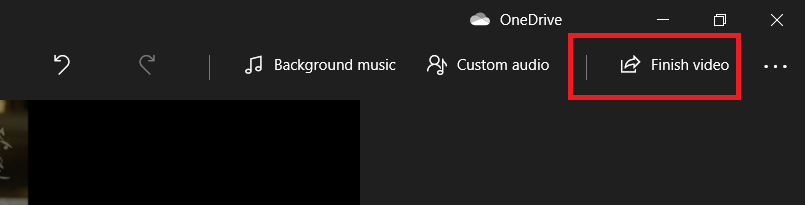
Step 8: Once you are done with rotating your video, you can click on the “Finish Video” button on the right corner of your editor.
Step 9: Now select the resolution you want to download your video in and click the “Export” button.

It may take from a few seconds to a few minutes to render the file depending on the length of your video. That’s it though. Simple enough right? Now let’s check out how you can rotate videos in older versions of Windows.
2. How to rotate a video using Windows Movie Maker
If you are using a Windows 7 or a Windows XP system, you already have Windows Movie Maker pre installed into your system. There is a very simple solution to rotate a video using Windows Movie Maker. Let’s check it out.
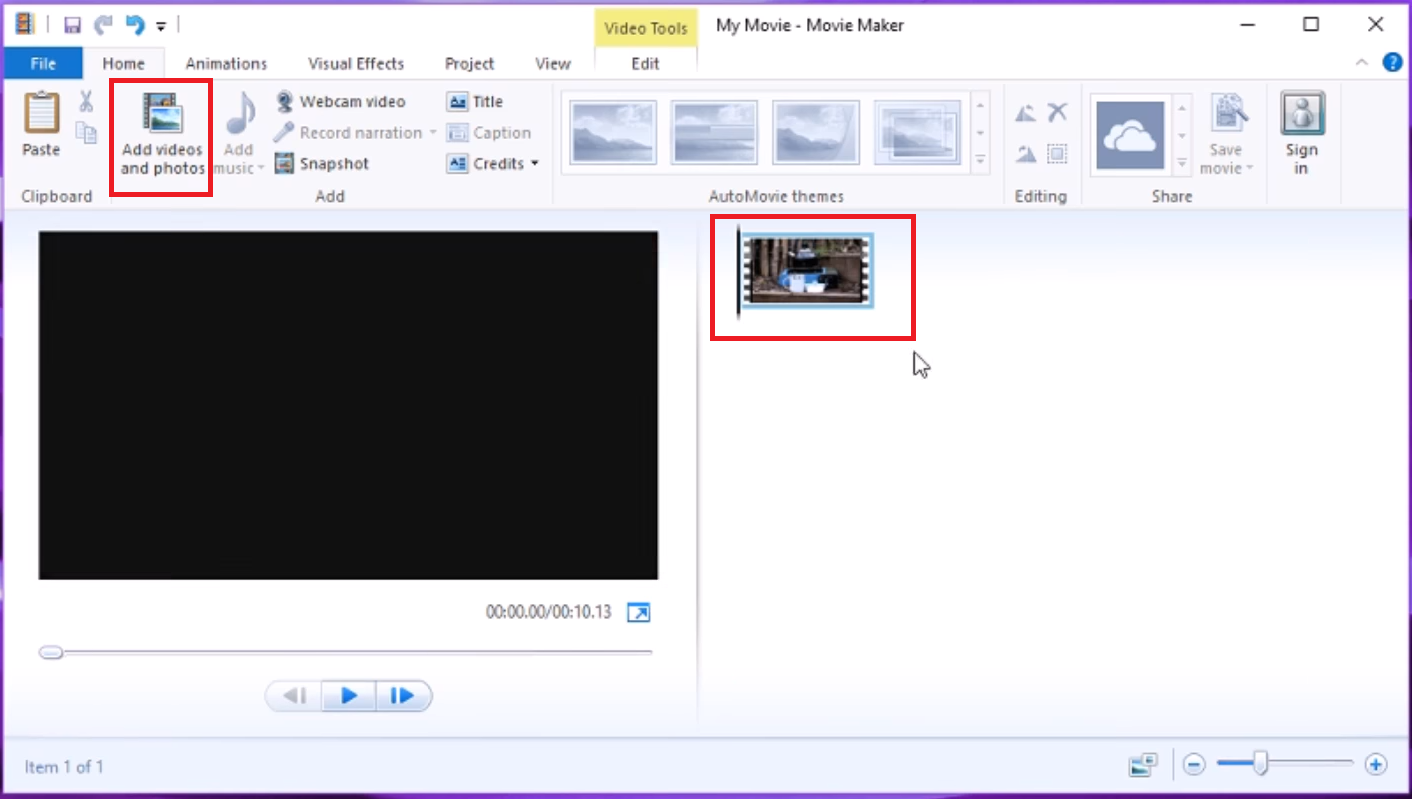
Step 1: Launch Windows Movie Maker and import the video you want to rotate first by dragging your video onto the Movie Maker workspace or clicking the “Add videos and photos” icon.
Step 2: It may take some time for Windows Movie Maker to process your video. Once it is ready, click the “Rotate right” or “Rotate left” icon, depending on the current orientation of your video.

Step 3: That’s it! You now have your video rotated. But to make this change permanent you need to save your video. To do so, click the “Save movie” icon and choose the option that suits you best. That’s it and you’re done.

Whether or not you have access to Video editor or Movie Maker, you will certainly have access to the VLC player. So next, let’s move on to how you can rotate video with VLC Player.
3. How to rotate a video using VLC Player
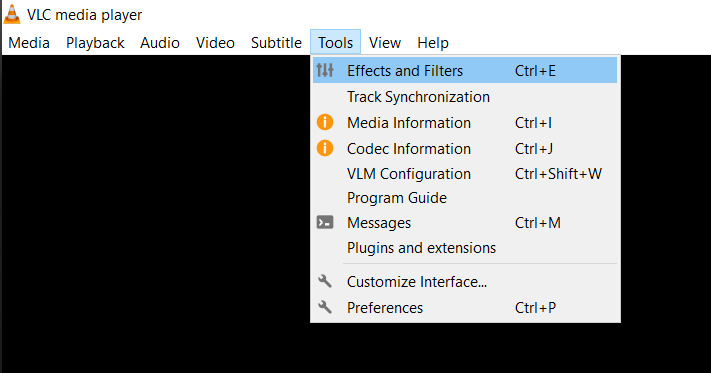
Step 1: If you don’t have VLC player, download it here. Once done, launch VLC player and navigate to the “Tools” menu and click on the “Effects & Filters” option.
Step 2: You will now see the “Adjustment and Effects” window pop up. Next go to the “Video Effects” tab.

Step 3: Now go to the sub tab in Video Effects that says “Geometry.” If you do not see the sub tab immediately, use the arrow keys in the right corner to scroll and find it.

Step 4: Check on the checkbox beside the text that says “Transform”. Here you will find options to do the following to your video:
i) Rotate by Fixed Angle: Click on transform, to rotate a video by a certain fixed and a standard number of degrees: 90, 180 and 270 degrees. Those can be selected from the drop-down after you check the transform button.
ii) Flip Videos: From the drop-down select on “Flip horizontally” or “Flip vertically” to flip the videos in those directions.
iii) Transpose: Click on “Transpose” and “Anti-transpose” from the same drop-down to flip as well as rotate the video. Transpose is when your video is rotated 270 degrees clockwise and flipped horizontally. Anti-transpose is the result when your video is rotated by 90 degrees clockwise and flipped horizontally.

Step 5: You also have another option of manually adjusting the angle of your video rotation. For this, check on the checkbox beside the text that says “Rotate”. Move the angle dialer around. Your video will be rotated by a certain arbitrary degree.

Step 6: Once you are done with rotating your video, hit save to view the edited video. Note that this process will only allow you to view a rotated video in VLC. To make this rotation permanent and save the video on your system, check out the next steps.

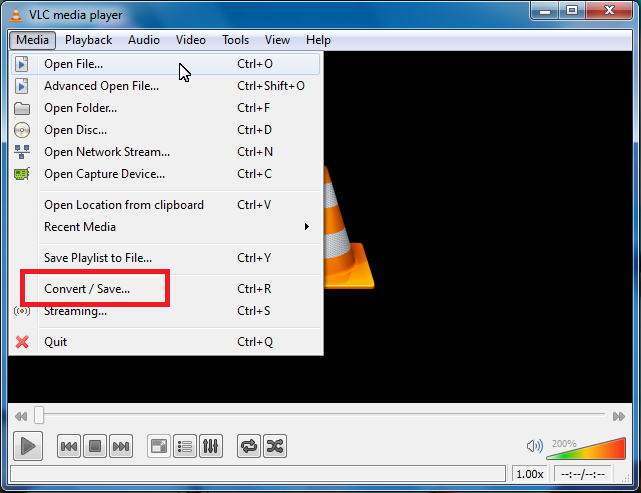
Step 7: From the menu bar, go to Media > Convert / Save.
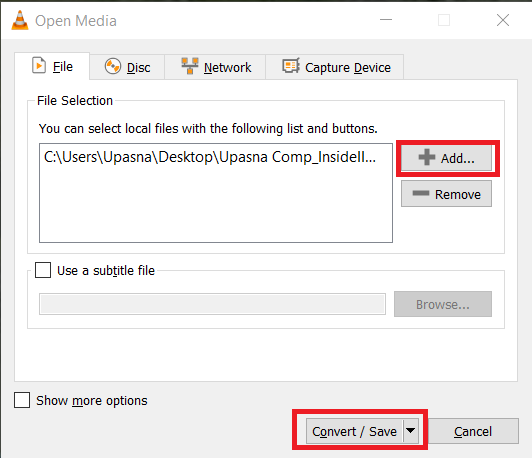
Step 8: Next click on the “Add” button, and browse and add the current video that you rotated. Now click on “Convert/ Save.”
Step 9: In the Convert dialog, click on the “Settings” icon next to the Profile.

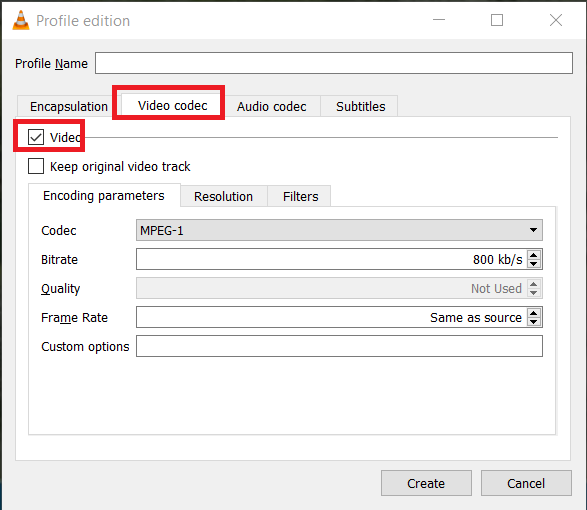
Step 10: Now navigate to the “Video Codec” option in the menu. Make sure that the Video option is checked.
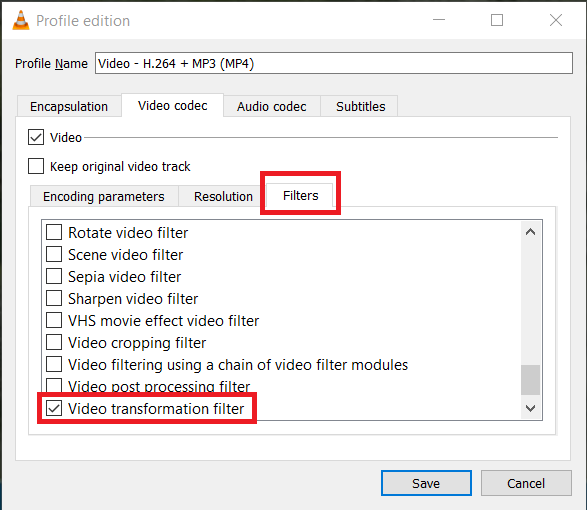
Step 11: Now navigate to the “Video Filters” Option and Check the “Video Transformation” filter.
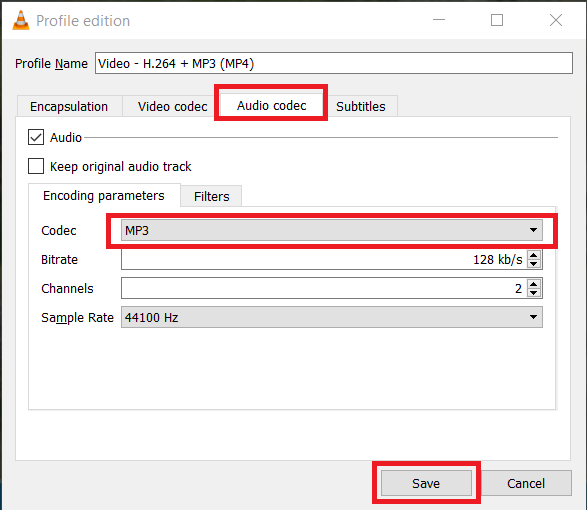
Step 12: Next, switch to the Audio codec tab, and choose MP3 as the Codec under Encoding parameters. Once done, hit the “Save” button.
Step 13: You will now be able to see the Convert dialog box once again. Now you need to choose a Destination file and press the “Start” button for VLC to start saving for video.

These were the most common methods to rotate a video on Windows. Now let’s move on to Apple’s Mac OS.
(3) How to rotate a video on Mac (using QuickTime Player)
You can easily rotate your videos on a Mac using your inbuilt QuickTime Player. Let’s check out how.
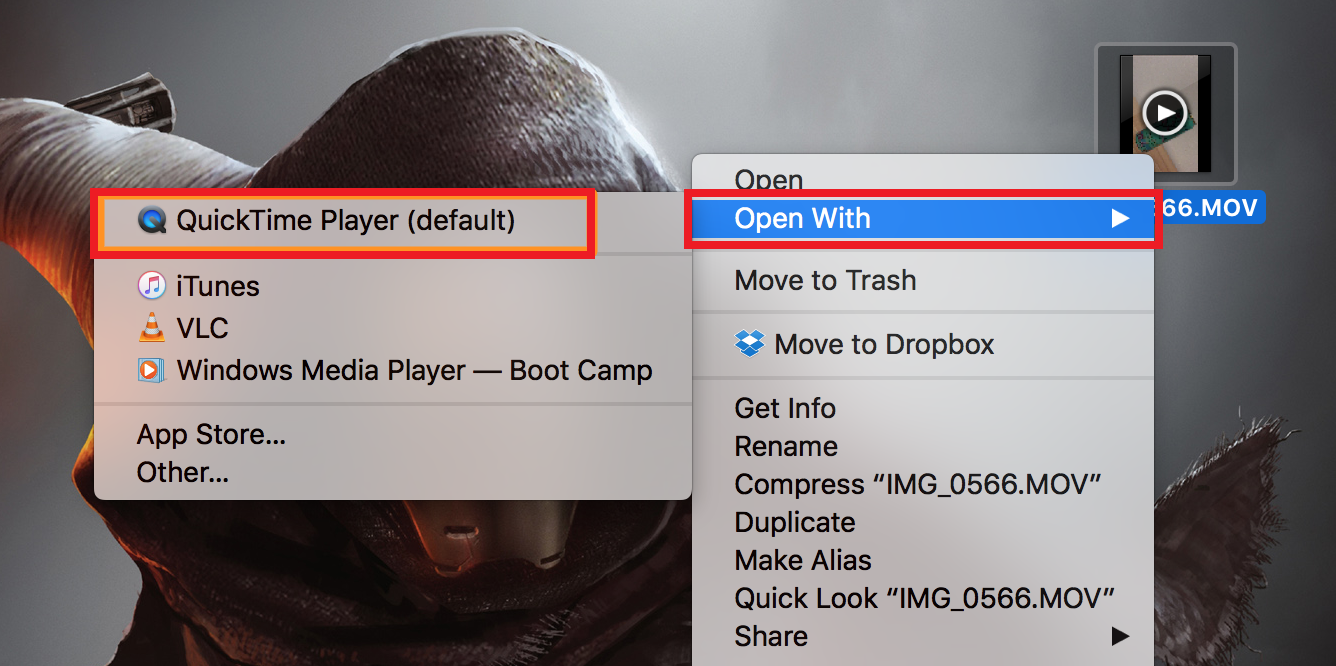
Step 1: First, open your video with QuickTime. This program is capable of opening the videos created by most cameras and phones. Right click on the video and click “Open With>QuickTime Player.”
Step 2: Next, click “Edit” in the menu bar, then “Rotate Right,” or whatever rotation is appropriate in your case.

Step 3: When you are done, you’ll have the video oriented the way you want it. Now in order to save it, you need to go to File > Export in the menu bar.

Step 4: Add the name you want to save your file as, check the destination folder and hit the “Save” button. QuickTime will not overwrite your original video, so you can save the new version anywhere you want. That’s it.

Pretty quick and easy to rotate a video on the Mac OS using QuickTime right?! But you can also rotate a video easily on your iphone. So next, let’s look at how you can rotate a video using your iPhone.
(4) How to rotate a video on iPhone
You can easily rotate a video on your iphone using your in-built photo/ video editor. Let’s check out how to rotate a video using the iPhone’s step by step.
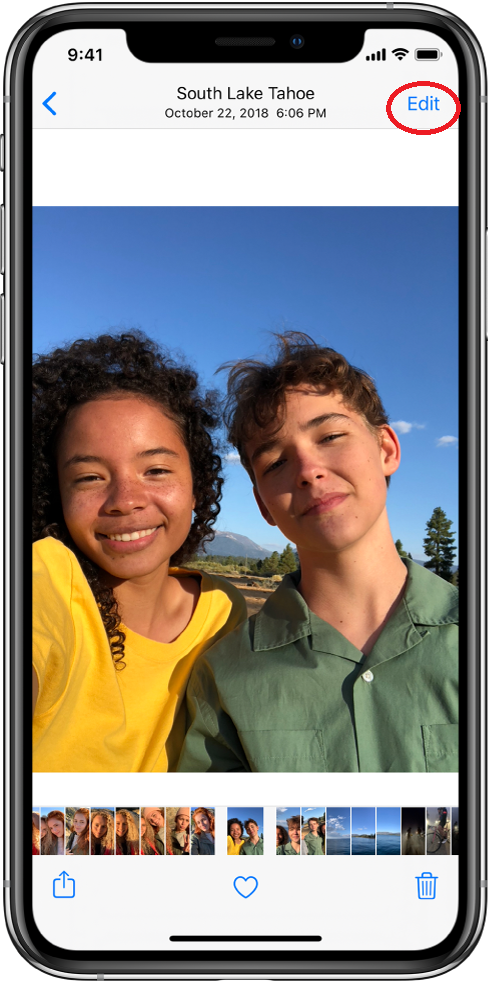
Step 1: Open the photos app on your iPhone and select the video you want to rotate. You can find your video at Photos>All Photos. Next, tap the “Edit” button on the top right corner of your screen.
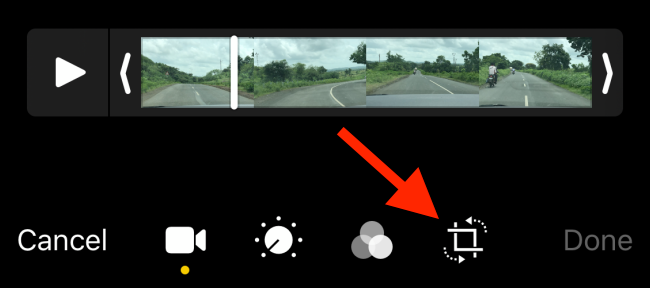
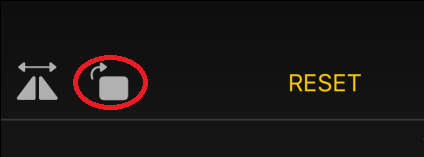
Step 2: Tap the “Crop” icon in the right bottom of your screen next. This is the square icon with two arrows surrounding it pointing counterclockwise.
Step 3: Next tap the “Rotate” icon on the top left corner of your screen. This is the button that has a square with an arrow around it pointing clockwise. If you need to rotate the other way, simply tap the button two more times.
Step 4: Finally, once you are satisfied with your rotation edit, tap “Done” on the bottom right corner of your screen. Your rotated video will be visible to you now in your Photos app!

Now let’s move on to rotating videos on android devices.
(5) How to rotate a video on Android
There are various android apps you can use to rotate your videos. You can also use your native photo or video app to rotate videos. But for this guide, we are going to look at one of the most used video editors on android phones – The Google Photos editor. If your device is relatively new, then it should have come with Google Photos pre-installed straight out of the box. If it didn’t, you can download the app for free from the Play Store.
Let’s check out how you can rotate a video on android phones using Google Photos.
Step 1: Open Google Photos and find the video you wish to rotate.

Step 2: Tap and select the video you wish to rotate. Next, tap on the “Edit” icon (bottom center of your screen).
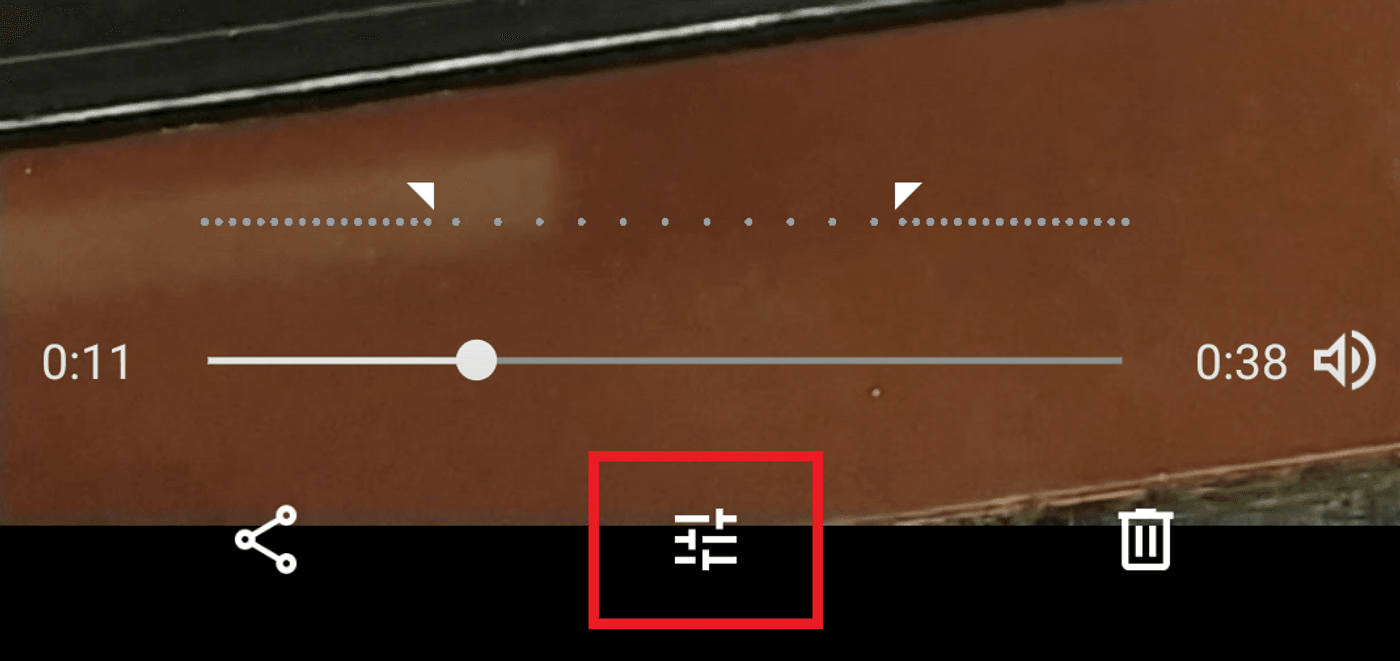
Step 3: Next hit ‘Rotate’ (on the right hand bottom corner of the screen) until the video takes the orientation of your preference.

Step 4: Once done with rotating your video, tap “Save A Copy” on the right hand top corner of your screen. The App will process and save the video.

Note that Google Photos essentially stores your photos and videos on the cloud. You can access them from any device by just logging in to your Google account. If you are unfamiliar with the app, all you have to do is open it, log in to your Gmail account, and set your Backup & Sync settings. Here’s a quick tutorial of how the app works.
And that’s a wrap. As discussed earlier, these are the 5 ways you can rotate your videos. If you found this article helpful, make sure to share it with your friends and team members!
For more quick tips and hacks on editing and creating videos, subscribe to InVideo’s YouTube Channel. Finally, if you’re looking to create thumb-stopping videos in minutes (even if you’re not a PRO)- sign-up for a free account on InVideo.io today.
This post was written by Upasna and edited by Abhilash from Team InVideo