


Imagine viewing a stunning nature documentary on BBC One without David Attenborough’s voice (or any voice in general). How utterly boring would that be? There would be no context and the audience would not be able to connect with what they are viewing.
If you’ve ever shot an explainer video, an unboxing video or a product video, you know how indispensable voice overs can be. A well crafted voice over helps you:
- Impart validity, reliability and authority
- Provide direction to your video
- Helps your audience connect to what they are viewing
- Set the mood and form an emotional connection with your audience
- Make effective call to actions
- Make up for missing shots, footage or elements in your video
But how exactly do you record and add a voice over to your videos? It is not as tedious as it sounds. You can add a voice over to your videos quite easily from the comfort of your home – all you need is a quiet space, a good mic, and an editor like invideo to put it all together. So, to help you with creating awesome voice overs for your videos, we will take you through all these steps in this article.

We will cover:
1. How To Record A Voice Over
2. How To Add A Pre-Recorded Voice Over To Your Video On InVideo
3. How To Add An Automated Voice Over To Your Videos
4. Pro-Tips For Adding A Voice Over To Your Videos
Let’s get started with how to add a voice over to your videos!
1. How To Record A Voice Over
Recording a voice over is crucial to how your video turns out. It’s super important therefore that you not only pay attention to how you are recording but what you are saying in your voice over. A good idea is to prepare a script beforehand so that you have that ready, in front of you when you sit down to record. We will cover this point in detail later in the article but for now, once you have your script ready, you will need to do two things:
#1 - Find a Quiet Spot
When sitting down to record, you want to do so in a space where you will not be interrupted by environmental sounds such as birds chirping or wind gushing, ambient sounds such as those from your air conditioners or traffic, or sounds of other people. Most good microphones can pick up even the faintest of sounds so you want to be super careful of this.
Another aspect you want to pay attention to is that the room you’re recording in doesn’t have echo. So avoid recording in a room with bare walls. You ideally want to sit in a place that has furniture, which can absorb some of the echoing.
If you don’t have a space like this readily accessible, a small hack you can try is putting thick blankets on your walls to absorb some of the environmental sounds.
Once you’ve finalized where you’re going to record your voice over the next step is to finalize what microphone you’ll be using.
#2 - Choose the Right Microphone
For most professional videos, it makes absolutely no sense to record your VO using the in-built mic on your laptop or phone. While these are great for video calls and skype meetings, they don’t produce the best quality audio for professional videos.
And if you create professional videos regularly, it makes a lot more sense to invest in a decent microphone that is going to last you long. To cut your work short, after thorough research, we’ve selected 2 microphones that are best for recording voice overs.
A. Blue Microphones Yeti Pro USB Condenser Microphone
The Yeti Pro combines a beautiful build with an affordable price tag. It offers both - USB & XLR connectivity and has one of the best audio quality in a USB mic. The Yeti Pro cost around $249.99. If that is a little off your budget, you can also opt for the Blue Yeti, which boasts of similar features but at a lower price point of $129.99.
B. Neumann TLM103
If you’re looking for a high-end microphone, look no further than the Neumann TLM103. If you have the budget, you might never have to worry about audio quality with this device at your fingertips. It’s a great condenser mic to add to your home studio and costs approximately $1,299.95.
Now that you’re all set in your disturbance-free space along with a microphone of your choice, let’s look at how to add a voice over to your video using InVideo:
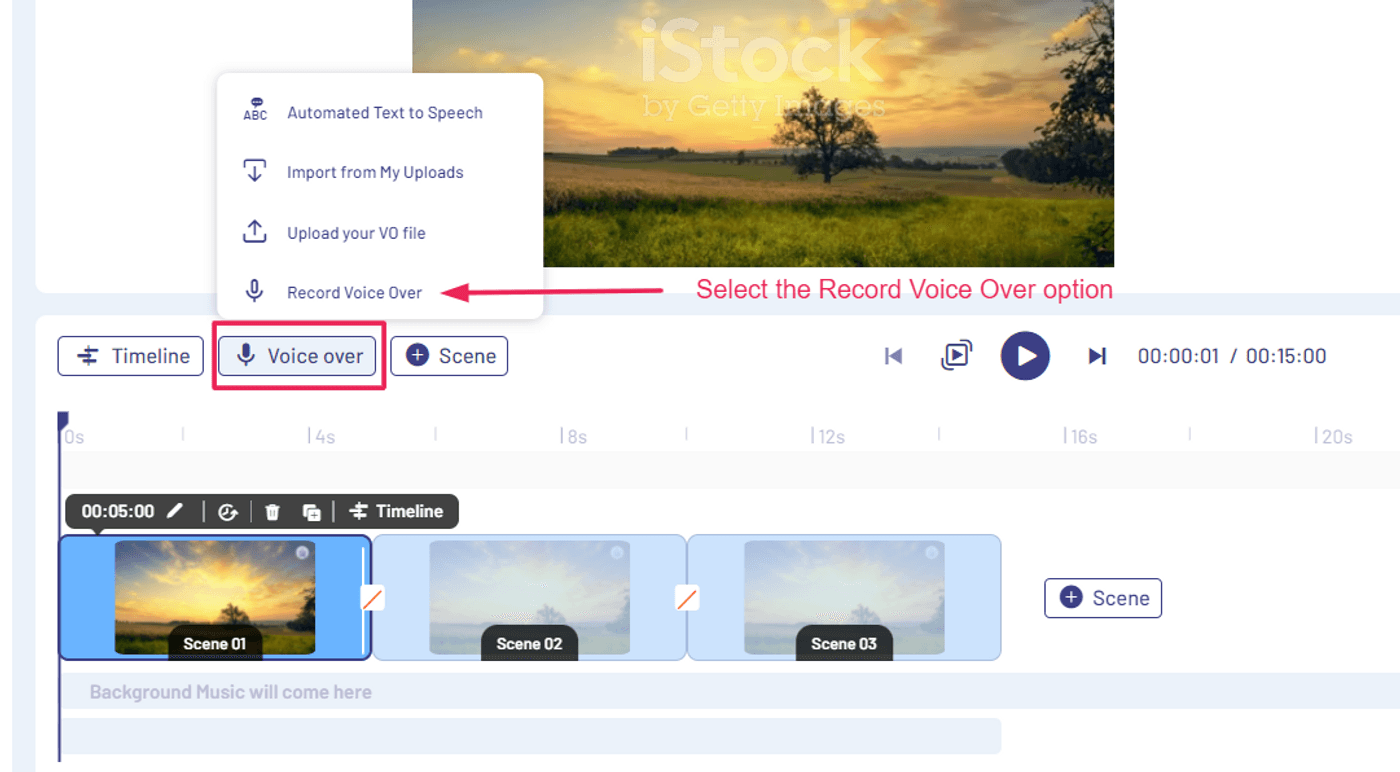
Step 1: Once you have added your video to the invideo editor, click the Voice Over button on the dashboard and select Record Voice Over
Step 2: When you’re ready, click on the red Record button. After a quick countdown, you can begin recording your voice over. Ensure you have your script in front of you so that you can avoid fumbling and awkward pauses. When done, click on the red Stop button to end recording.
Step 3: Next, you can preview your recording by hitting the play button to check for quality or hit the Record button to record again. If you’re satisfied with the output, click on Add at the right-most corner to add the recording as a VO.

Step 4: Your recorded voice over will appear at the bottom of your dashboard. The best part about recording a voice over using the InVideo editor is that you can record in parts and move the cursor/seeker to begin recording where you left off.

You can also choose to trim, loop, duplicate or adjust the volume of your recording by clicking Edit on the recorded voice over.
Once done, you can click on Download & Share at the top right corner to export your video with the voice over.
That’s how easy it is to record and your voice over to your videos online in just 4 steps. But what if you have to add an already-recorded voice over to your video? Perhaps because of a client requirement or because someone else is recording the voice over and sending it across to you. Here’s how you go about that:
2. How To Add A Pre-Recorded Voice Over To Your Video On InVideo
If you have a voice over recording ready, adding it to your video clips is super easy to do using InVideo’s online video editor. Follow the steps below to do that:
Step 1: Once you have uploaded your video to the InVideo editor, click on Uploads on the left hand dashboard and select Upload Media. Go on to upload your pre-recorded voice over from your system.

Step 2: Once your recording has been uploaded to the dashboard on the left, click on the 3 ellipses next to the uploaded file and select Add as VO.

Step 3: Once the voice over appears at the bottom of your dashboard, you can preview it by hitting the Play button or choose to trim, loop, duplicate or adjust the volume of your recording by clicking Edit on the VO bar at the bottom.

Once done, you can click on Download & Share at the top right corner to export your video with the pre-recorded voice over.
We’ve now shown you two ways to add a voice over to your videos. But what if you don’t have a good mic or a voice actor who can record a VO for you? This next method will help you out in all of these scenarios. Let’s have a look.

3. How To Add An Automated Voice Over To Your Videos
Don’t have a voice actor? Don’t want to use your own voice? In this case you can actually add an automated voice over to your videos by using InVideo’s automated text-to-speech feature by following these simple steps. For this method, you don’t need any recording equipment or even another person. All you need is your voice over script and you’re ready to get started.
Here’s how you can add an automated VO to your videos:
Step 1: Click on the Voice Over button in the bottom dashboard and select Automated Text to Speech.

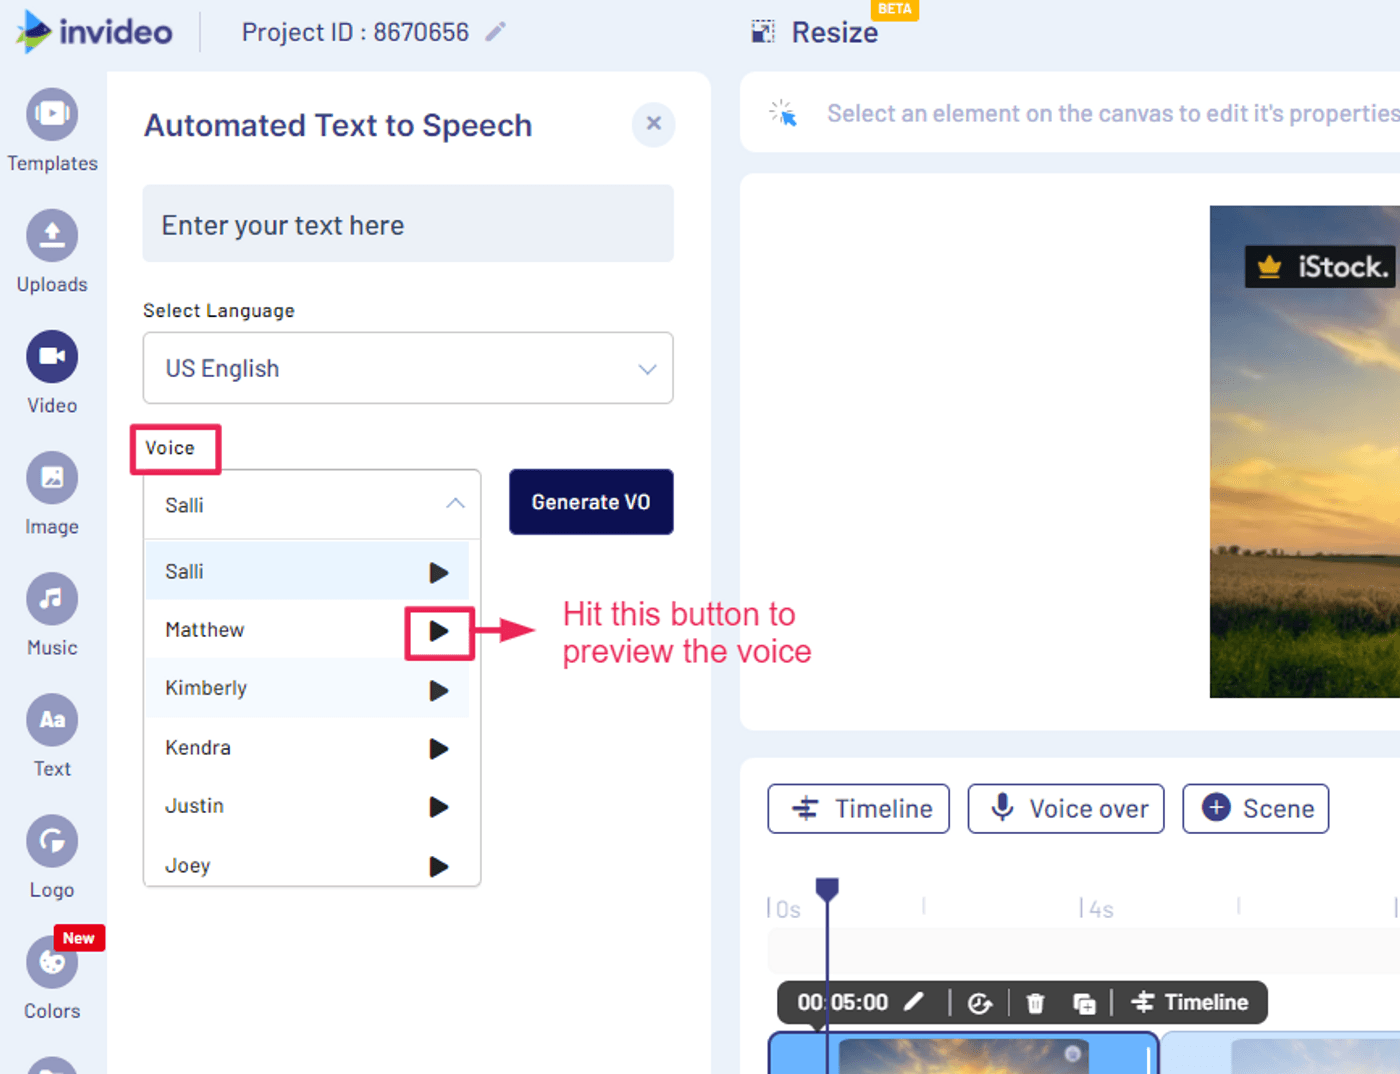
Step 2: Next, you will see the Automated Text to Speech menu open on the dashboard to the left. Here, you can select a language of your choice.
Step 3: Once you select the language, you can browse through the different voice options and hit the play button next to each of them to know how they sound.
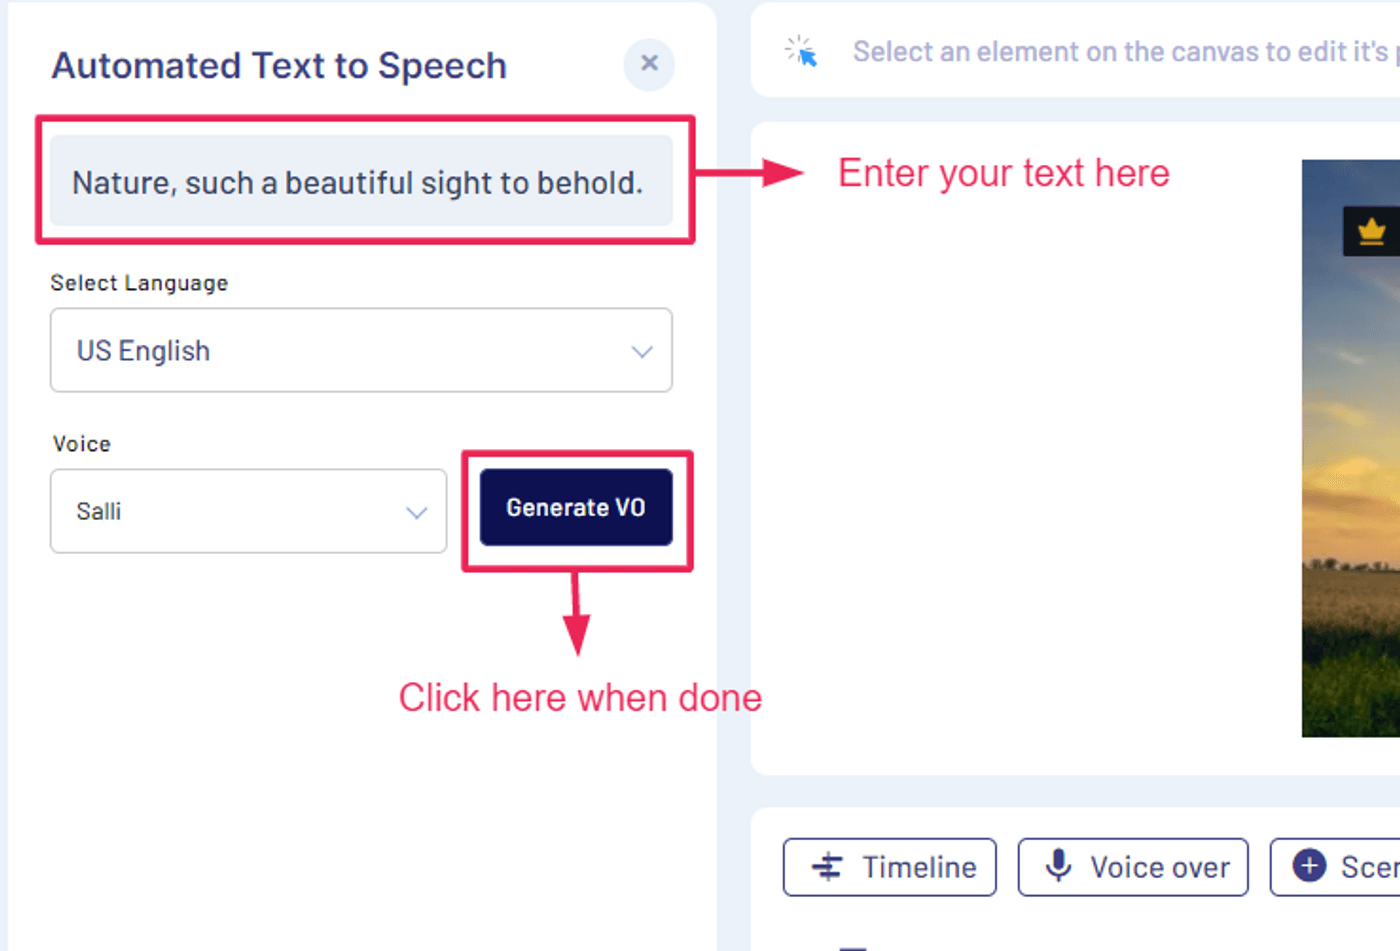
Step 4: To convert your text into a voice over, begin entering your text, line by line in the text box. This is where your script will come in handy. If you already have everything ready, you will just need to copy and paste the lines from your script into the text box. Once done, click on Generate VO.
Note: Make sure you use full stops and commas to indicate pauses in your sentences for the AI to pick up. .
Step 5: Once done, you can preview the voice over by hitting the play button. If it sounds good to you, you can add the voice over to your video by clicking Add VO to Scene.
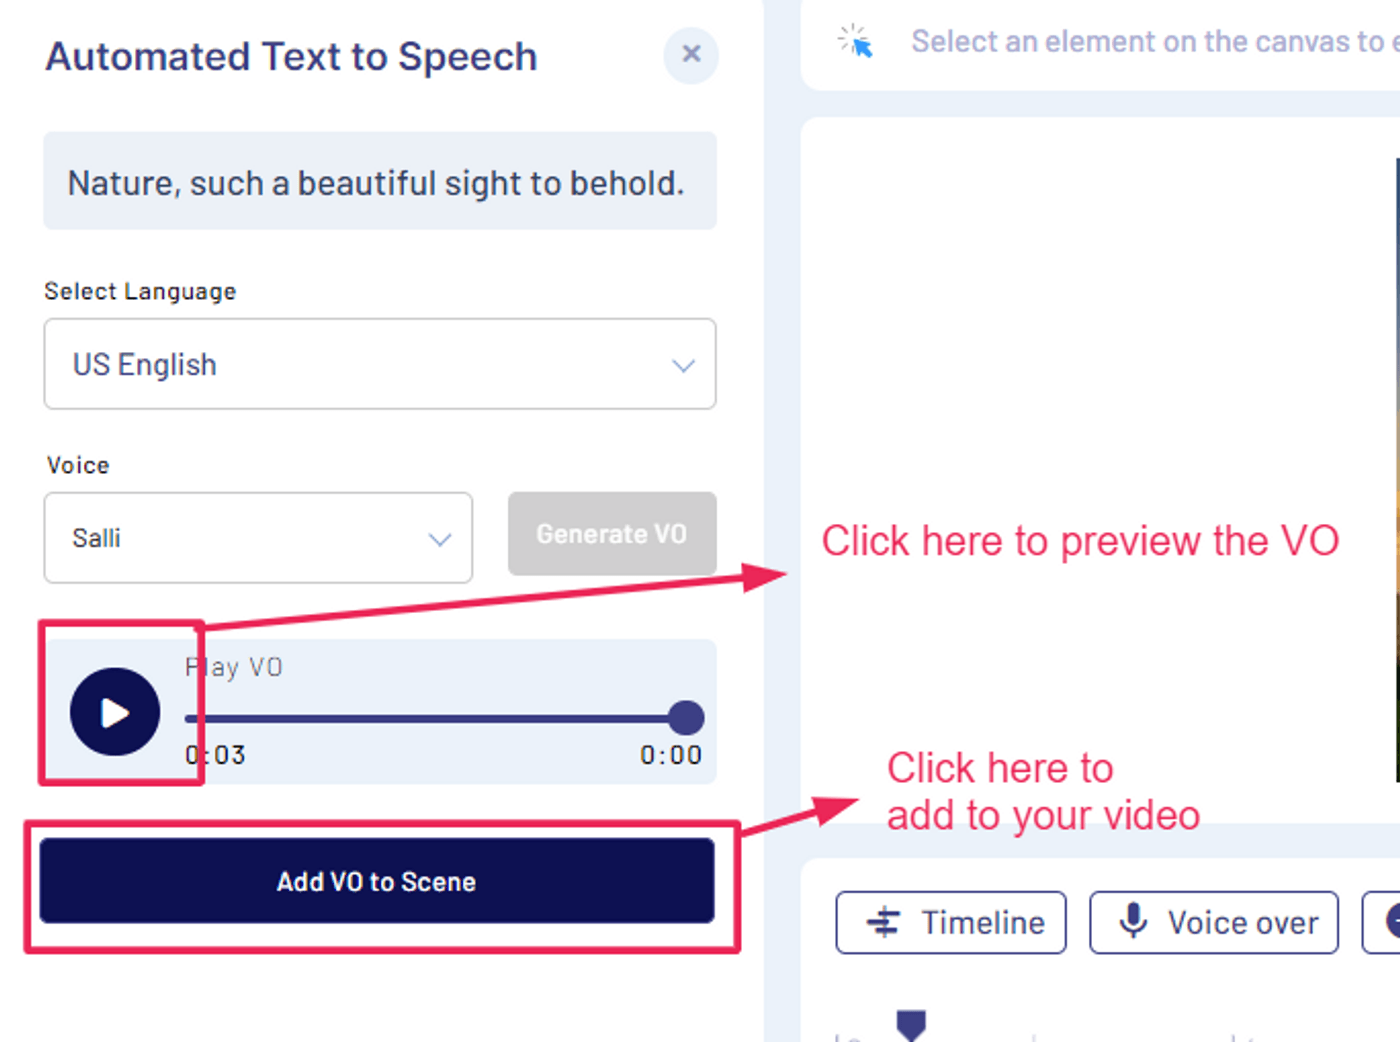
The VO will appear in the bottom dashboard where you can choose to edit, trim, duplicate, loop or adjust its volume. Once done, you can click on Download & Share at the top right corner to export your video with the automated voice over.
Now with those three different methods, you can easily record, add and edit the voice overs in your videos. But before you get started, let’s go over some of the most important things you need to keep in mind while adding a voice over to your videos.
4. Pro-Tips For Adding A Voice Over To Your Videos
What separates a good voice over from a bad one? You would think that audio quality is at the top of the list but while that is important, there are several other things that add to the quality of your voice over. Let’s take a look.
Tip #1 - Script
Having a script with details of the video and the voice over is a crucial step that you should not overlook. Once your video’s script and storyboard are ready, you actually want to go ahead and write down the exact text of your narration, with pauses in the right places to ensure that your VO recording goes smoothly. If you want to avoid those unnecessary pauses or awkward silences, it is a good idea to keep the script in front of you on a desktop or a teleprompter as you record your voice over.
Pro-Tip: Once you’ve penned down your script, read it aloud as a script feels different when read aloud vs when read in your head!
Tip #2 - Mic Placement
The placement of your microphone plays an important role while recording a voice over. If it is placed too close to your mouth, you might end up hearing air puffs and other sounds produced by the mouth. If it is placed too far away, your voice will sound distant and echo-y. You also need to be careful of the surface you place your mic on because it might pick up sounds from the surface it is placed upon as well, for instance from a creaky desk.
For most professional mics out there, the ideal placement is 6-8 inches away from your mouth and slightly below the chin. You can figure out what placement works best for you by doing a test recording.
Tip #3 - Do A Test Recording
Practice makes perfect! If you don’t want to fumble or if you want to check how your voice will sound when you read your VO aloud, do a test recording. This will also help you check if your equipment or microphone works well and if your audio quality is good. There’s no need to record your entire script. Just recite a paragraph to check for any ambient noise or disturbance.
Pro-Tip: Check your test recording using headphones since this will give you the best sound output. This will also ensure that you pick up any noises you might miss while listening to the audio on loudspeaker.
Tip #4 - Audio clarity and volume
Audio clarity and a comfortable volume are key elements of a great voice over. If your recording sounds fuzzy or unclear, it will be difficult for your audience to understand and the information you’re trying to impart will be lost to noise. And if your volume is too low, it makes it hard to hear and if it is too loud, it will only annoy your audience.
While a good microphone should take care of both the clarity and volume of your audio, you want to make sure that you pay attention to the settings on your microphone such as the gain and the volume. You want to ensure that your audio levels are not peaking – which can create an unpleasant experience for the listener. After you’ve recorded, you can also adjust these settings while editing by digitally increasing or decreasing the volume of your audio. Just ensure
Tip #5 - Pacing and Vocal Tone
Why do we like listening to the voices of some people more than others? For instance if we had Morgan Freeman’s voice in a motivational video, we are more likely to pay attention instead of if it was shot by a random person. The reason for this is the pacing and vocal tone of Freeman’s voice.
When you start recording a voice over, you want to pay a lot of attention to how fast or slow you’re speaking as well as what tone you’re using. If you go too fast, your audience might struggle to grasp the information and if you go too slow your video might sound boring.
This, of course, becomes better with practice, but you want to focus on your voice modulations and practice those from the get go. Another important thing to keep in mind is that you might have to exaggerate your voice slightly for it to appear pleasant in the recording. Often when we speak in our normal tone, it can actually sound drab. The tone of your voice needs to be pleasant and engaging, pronouncing each word accurately. Avoid mumbling, sounding too monotonic or robotic, over-enunciating words or shouting.
Wrapping Up
Recording voice overs is an art and an industry in itself but when you’re creating videos for your own channel or even a client project, you are not very likely to work with a professional voice over artist. Which is why this guide will help you create amazing voice overs that enhance the narrative of your videos.
But note that in most cases, just adding a voice over will not do the trick, you will also probably need to add background music to your videos in order to make them sound more appealing. Adding music will also help take care of any residual background noise. Check out this blog to understand how to do that. And, if you don't want to record your voice multiple times, check our AI voiceover generator to generate voiceovers using Artificial Intelligence.
If you found this article helpful and want to start planning your next video, check out this article on how to create a storyboard to help you plan your shots and voice overs more systematically. And if you prefer learning via videos and want to keep up with the latest video trends, tips and tricks to help you create amazing, thumb-stopping videos, head over to our YouTube Channel.
This post was written by Shayne and edited by Adete from Team InVideo