What does an AI film post-production pipeline look like from raw footage to final cut?
Last updated July 10, 2026
An AI film post-production pipeline runs in six stages: conform and log the raw generations, pass each clip through a continuity and artifact check, assemble a rough cut, upscale and grade for realism, layer sound and music, then run a QC and reformat pass. Human review sits at the continuity and final QC stages; everything else can be agent-driven.
Start by conforming. Pull every generated clip into one project, label it against your shot breakdown, and mark which seconds inside each clip are actually usable — across documented productions only about 25% of generated clips reach the final cut, and on average just 5 seconds of each 15-second clip get used, so logging usable ranges is the first real edit decision.
1. Conform and log. Ingest all clips, tag them to scene and shot numbers, and note the usable window inside each one. If you generated 100–400 clips for a short, this is where you cut the noise — one documented horror short ran ~400 video generations and 30 image generations before assembly; an animated episode ran 164 clips down to 41 finals. Without a logged shot list, the next stages collapse.
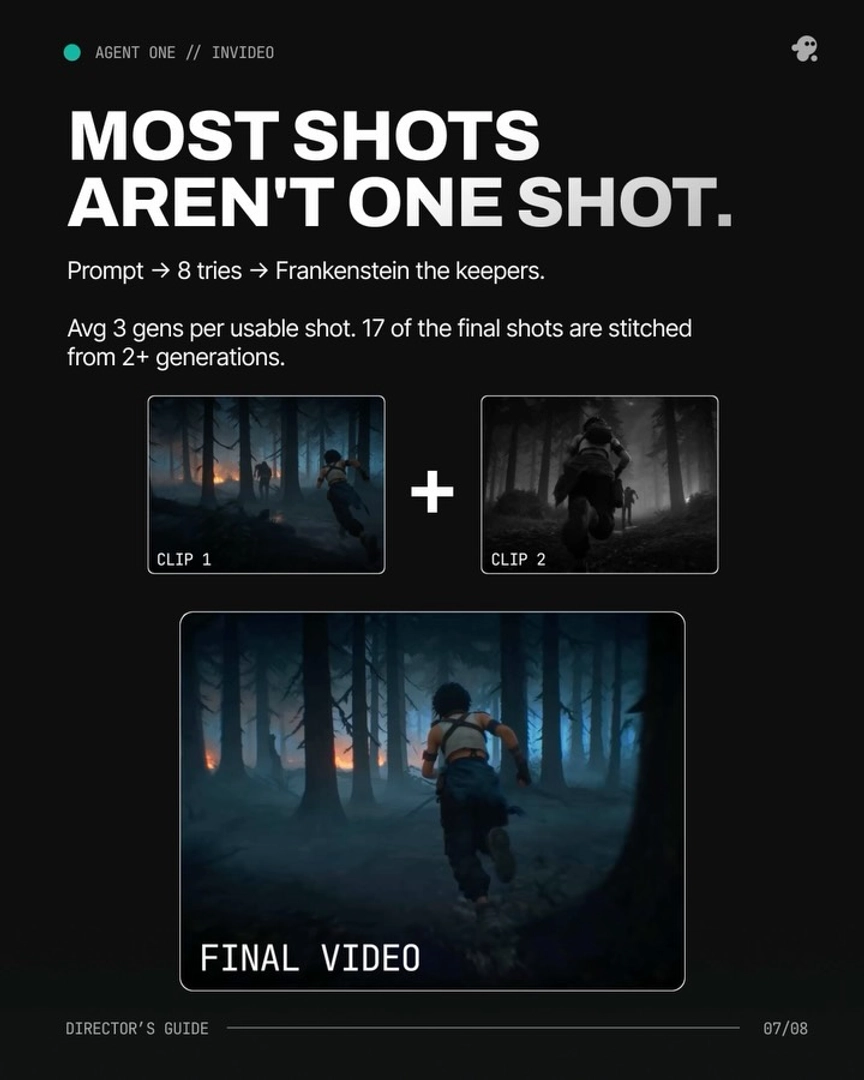
2. Continuity and artifact check (human checkpoint). Walk every selected clip and flag identity drift (face, costume, prop changes between shots), spatial errors (eyelines, screen direction, background mismatches), and AI artifacts (warped hands, morphing edges, flicker, plasticky over-sharpness). When a continuity error appears, fix it at the source: ask the invideo agent to inspect the character sheet, identify the panel with the error, correct it, and regenerate only the affected shot — surgical edits, not slot-machine re-rolls. Roughly 40% of final shots in documented productions are composites stitched from 2+ generations, so mark which shots need stitching here.
3. Rough assembly. Cut the timeline act by act rather than across the whole film at once — completing one act fully before starting the next prevents context loss and keeps your shot logic straight on long projects. Assemble in your NLE of choice (Premiere, Resolve), drop in the logged usable windows, and build to a watchable rough cut. Then send the rough cut back to the invideo agent with an open-ended "what's working, what's not" prompt — it catches pacing slips, emotional-stage register mismatches, and SFX gaps a human editor often misses. One documented production caught an entity-reveal shot running at the wrong stage register this way.
4. Realism pass — upscale, then grade. This is where AI footage moves closer to live action. Run upscaling first: Topaz Astra inside invideo is the standard first step, and you can spin up a named sub-agent (call it "upscale artist") to batch the work. Then grade for realism — Seedance 2.0 output tends to come back ultra-sharp with a plasticky skin quality, so add a small amount of blur on top, layer film grain, and push the color grade until it sits closer to live-action film. Match scenes against each other for consistent skin tone, contrast, and blacks.
5. Audio integration. Layer dialogue, music, ambient beds, foley, and SFX. If you generated dialogue separately, lip-sync correction goes here. Sound is roughly half of what makes a film land — encode diegetic sound logic into the cut (a hard prop hits with a hard sound), build atmosphere beds per scene, and mix against your reference grade. The invideo agent's audio architecture, if you loaded it into your treatment, holds across the mix.
6. QC and reformat (human checkpoint). Final pass: full playthrough for continuity, audio level checks, subtitle/caption sync, color-space conform for delivery, then export in your film's aspect ratio and any additional platform formats. This is the second hard human checkpoint — skipping the cut review is the most common mistake in AI-directed workflows.
The invideo agent runs this pipeline as an orchestrator: it holds your treatment and shot breakdown from production, lets you spin up sub-agents for upscaling and review, and routes the realism passes — Topaz Astra for upscale, your grade tools, the maker-checker review — without you leaving the project. Cost-wise, documented productions land between $315 and $750 per finished minute all-in across generation and post — $315/min for a 3-minute animated episode, ~$580/min for a 90-second horror short, ~$643/min for a 70-second short, and $750/min for a 2-minute brand promo — with 2-day to 5-day end-to-end timelines.
Hridaye, invideo's creative director, on the realism pass: "What we tend to do is put a tiny bit of blur on top of the scene, add a bunch of grain and then play with the grade till it comes closer to live action film." And on the review step most teams skip: "This is the step that most people skip, but it's actually extremely useful."
Watch some of these to see what works for you:
What we tend to do is put a tiny bit of blur on top of the scene, add a bunch of grain and then play with the grade till it comes closer to live action film.
— Hridaye, invideo's creative director