
Since Microsoft discontinued Windows Movie Maker from Windows Essentials apps - is it possible to merge videos on Windows 10 without downloading or buying a third-party video editing app?
In this short guide, we show you more than one method of how to combine any number of clips into one video in Windows 10. We will show you how to -
A. Merge your videos into one file using the Windows Photos App
B. Combine multiple videos into one using Windows Video Editor
And as a bonus, we will also show you how you can merge and create stunning videos online using InVideo’s online video editor.
Let’s get straight to it!
Merge your video clips into one cinematic masterpiece With the world’s easiest video editor Try InVideo today
A. Merge your videos into one file using the Windows Photos App
You might have cropped, rotated, or added effects to your photos in the basic Windows Photos app before, but did you know that you could also use the tool to edit your videos, including merging multiple videos into one file?
Follow this step-by-step tutorial on how you can combine your videos into one using the Windows Photos app:
1. Launching the Photos App
Before you go to the Photos app, you might want to put all the videos or photos you want to merge together in one folder on your computer. This will help speed up the entire process.
In the search tab of your computer, type in ‘Photos’, and open the app when it pops up.

Searching the Photos App in Windows
2. Starting Your Video Project
When you have opened the Photos app, you want to launch your video project. To do so:
- Click on the New Video option on the top right side of your screen
- Select New Video Project to launch the editor mode
 Starting a New Video Project In Photos
Other versions of Windows 10’s Photos app have different names for the second step of this process, such as:
- Create a video with music
- Create a video with text
- New video project
If you are using photos in your video project, you can also launch the editor mode directly from the photo. In that scenario:
- Open your file in the Photos app
- Click on Edit & Create
- Go to the Create a video with text option
3. Naming Your Video Project
You are now in the Photos app’s video editor mode. At this stage, you have to name your project before you start adding files to it. You can name your project by typing the title in the top left corner of your screen, in the name tab. You can edit your title anytime you want by clicking on the pencil icon next to your project’s name.
The Photos app’s video editor will not let you add files before you title your project. This means that a pop-up option will appear when you try to add a file, and you can type in the project’s name then and click OK or Create a Video to proceed.
4. Adding Your Files
To add files to your video project, you have to click on the plus icon on your screen’s top left corner—this section is called Project Library.
The Photos app’s video editor mode allows for three options when adding new files. You can add files from:
- This PC
- My collection or
- The web
If you have all the files you want to merge into one video in one folder, you can choose from the ‘This PC’ option, select all the files, and add them to your project. You can also add the files one by one.
The tool will merge all your files into a single video automatically. You can edit them and rearrange their order in the storyboard.
To begin working on your project, you need to move all the files you added to the video editor from your Project Library into the Storyboard section. The storyboard section is at the bottom of your screen, and you can drag and drop the files onto it immediately upon adding them to your Project Library.

Adding Files to the Storyboard
If you are uploading many files or clips that are longer than several minutes, be prepared to wait while Windows 10 adds them to your Project Library and then into the Storyboard section.
5. Trimming Your Files
If you need to trim your clip, you can do that too in the Photos app. Here’s how:
a. Select the Trim icon on your Storyboard
b. Shorten or extend the duration of your clip as you want by using the handlebar
c. Click Done
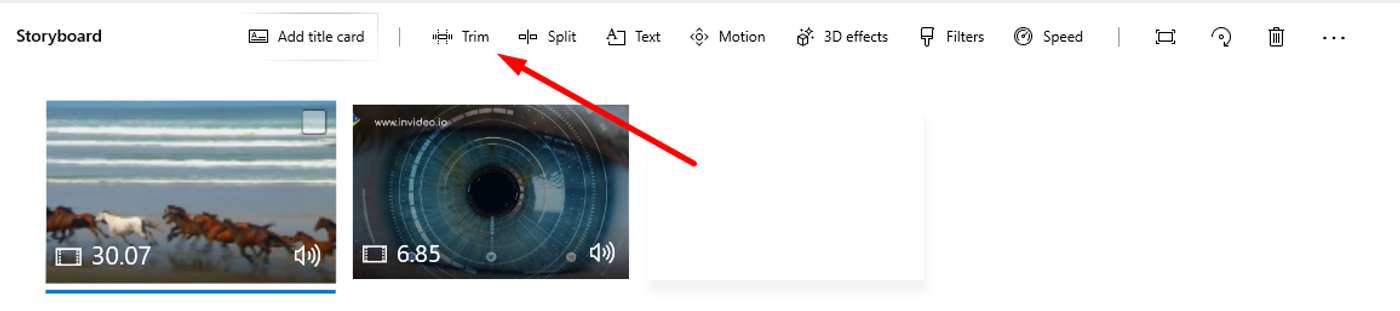
Trimming Files in the Photos App
6. Removing Sound and Adding Music
Now you might want to add music to your project or remove the existing sound from your videos. Follow these simple steps to do so:
a. Click on the Background Music option on the top-right corner of your screen
b. Mute the sound of your video or optimize its volume
c. Select different audio from the Microsoft library
If you want to add your own audio or voice-over to a clip:
a. Go to the Custom Audio option on the top-right corner of your screen
b. Choose to add an audio file
c. Select the file you want to import
d. Click Open
e. Edit the audio file as you wish
f. Select Done
You can now choose from the Windows library for different music options or upload your own.

Adding Music in the Photos App
7. Adding Text
If you want to add text to your video project, you can do that in the Windows video editor, but there aren’t many font style options. You also need to add and optimize your text to your liking for each clip individually, which certainly isn’t a time-efficient option.
To add text to your clips:
a. Select the little box icon on the clip you want to add text to
b. Choose Text
c. Type in the text you want to add in the empty box
d. Choose the font style
e. Customize where in the video you want your text to appear

Adding Text in the Photos App
You can also add 3D effects and filters by clicking on the little box of your clips. These need to be customized for each clip separately.
8. Exporting Your Finished Project
When you are satisfied with your video project, you can download it to your computer. To do that:
a. Click on the Export or Share or Finish video option in the top right corner of your screen
b. Choose the resolution in which you want your video to be saved
There are three resolution options the Photos app offers:
|
Video Quality |
Resolution |
|
High |
1080p |
|
Medium |
720p |
|
Low |
540p |
c. Click Export or Save
Don’t be surprised if it takes a while for Windows to save your file. The built-in editor will export your file either quickly or slowly, depending on your video size and duration.
It may seem surprising, but you can also crop and rotate a video in Windows without third-party video editing software.
Easily cut, merge and edit your videos Even if you've never edited a video before Try InVideo for free
B. Combine multiple videos into one using Windows Video Editor
You might not have known this, but Windows has its own free editing tool present on your system. You can also use the Windows Media Player to merge videos, however, the only catch is that you first need to download and install the Windows Media Joiner. This is a free app.
Here is a step-by-step guide on how you can merge your videos using the Windows Video Editor:
1. Type ‘Video Editor’ in the search bar of your system and click on the first suggestion.

2. Click on the blue block to start a new project

3. You will have to name your project to start working on the editor.

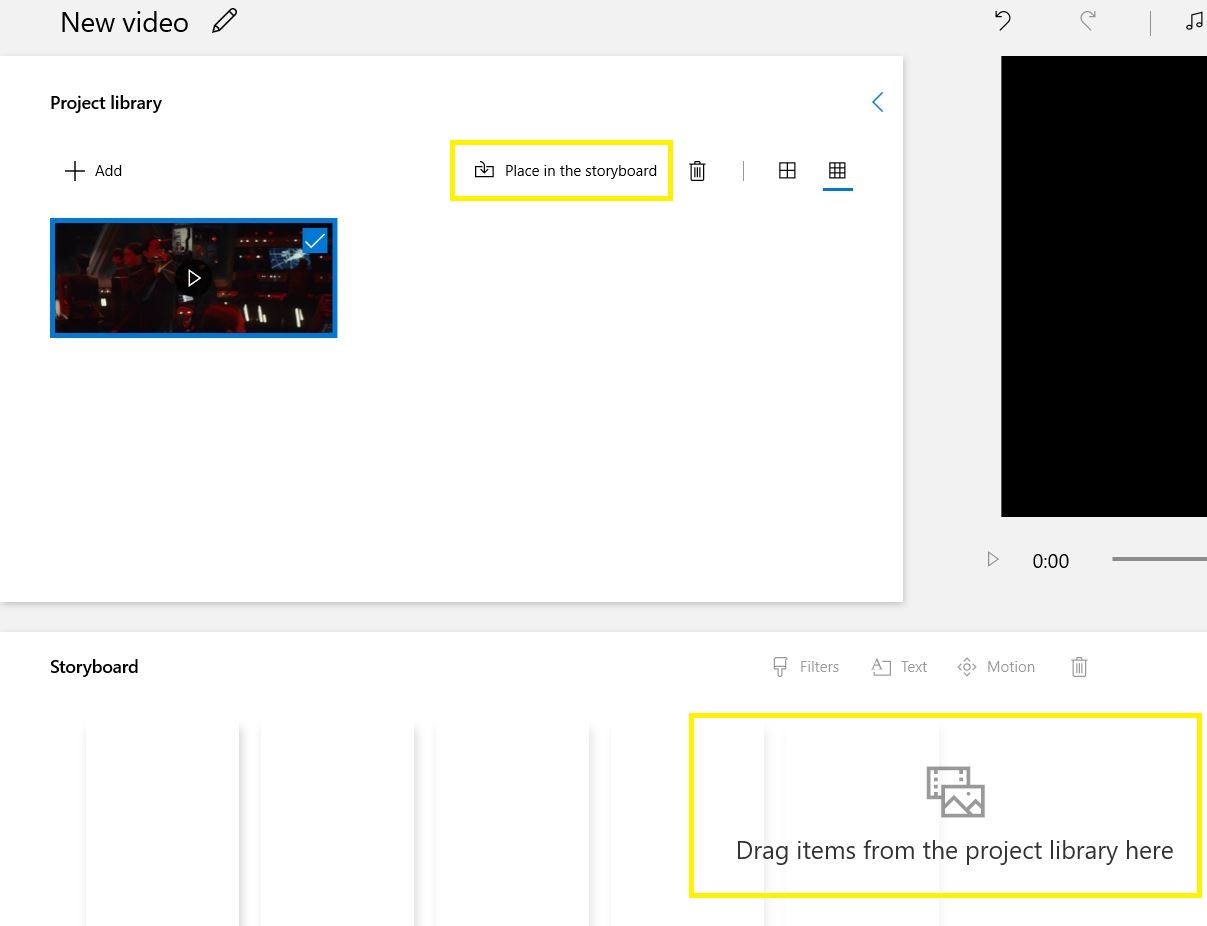
4. Click on the + Add button on the left side of your screen and you can import video files from your PC or even the web.

5. Once your video is imported, click on the Place in storyboard button or simply drag your video file down to the storyboard section to start working on it.
6. You can keep adding video files to your storyboard and the Windows Video Editor will seamlessly merge them. If you want you can also add effects, text, background music, etc to your merged video.

7. When you’re done editing your video, simply click on the Finish video button on the right hand corner of your screen. You can export your video file in high (1080p), medium (720p) and low (480p) resolution.

Bonus: Merge clips online and create stunning videos fast and easy with InVideo
You can only go so far with your video editing endeavors if you are relying on Windows 10’s built-in apps. Even if you are a beginner in the field of video making, the default apps will exhaust your creativity quickly since they offer very limited features and video editing tools.
You do not have to download third-party editing software to create better-looking videos than the ones you can make on the Windows Photos app. Instead, you can use efficient editing platforms online for free.
InVideo is one such cloud-based video editing solution that you can use in your browser. As soon as you make a free account on InVideo, you enter a world in which video editing is fun, quick, and efficient.
Here are some of our video editor’s characteristics that will make you fall in love with making videos:
|
InVideo Features |
Their Purpose |
|
Pre-made video templates |
You don’t have to start making videos from scratch. Our collection of 5000+ pre-made templates fits every use case. |
|
Text-to-Video |
You can easily transform every text or article into a video with our text-to-video templates. Why spend hours or even days on creating a video from a text when you can do it in minutes with InVideo by copying your text or article’s URL and pasting it in our editor? |
|
Support |
You won’t be left to your own devices when using InVideo. We have dozens of easy-to-follow tutorials to guide you as you are exploring the world of video editing. You can also chat with our support team 24/7. |
How To combine videos into one file using InVideo?

InVideo lets you upload your own media files
When it comes to video editing options, InVideo lacks none. Merging multiple clips and photos into one video file is only one among many feats you can accomplish within ten minutes using our platform.
To combine your videos into one file using InVideo, here’s what you will do:
1. Log in to your InVideo account or create one for free

2. Click Blank Template on the homepage and choose a format

3. Select the Upload option in your Asset Library on the left side of your screen and upload your files.

4. InVideo merges your files into one video automatically. Edit your video to your liking - you can add text, music, and effects to make your video interesting.

5. Select Export when you are satisfied with your project to download your new video.

InVideo offers a large number of media and special effects you can use to make your project more interested and professional.
Some of the most popular InVideo features that bring efficiency and functionality into video editing are:
#1 - Video Elements

Adding Elements in InVideo
You have at your disposal 8M+ stock footage, images, animated texts, stickers, shapes and royalty-free audio to help you make your video engaging. All of these tools are available on the online editor and can be accessed from the asset library on the left hand side of your screen.
#2 - Voice-over recording + automated text-to-speech feature

Adding a Voice-Over in InVideo
Our voice-over feature lets you do both:
- record your voice and attach it to your video
- or if you are not a fan of your voice, no problem! You can let one of our custom voices deliver your speech by simply typing in the text into our automated text-to-speech feature.
Watch this tutorial to see how you can add a voice-over to your video project in minutes.
#3 - Intelligent Video Assistant (IVA)

Using the Intelligent Video Assistant (IVA) in InVideo
If you’re not sure if you’re going in the right direction with your video, you can always let our Intelligent Video Assistant (IVA) give you feedback on the spot. IVA is an AI-driven tool you can use in InVideo to level up your video editing game.
#4 - Live customer support 24/7

If you would be more comfortable with having assistance from a real person, InVideo’s customer support is at your disposal 24/7. Click on the chat icon in the bottom-left corner of your screen and ask away. Whether you need suggestions for video editing or a short, easy-to-understand explanation on how to use our features, our customer support is here for you.
Wrapping up -
Merging your videos on Windows 10 is super simple with in-built apps like Photos and Video Editor. If you want to make your videos more interesting and professional-looking, use InVideo - which enables you to create high-quality videos in minutes! So what are you waiting for?
If you’ve found value in this article and are looking to learn more about video creation and how you can leverage InVideo’s editor, check out this playlist. If you’re a creator, you’d love what we have built at the InVideo community – a place for you to connect and learn from 25,000+ other marketers, business owners, and creators like yourself.