

Every month, over 10,000 online searches are made on average for the term “how to edit a video” and there are just as many search results on Google if not more. You most likely came across this article because you were looking for an easy-to-understand guide to video editing.
But with an ever-growing number of blogs and videos being posted on this topic, learning how to edit a video can quickly turn into a never-ending rabbit hole. And while it’s true that every project you work on will have slightly different editing requirements, you should know that the fundamentals of video editing largely remain the same.
So, to help you out with the process of editing a video, we've put together this comprehensive guide that talks about everything you need to do to create breathtaking videos, even if you have no prior video editing experience. We will also show you the exact steps to edit a video using the super-intuitive and easy-to-use InVideo editor.

Here's what we will cover:
- Things you need to do before you start editing
- How to edit a video on desktop
- How to edit a video on your phone
Let’s dive right in!
Things you need to do before you start editing your video
Like with everything else, you need to prep before you start editing your video! This will make sure that everything is in place so that your actual video editing process will go smoothly. Here are a few things to keep in mind when you are prepping:
a) Back-up your media
This is often the step people regret overlooking the most! Without backups, you stand a high risk of losing all your hard work due to any number of unexpected problems. That’s why it’s important to have a backup of a file in at least 3 different places! It’s usually recommended to have backups in physical hard drives as well as in cloud storage.
Here are some of our suggestions:
For physical storage solutions, Seagate BarraCuda and the Toshiba X300 as the top 2 hard drives of 2022. As for cloud storage solutions, you can go with iDrive, pCloud, and Backblaze. Apple cloud storage and Google Drive are also decent solutions.
b) Organize your media for ease of access
Imagine shooting hours worth of footage and then having to sit down to figure out what each shot is and where it goes! Wastes a lot of time, right? Organizing your media is key to editing your video efficiently. And while there are several ways to do it – every editor will have a system that works best for them – we recommend doing two things:
- Logging your shots while filming: Create an excel sheet or even a simple note on your phone, where you just note down the name of the shot (DSL_001) & what it is. This might seem slightly inconvenient when you're doing it, but this will save you hours of time.
- Naming your footage and media using an effective system like the YRMODA system! In this, you name each file by the year-month-date so that they are chronologically maintained. You can add more keywords to this to help explain the content of the video. For example, if you took a video by the riverside on the 20th of September, 2021; you could name the file 210920_River. After your files are all organised, they will be much easier to work with when you start editing! Here’s an example of what the YRMODA System looks like:

c) Be clear on your goal for the video
Before you begin editing, you want to be crystal clear on your goal for the video. This will determine the type of video you create, the kind of music, graphics, and fonts you choose, and where you showcase your video. Do you want to create a video to market a product? Or are you making a highlight reel for a sportsman? Do you want it to be high-energy or do you want it to be more mellow? These are the questions that will determine your entire editing process.
Depending on your goal you can create a compilation video, a montage video, an explainer video, or a product video, among other types. Ideally, you want to have your script with you at this point because that will help you figure out answers to most of these questions. If you weren’t working off a script, you want to write down the flow of your video so that you don’t face difficulty while editing.
d) Preview your footage and select the shots you want to use before you begin editing
This is a big time saver because previewing and pre-selecting the shots you want to use saves you the headache of browsing through hundreds of clips while you’re actually editing. A great way to organize your selected clips is to copy them to a new folder and have that folder in a super accessible location so that you can see your clips any time you want.
Doing this also prevents you from going back and forth when you’re uploading clips to your editing software.
e) Find the music you want to use
Music is a powerful tool for communicating any kind of message - videos with some form of music in them perform better in both, conveying information as well as connecting with the consumers.
But before you decide what music to use, you should read about music copyright and using royalty-free music and you can check out this guide if you want to know more about how to use royalty-free music without having to buy a license.
To make things even simpler, InVideo's intuitive video editor gives you access to thousands of royalty-free audio tracks and sound effects. The best part is that you can search for exactly what you need in InVideo’s music library.
Now that you know how you need to prepare for editing your video, it’s time to put that knowledge to use and begin editing your first video. In the next section, we’ll take you through the step-by-step process of editing a video using InVideo’s online video editor.

How to edit videos on your Mac or Windows using InVideo
First things first, Log in or sign up for a free account on InVideo. You can simply create an account or you can choose to add your Brand Presets at this stage where you can type in your brand name, upload your logo, select the colors you use for your branding, add your social media handles, and plug in anything you’ll be using for your branding. Then you just need to click on Save and this will apply to all of the videos you edit on InVideo.
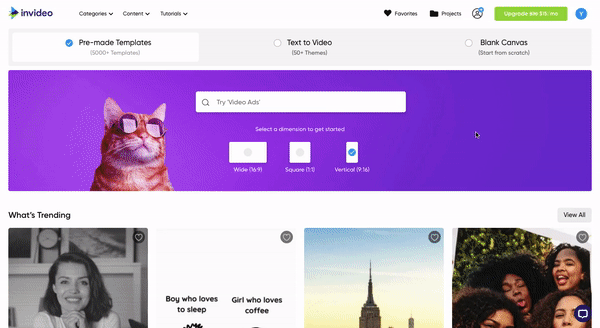
Now, there are a few different ways to edit videos on InVideo. You can use a Blank Canvas and make your own video from scratch, or you can use one of InVideo’s 5000+ Templates to make a video, or you can even turn your articles or blogs into a video! Let’s go through this one by one.
a) Basic Editing on Blank Canvas
b) Using Pre-made Templates
c) Using Text to Video
a) Basic Editing on Blank Canvas
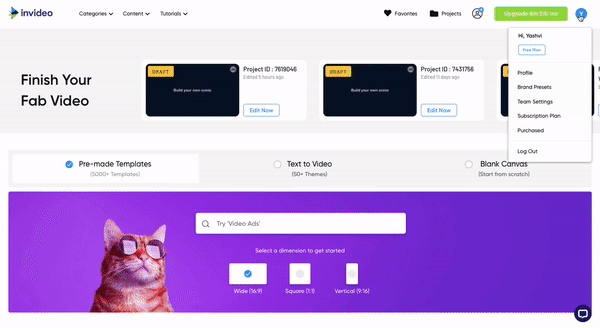
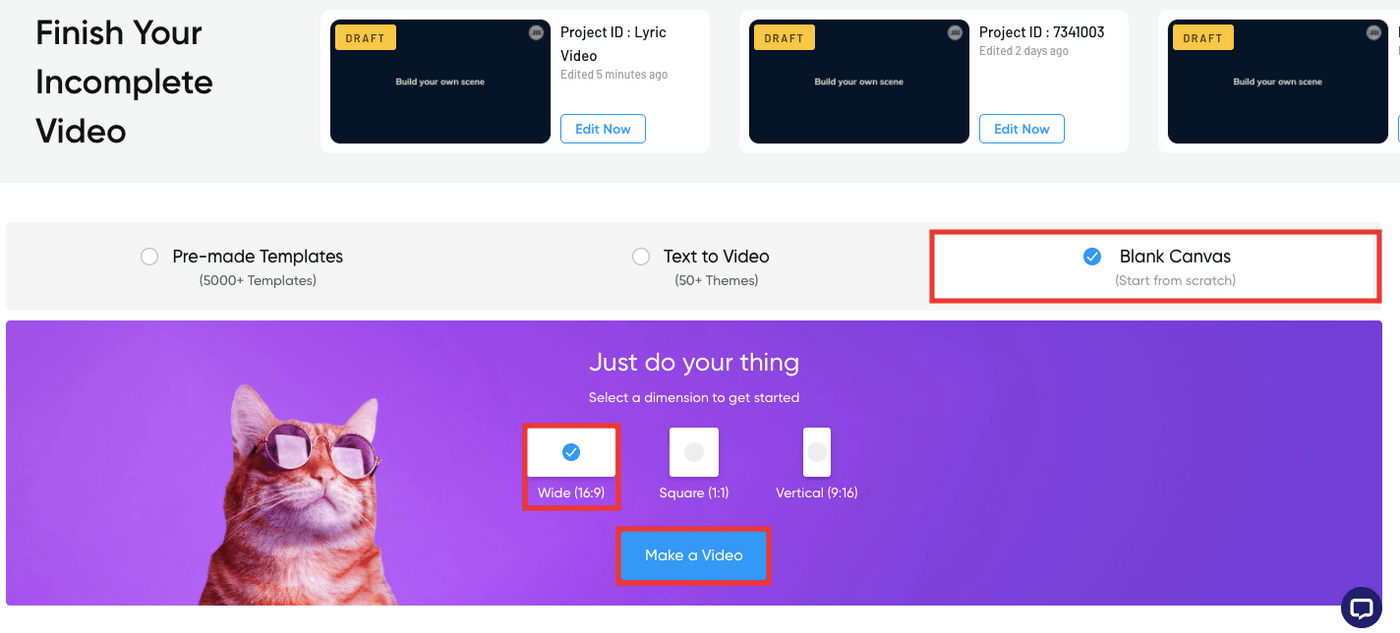
Step 1: Log in or sign up for a free account for InVideo.
Click on the Blank Canvas option and select the best aspect ratio depending on which platform you’re making the video for. Finally, click on the Make A Video button to get started.
Step 2: Upload your footage
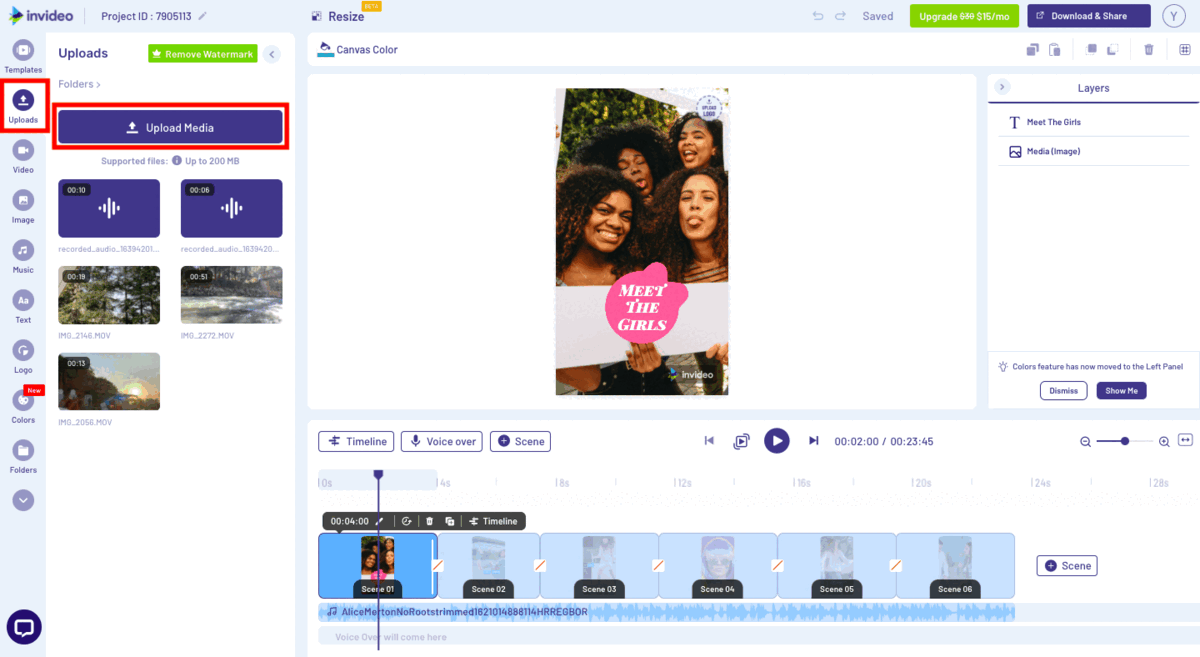
Here you need to upload your video files first. To do that, you will need to click on Uploads in the left panel and click on Upload media to access your folder of videos.

Alternatively, you can also choose images and videos from the stock media library on InVideo. Click on Video in the left menu panel to access the stock library.

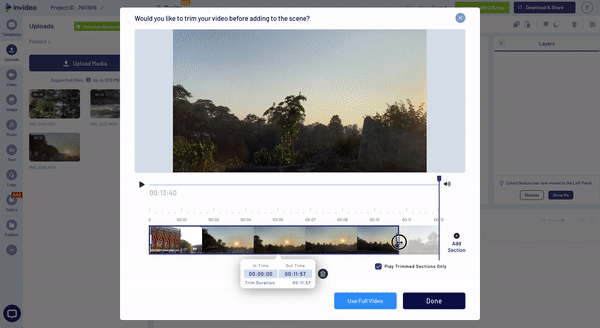
Step 3: Add media to the editing timeline
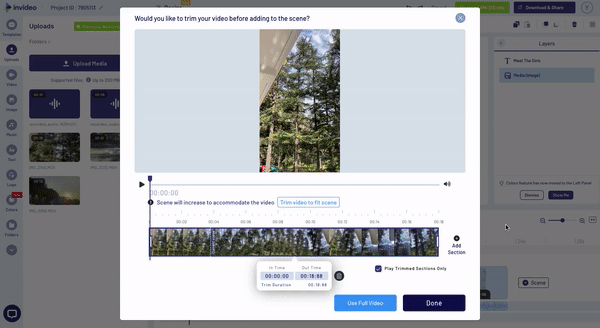
To add the media to the editing timeline, you will drag and drop it onto the canvas. As soon as you do that, you will get a pop-up notification asking you if you want to trim the clip or use the full video. Click Use Full Video if you need all of the footage. If not, you can drag the clip from the right or left side to trim the clip according to the amount of footage you need!
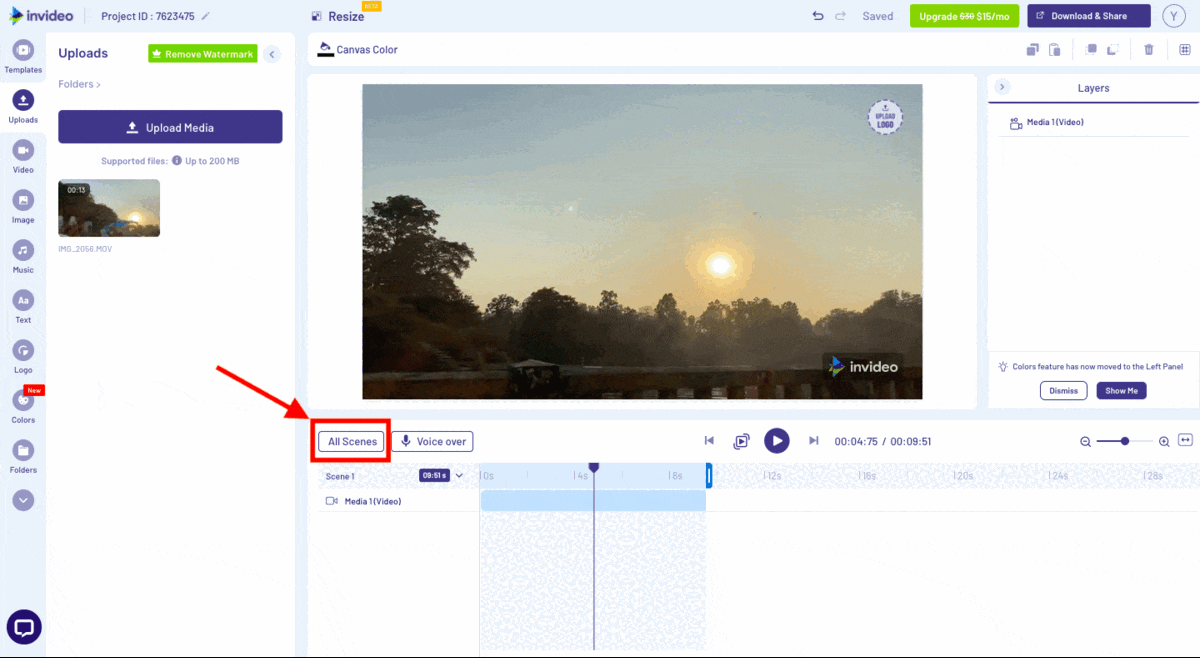
After that, in case your InVideo editor is set to the Scene Timeline view, click on All Scenes so that you can view everything more easily.
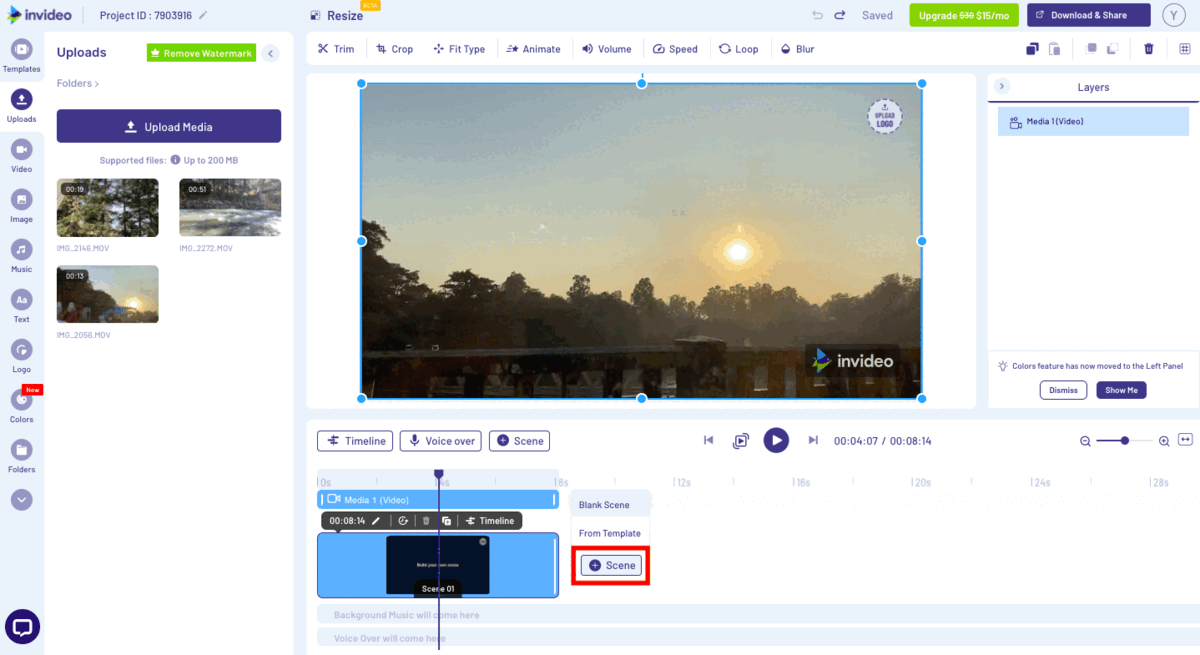
To add another clip, you need to click on +Scene in your timeline and select Blank Scene. Then drag and drop your next clip into this new Blank Scene. You can trim or crop it in the way you’d like! Repeat this step for all the clips you want to add.
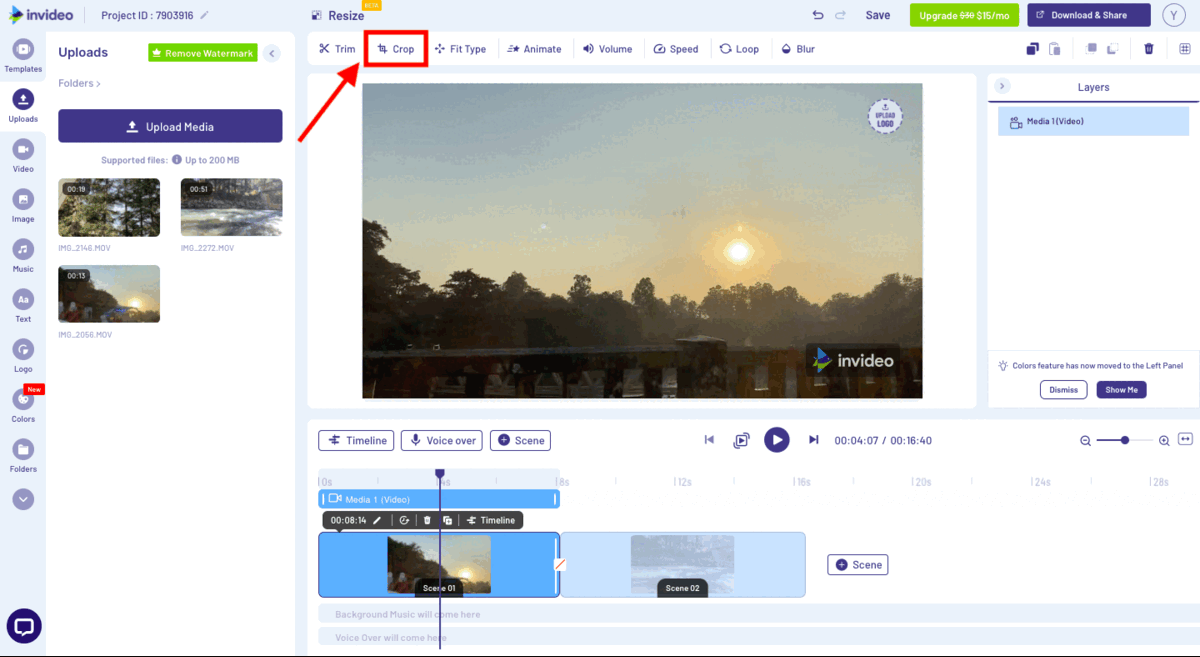
Step 4: Crop your video
If you need to crop your video, click on the canvas again and you will find the Crop option on the top left corner above the canvas itself. You can click on that and crop the clip and then click on Done
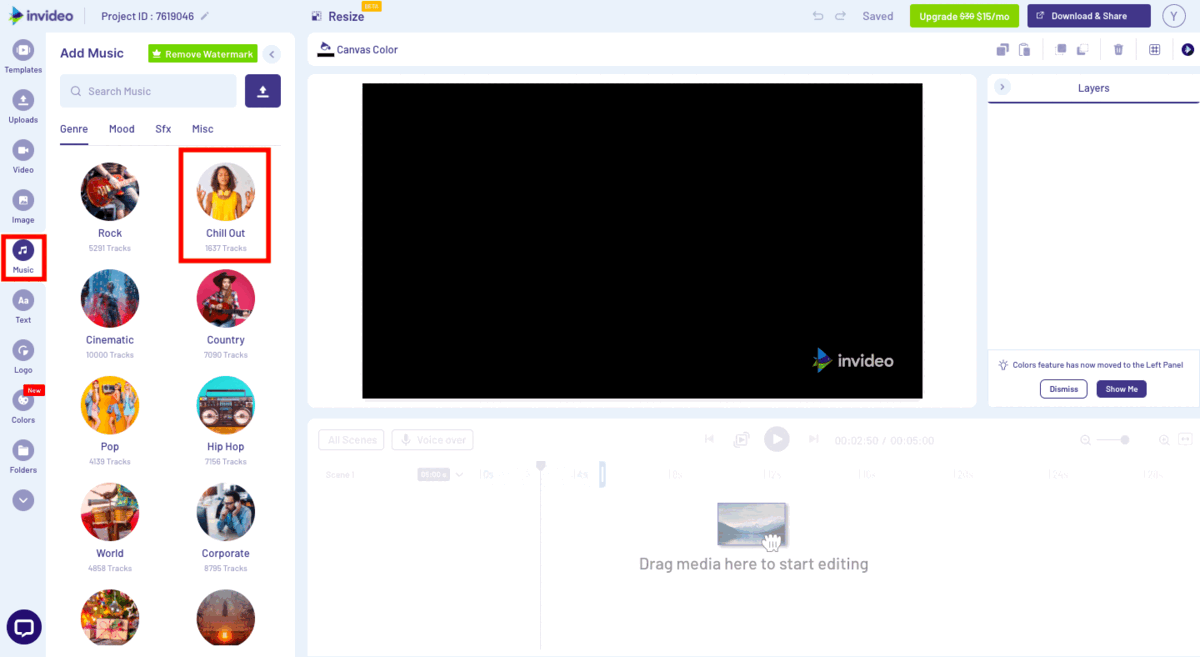
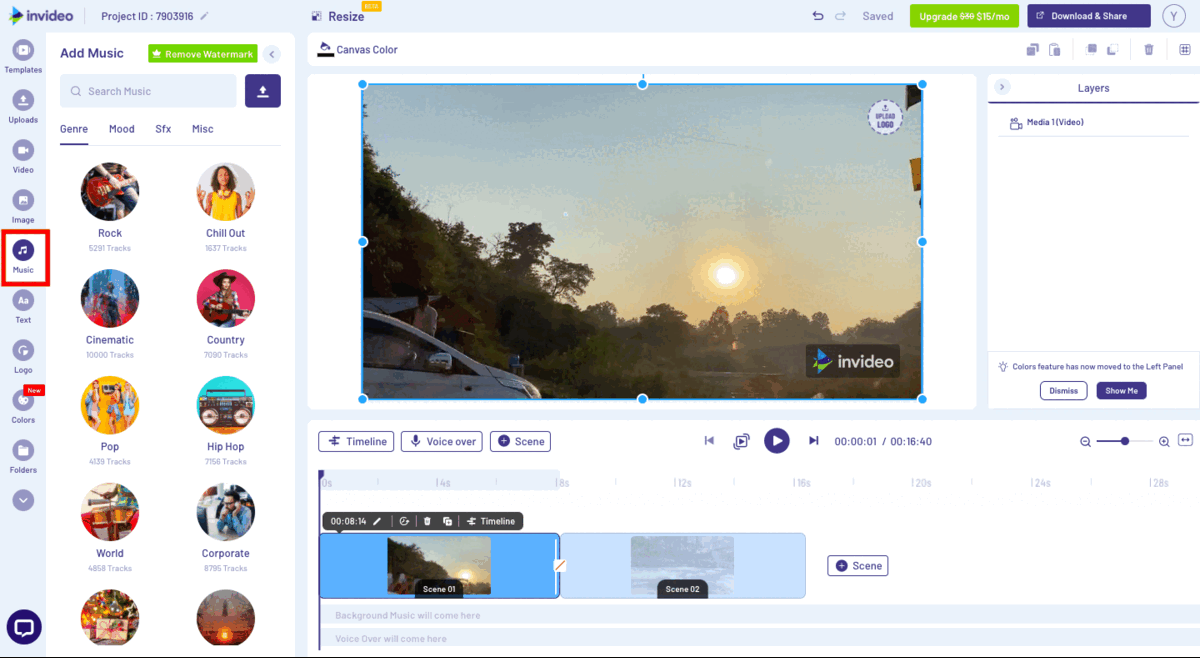
Step 5: Add voiceover and Music to the video
For Voiceover, you can either upload your voiceover or record your voiceover in the InVideo editor itself! To record in InVideo, click on the Voice over option just above the timeline, and select Record Voice Over. Then, click on Record and start recording!

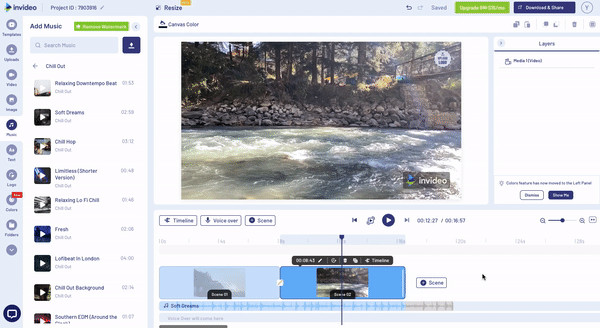
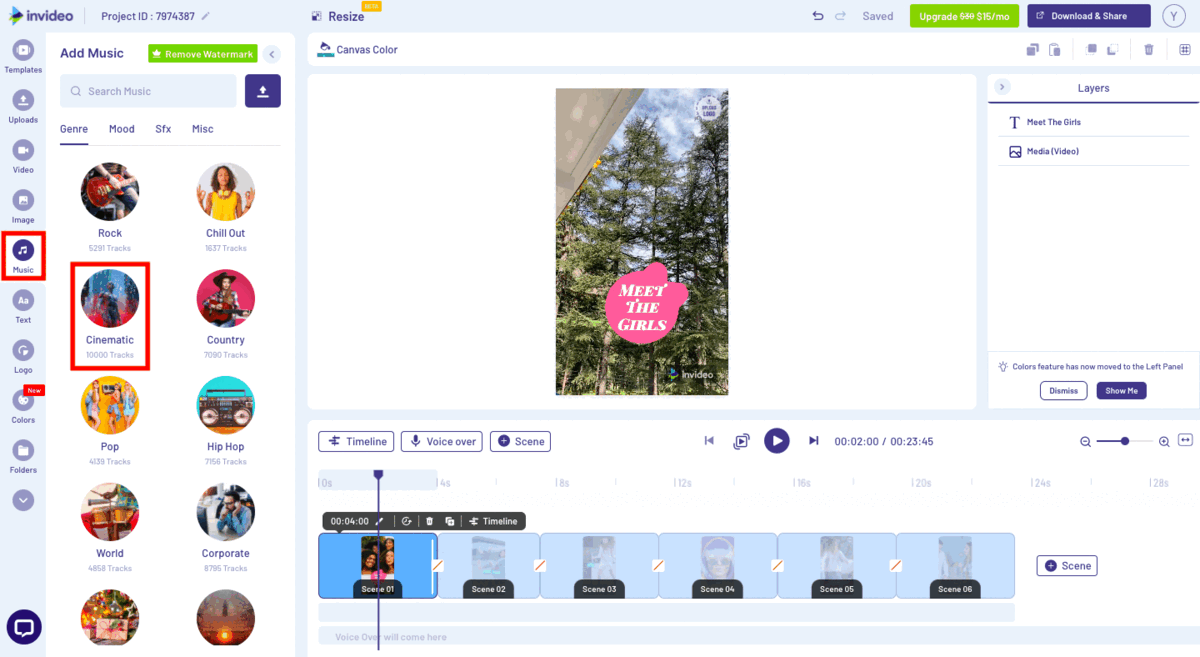
To add background music click on Music to access InVideo’s free library of royalty-free music and sound effects! You can search for any kind of track that you’d like to add to your video. Then just hover over the song of your choice and click on the + sign to add it to your video.
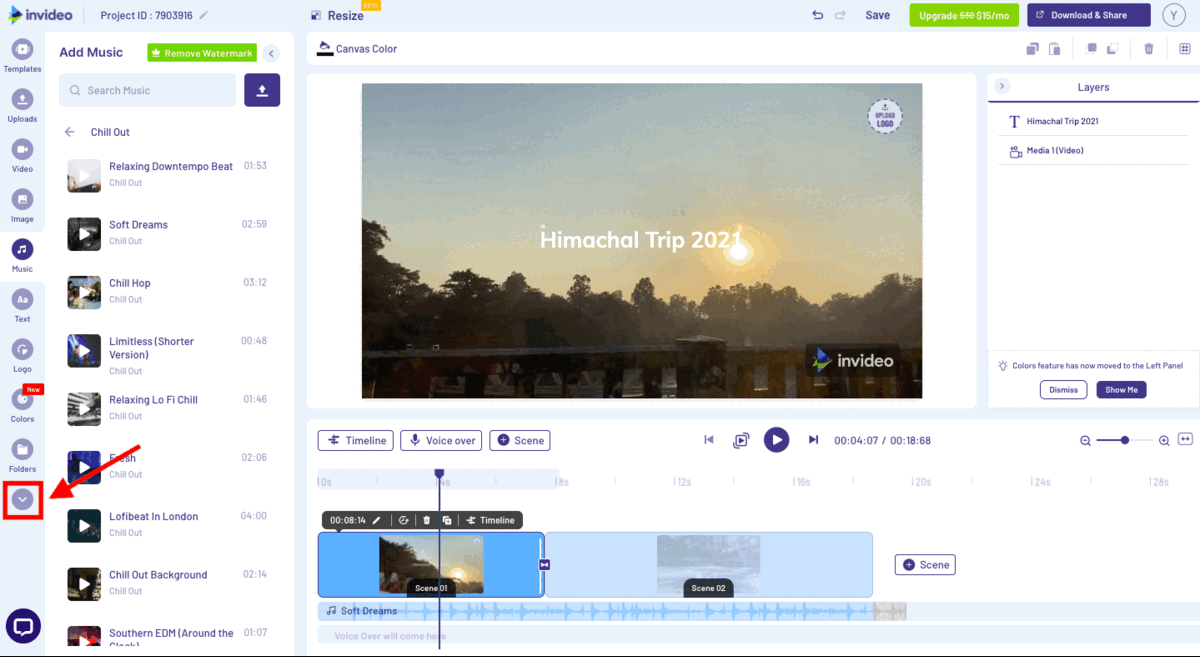
Step 6: Add text to the video
Click on the Text option in the left menu panel and simply click on the + sign next the add a heading option. To edit the placeholder text, simply click on the text box on the canvas and change type in your own text. For more help, check out this tutorial to learn more about how to add and edit text on your video.

Step 7: Sync the audio and the video
Now’s the time to sync the video to the audio or music! You can play your unfinished video and adjust the duration of each scene according to the timing of the music. Do this by dragging your chosen scene from its left or right side to increase or decrease the duration respectively.
Step 8: Add transitions to your video scenes
To add transitions between your scenes, go to the small box (it has a line through it) between your scenes and click on that. This will open up all of the transition options available for you. You can hover over each option to see what it looks like and if you want to use it. Then click on the one you are finally using to add it to the video!

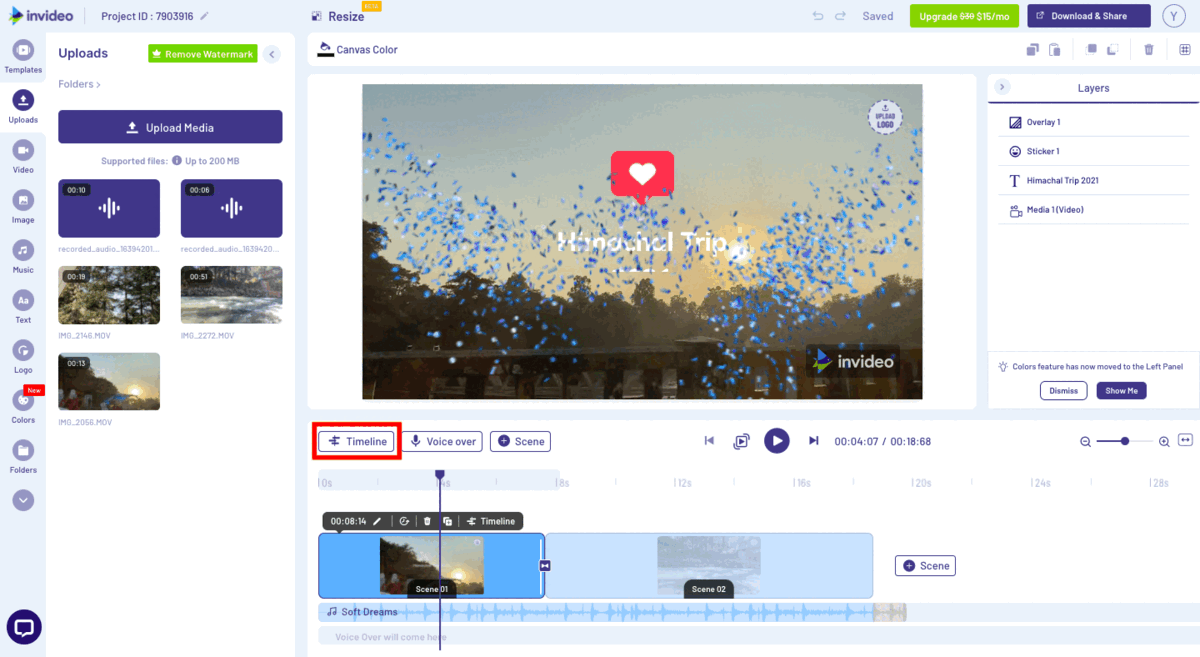
Step 9: Add other readymade elements like stickers and overlays
Now if you want to spice up your video even further, you can use stickers and overlays on your video to add that little extra something to your video!
Click on the stickers option in the left menu panel. Search for stickers using keywords and just click on the one you like to add it to your video. You can shift it around on the screen to place it where you intend to, and you’re done!
To add overlays, click on the Overlay option in the left menu panel. You can search for a particular overlay or choose from the list that opens up. Hover over an overlay first to see how it would look and then click on it to add it to your video. Here we’re adding a confetti overlay as an example. You can even play around with the colors and transparency of the overlay.

Anytime you want to see all of the different elements of a scene, you can click on the Timeline option between the canvas and the timeline. This opens up an advanced timeline that shows you all of the layers of the video, and you can adjust elements within this if you want to be more precise with your editing.
Step 10: Export and Share your video
Once your video is synced perfectly, you can preview the entire video to check for any errors or edits. If everything’s okay, you can click export and your video will soon be ready for you to download!

After clicking on Export, your video will start to render. Once that’s done, you can just click on Download to save the video to your device or directly Share Video to your social media platforms from here! Now you’re all done!

Now that you understand how to edit a video from scratch on InVideo, let’s look at how you can use the InVideo templates to your advantage.
b) Using Pre-made Templates
For marketers and social media creators with busy schedules, using templates can really speed up your video creation process! InVideo’s pre-made templates come with video and audio clips, and they’re customizable in InVideo’s editor, so they’re pretty great to use.
Let’s see how to make amazing videos using templates!
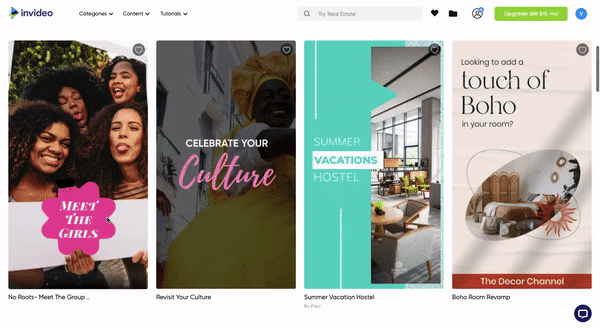
Step 1: Log in to your InVideo account and select Pre-made templates on the home screen to access InVideo’s library of over 5,000 templates. Select the aspect ratio you want depending on the platform you’re making the video for and then search for a template of your choice.

For the purpose of this tutorial, we’ll be creating a trending Instagram reel using this template of the No Roots – Meet The Group trend. You can search for the kind of template you want and then browse for the one you want to use.
Once you’ve chosen the template click on Use this template and that will take you to the editor.
Step 2: Once you are in the editor, you will see the template is loaded on the timeline. Now you need to replace the images and videos in the template with your own. You can choose to upload your own media or choose from InVideo’s stock library of over 8M royalty-free images and clips.
Choose any clip that you find fitting for your video, and drag and drop it onto the canvas. Then click on the Replace option to add it to the template.
Step 3: You’ll have to trim the video now. InVideo’s trimmer shows you the duration of the template clip with a dashed line, so you just need to bring it to that line and click on Trim video to fit scene. Now, repeat Steps 2 and 3 for as many clips as you want to replace in the template.
Step 4: If you want you can change the music on your template by first deleting the current track that comes with the template, and then adding new music from InVideo’s stock library. To delete the video, hover over the audio track and on Edit, and then click on Delete.

To add the new audio file, simply go to Music to access InVideo’s free library of royalty-free music and sound effects! You can search for tracks based on mood, genre, and more. Select one that you’d like to add to your video and then just hover over the song of your choice and click on the + sign to add it to your video.
Step 5: Once your video is synced perfectly, you can preview the entire video to check for any errors or edits. If everything’s okay, you can click export and your video will soon be ready for you to download!

After clicking on Export, your video will start to render. Once that’s done, you can just click on Download to save the video to your device or directly Share Video to your social media platforms from here! Now you’re all done!
Now let’s take a look at how you can turn articles and blog posts into engaging videos using InVideo’s Text-to-Video feature.
c) Turn text into video
Turning text to video comes in super-handy when you want to create engaging videos from blog posts or long form texts. This tutorial explains exactly how to do that:
Now that you know how to easily edit your videos on your mac or windows laptop, let’s take a look at how you can create thumb-stopping videos right from your phone.
How to edit videos on your iPhone or Android using Filmr
If you’re a creator or someone who works on the move, having an app that you can use to quickly churn out high-quality video content is a boon. This is where Filmr comes in. Available for both iOS and Android, Filmr is ideal for both beginners and advanced users alike. With its collection of hundreds of filters and effects, and a library of over 20 million royalty-free songs, it makes editing on the move super simple.
Let’s see how you can edit videos on your phone using Filmr!
Step 1: Download and sign up for a new account on the Filmr app. For this tutorial, I am using my Filmr account on an iPhone, but the same steps can also be followed on the Android app.
You can also sign in using the same credentials as your InVideo account and if you have a paid subscription with InVideo, you automatically get access to Filmr PRO that gives you access to a host of additional features, filters and effects.
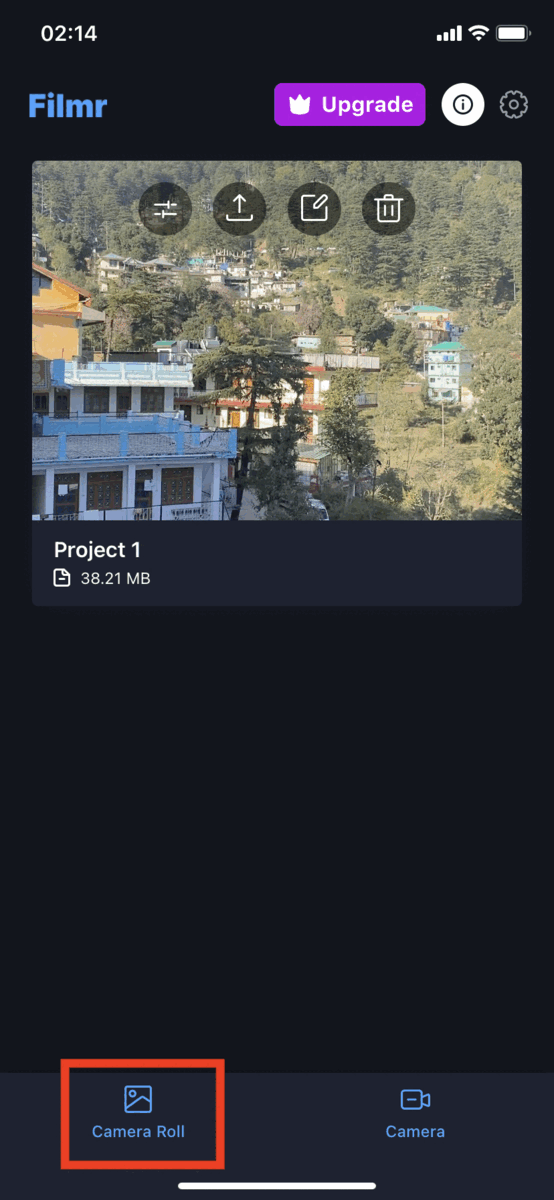
Step 2: Once you’ve signed in, you can choose to either upload footage from your camera roll or shoot a video using the Filmr app. For this tutorial, we’ll be uploading a video from the gallery. Simply click on Camera Roll and scroll to choose the video you want to edit.
Later, if you want to add more clips to your video, you can click on the video icon at the bottom if you want to add more clips to your video!
Step 3: Once you import all of your clips into the Filmr app, you will see that they are placed on a vertical timeline – which is built for mobile phones. This is a feature unique to Filmr because all other apps have horizontal timelines, which are better suited for desktop editing. You can drag and reorder your clips to get them in the order you want. Simply select the clip you want to move and long press on the 3 dots on the left side to drag it above or below the other clips.
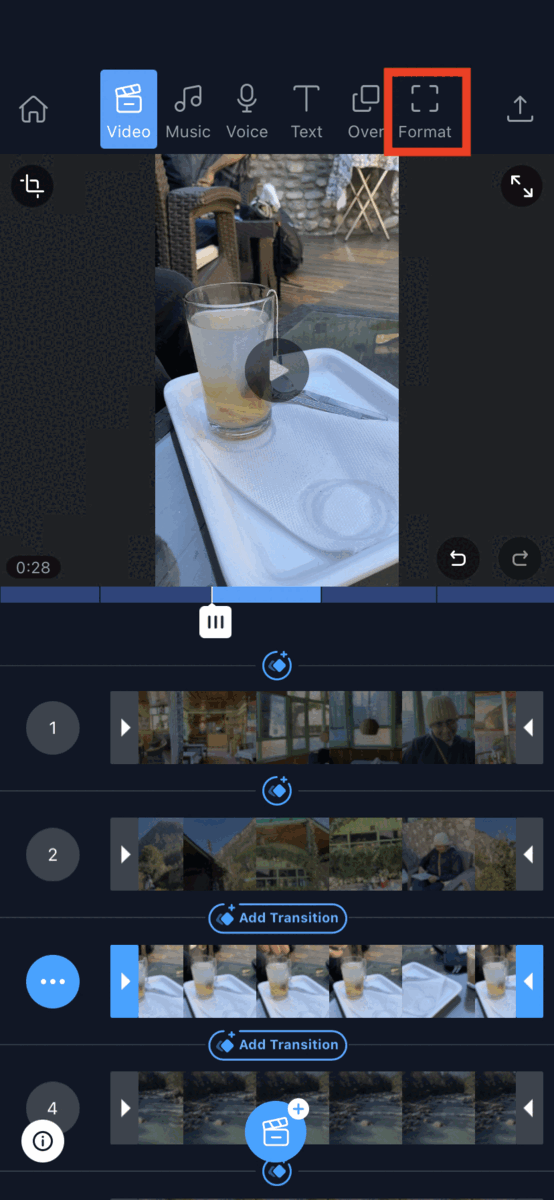
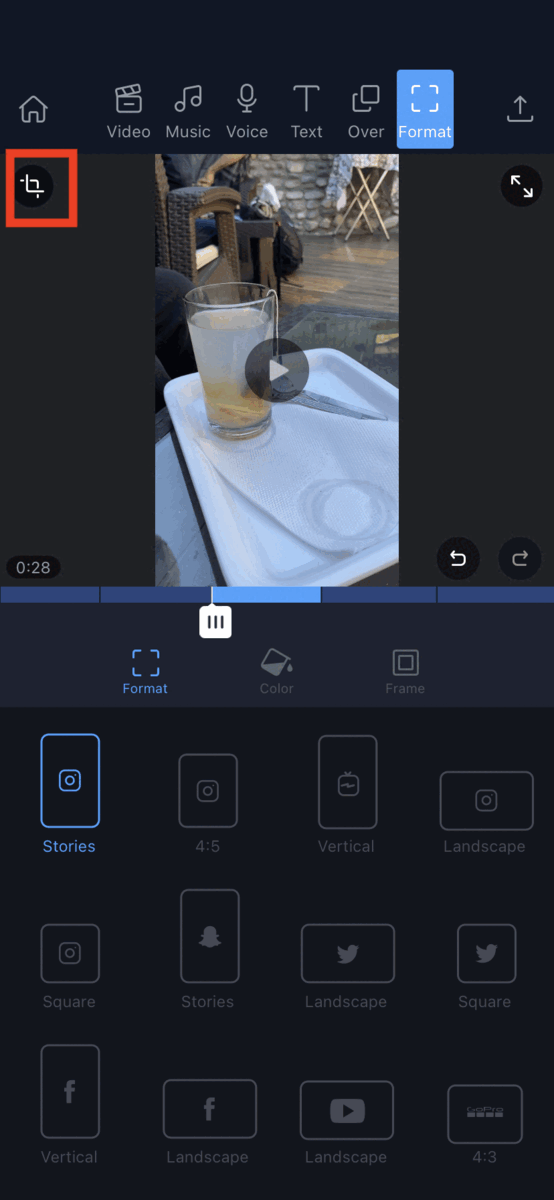
Step 4: Click on Format and select the orientation and aspect ratio depending on the platform you want to publish on. Once you choose your aspect ratio, your main edit canvas will change to that format orientation.
If you have any clips that are not of the same aspect ratio as your canvas, they will have black bars added to them. To optimize them for the format of your choice, you can use the crop function to zoom into each clip according to your needed aspect ratio. You can even leave the black bars if you want to include the entire clip without cropping it in any way.
Step 5: Once the basics are sorted, it’s time to trim your clips to select only the parts you want in the video. For this, simply drag the end points of the videos to the points where you want the video to begin and end.

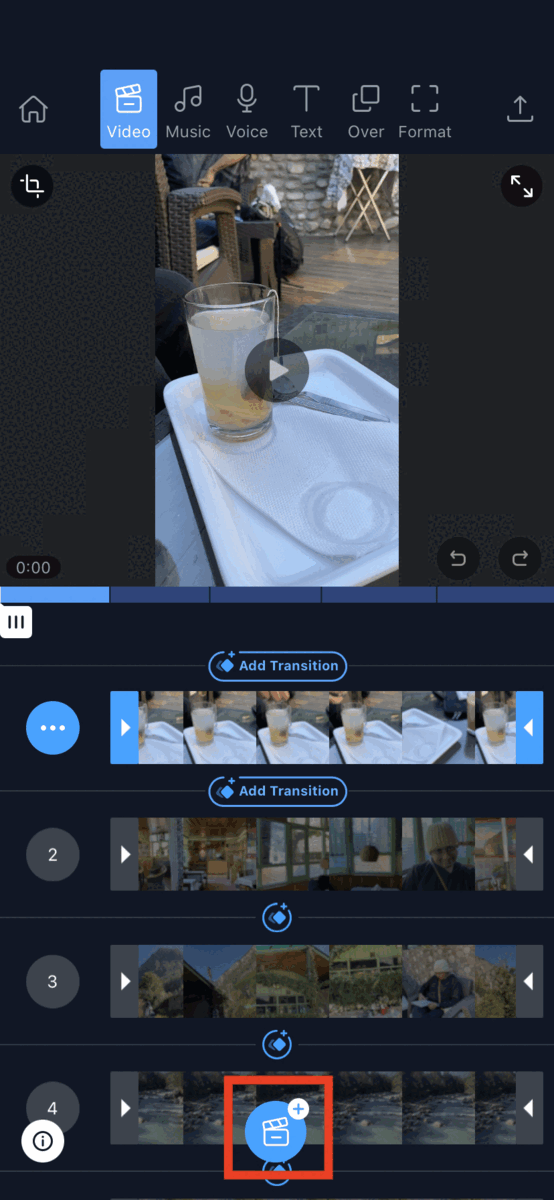
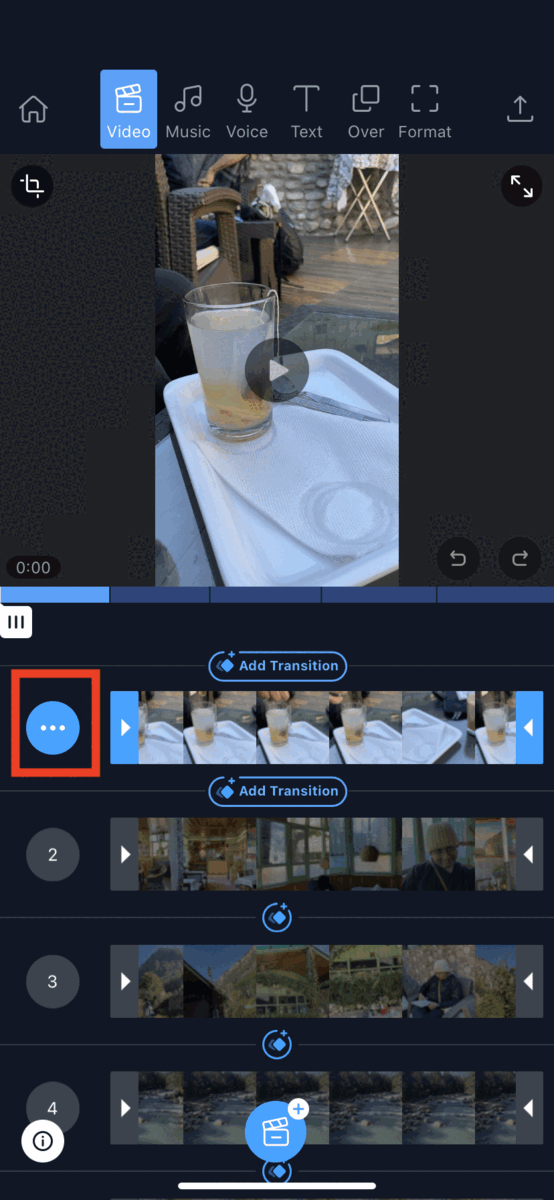
Step 6: Now that all of our clips are in the right order and duration, let’s fine-tune these clips and lock our visuals. To access the other editing features like Delete, Effects, Filters, Speed, Split, Rotate, Reverse, Duplicate, etc, click on the 3 dots next to each clip and you will see a menu open up. You can select the feature you like to make the adjustments.

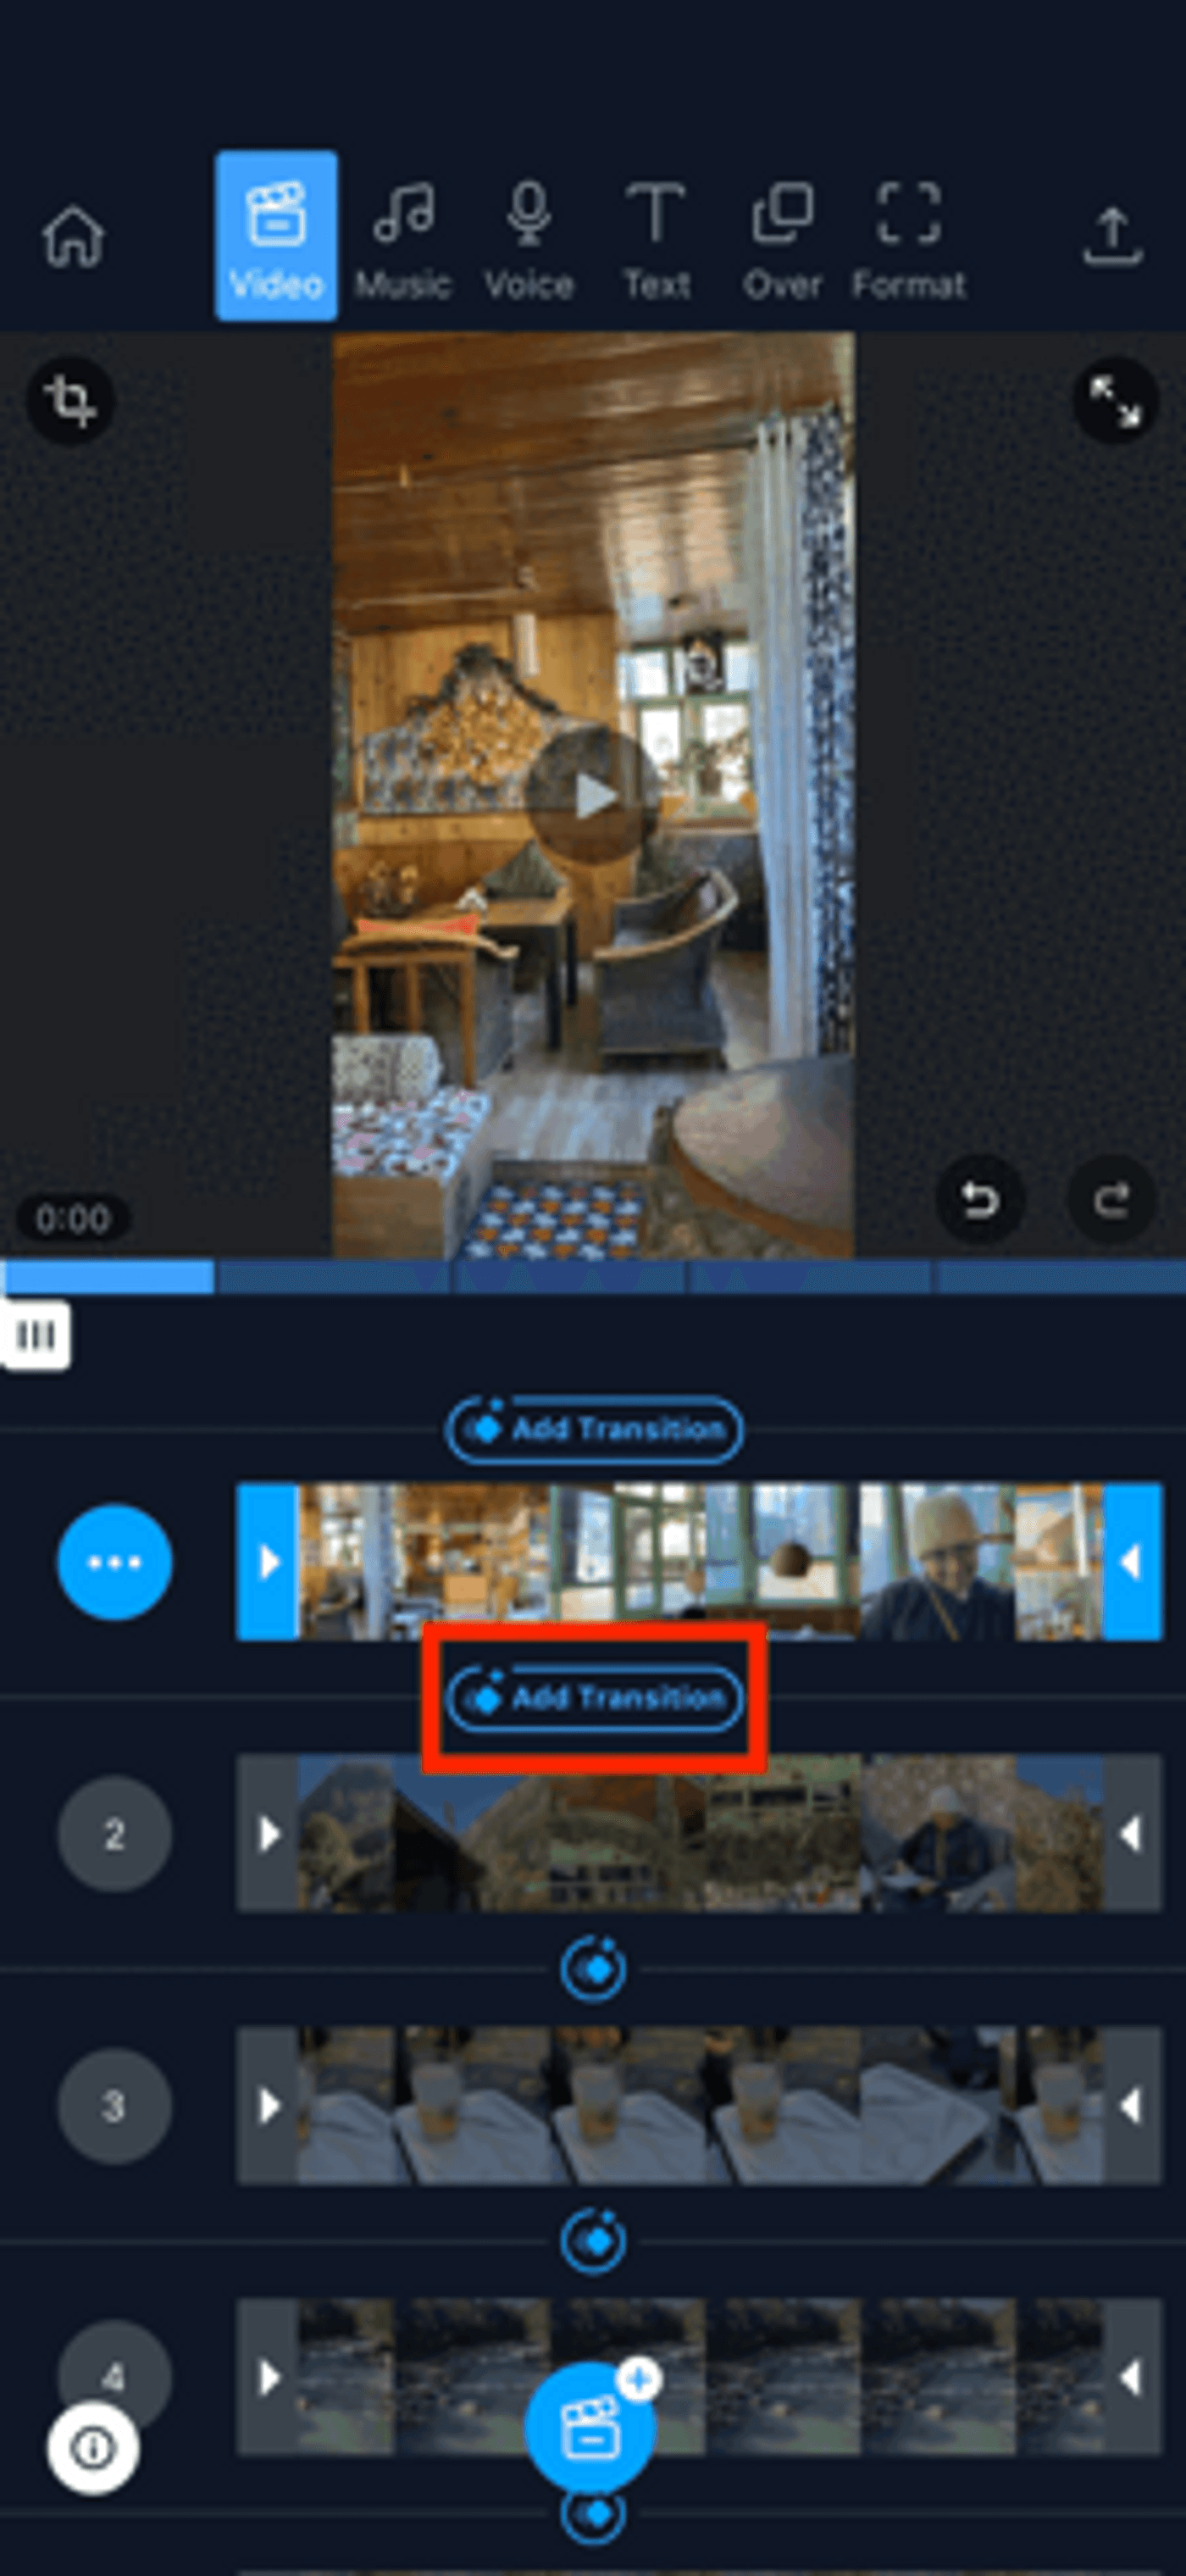
Step 7: Next, you can add transitions between your clips to make your edit flow more smoothly. Simply click on the Add transition tab under your video clip and choose the transition you want from the pop-up menu. You can also edit the duration of the transitions.
While there are several transitions on the free plan, you can access the full library by signing up for Filmr PRO.
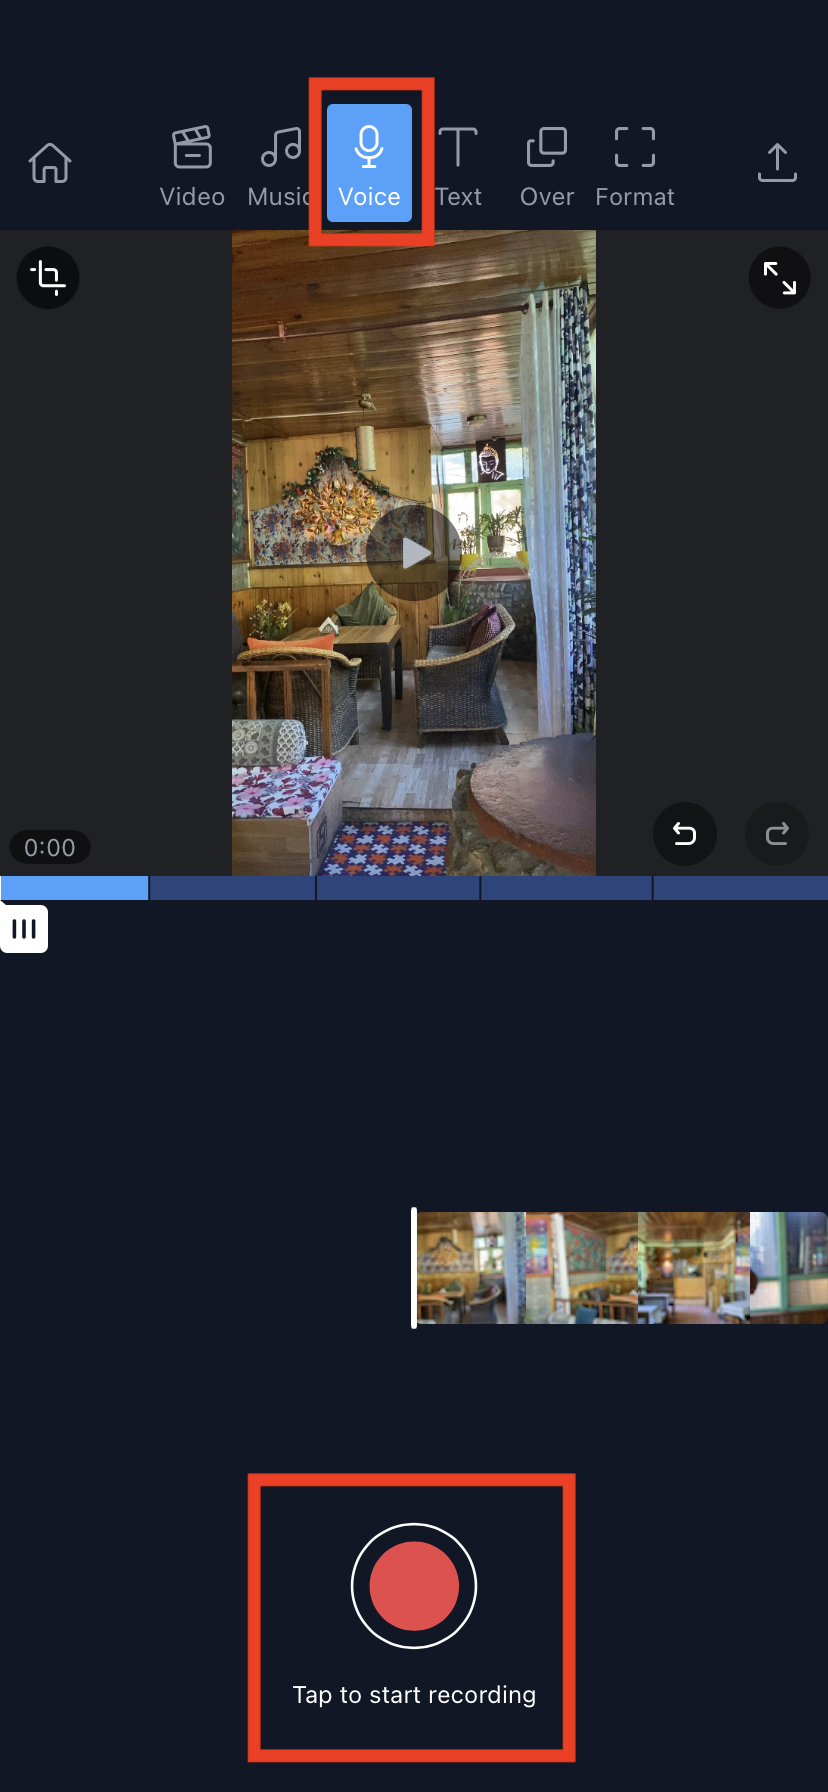
Step 8: Now that our clips are sorted, let’s look at how we can add audio to our video. If you want to add a voiceover, you can simply record that on the Filmr app. Click on the Voice option at the top of the screen, then hit record and start talking!
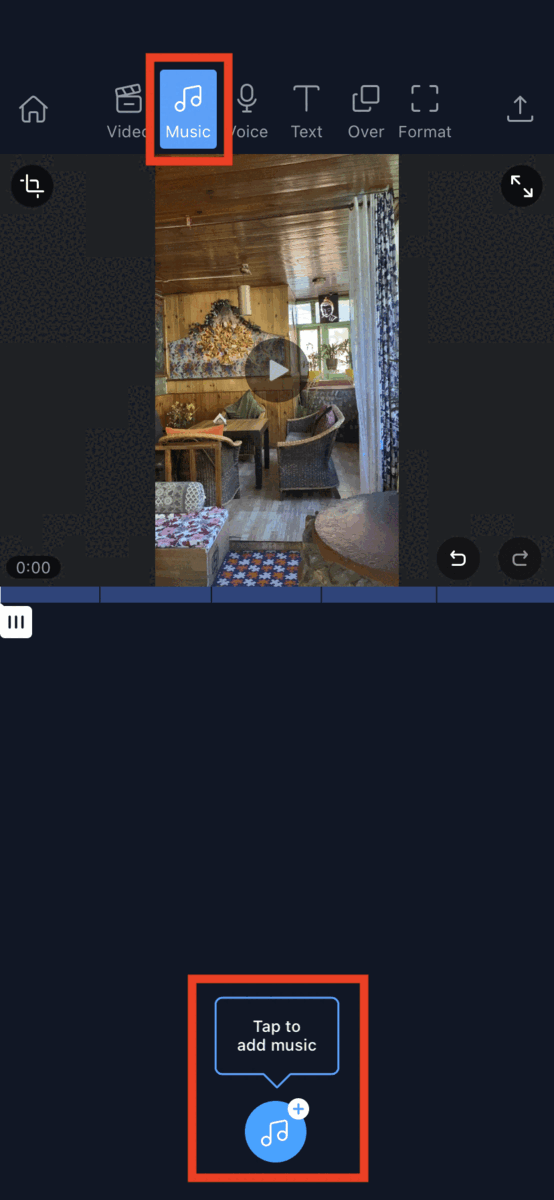
Step 9: To add background music, click on the Music option at the top of the screen. You can select a file downloaded on your phone or you can select music from the stock library. To adjust the duration of the music, just drag the end points to where you want the track to begin and end.
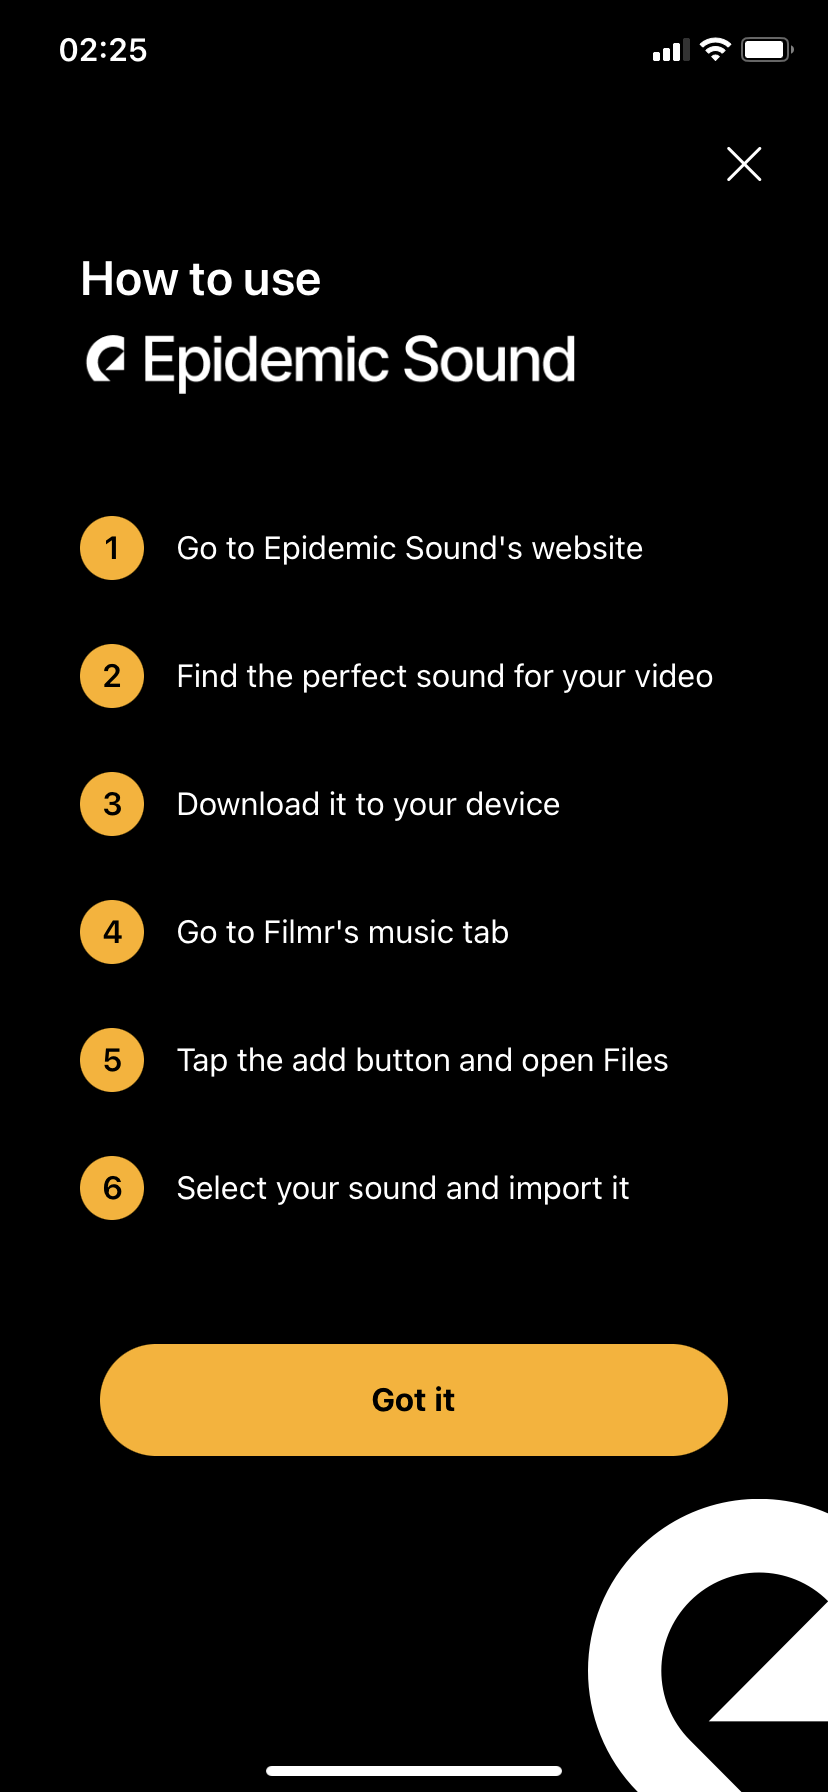
If you are planning on using these videos professionally for your brand or business or on YouTube, then it’s recommended to either only use licensed audio, or buy a subscription to a royalty-free audio library like Epidemic music — you will find an option to do that from within the app itself.
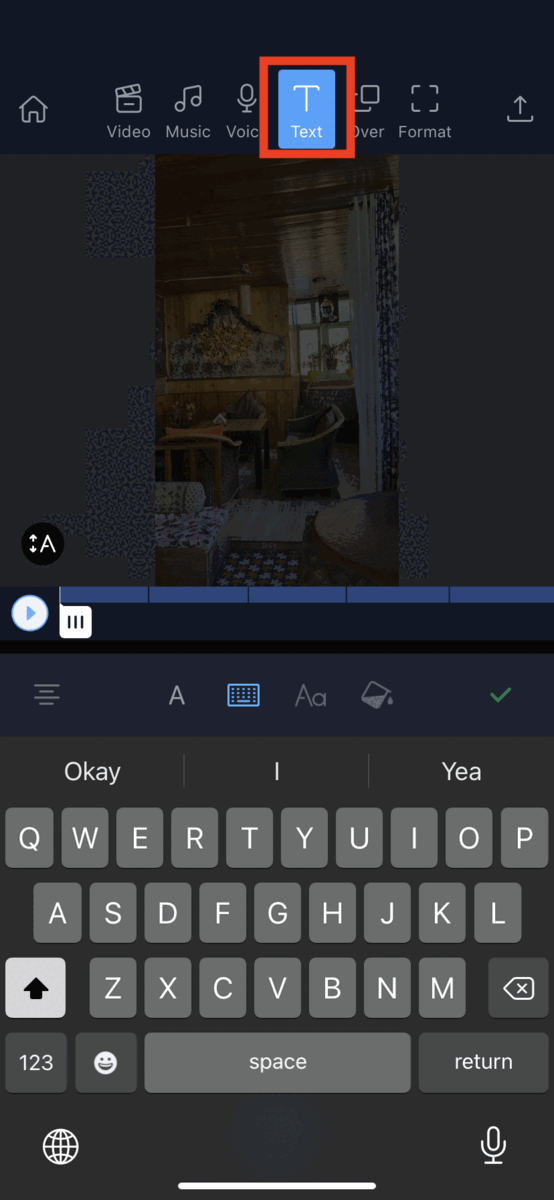
Step 10: Add text to your videos to spruce it up. Go over to the Text option on the top of the screen and after clicking on it, simply type out the text you want to use in your video. You can then play around with different fonts, colors and also adjust the duration of the text.
Step 11: To take things even further, you can add stickers to your videos by clicking on the Over option on the top of the screen. Then choose Stickers, and at the bottom of the screen, there’s an option to add stickers. You can search for the kind of sticker you want to add and then click on the one you like to add it to your video. Then adjust the duration of the sticker as you wish by dragging either the right or the left side arrows, and you’re done!

If you’re a PRO user, you can also add another video on top of your video with the Video in Video option.
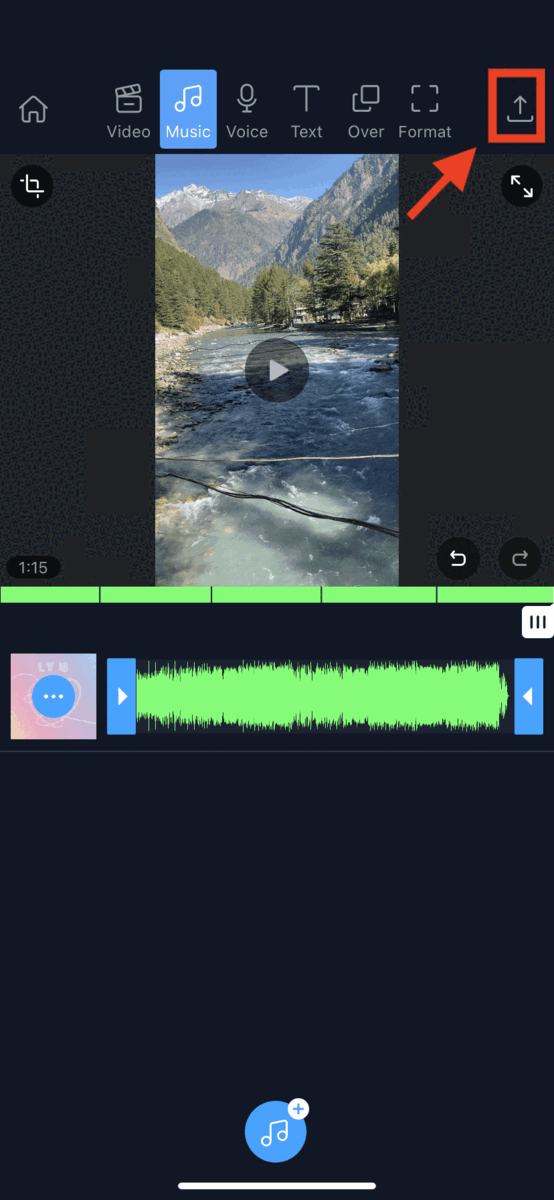
Step 12: Once you’re done making all the changes, preview your video and if you’re satisfied, click on the Share button at the top right corner to export your video. You can save your video locally and you can even save it as a GIF! Filmr also lets you decide your resolution and FPS. Here we will select 1080p, but you can select any resolution, even 4k!
You can also directly publish your video to any of your social media platforms like IGTV, Reels, Stories, Facebook, Twitter, etc, too. However, to upload directly on other platforms, you need a PRO subscription. If you have a free account then you can save the video to your phone first and then upload it to your social media platforms.
Wrapping Up
Editing a video is often considered to be something that’s overly complicated and tough but with the right video editor, it can be quite simple. As you saw it is super simple to create stunning videos on both laptop and mobile using the InVideo and Filmr apps respectively. If you want to dig deeper on making good videos, check out our article on How to Make a Video! And if you want to level up beyond the basic editing you just learnt, check out our video editing tips and learn how to add cool effects to your videos to make them more engaging.
And if you prefer learning via videos, you definitely should check out our YouTube channel where we share daily video creation tips and tricks, the latest video trends and ideas, and help you make more money as a video creator.
This post was written by Yashvi and edited by Adete from Team InVideo