How do you use color grading to unify inconsistent AI-generated video clips?
Last updated July 10, 2026
Unify mismatched AI clips in three grading passes: first correct every clip to a neutral baseline (matched white balance, exposure, contrast), then build the full grade on one hero clip and batch-apply it as a LUT or preset to the rest, and finish with a shared grain-and-blur texture pass so sharpness matches as well as color.
Correct before you grade. Bring every clip to a neutral baseline first — match white balance, exposure, and contrast across the whole set — because a stylistic grade laid over uncorrected footage amplifies the exposure and temperature mismatches between generations instead of hiding them. For AI output specifically, published calibration guides suggest conservative starting ranges (brightness −5 to +10, contrast +10 to +20, saturation +5 to +15), adjusted per clip from there. When you nudge lighting in this pass, reference your sources rather than adjectives — "warm yellow from the lamps only, like all the refs" lands more accurately than "warm lighting."
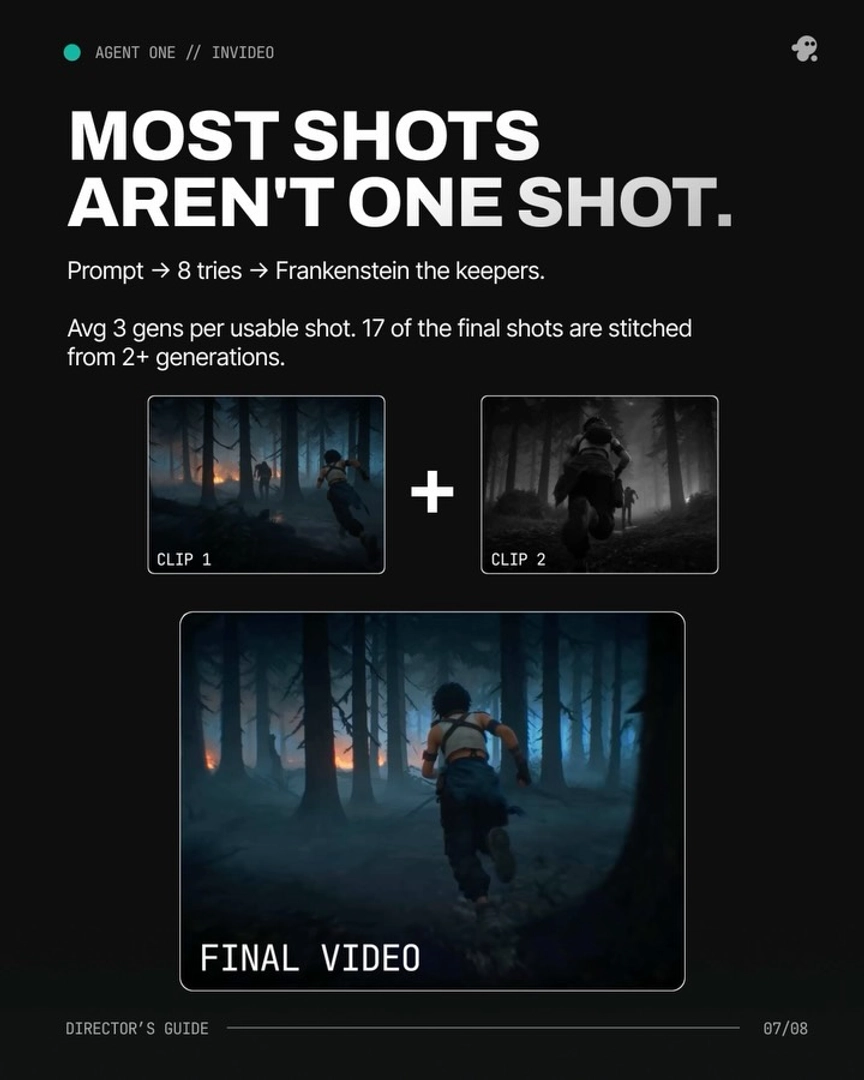
With the baseline set, build the look once and apply it everywhere. Pick the clip that best represents your film's intended palette as the hero, grade it fully, save that grade as a LUT or preset, and batch-apply it to every other clip — checking skin tones and shadow color against the hero after each application. This single unifying grade is what makes seams invisible in AI filmmaking, where shots are routinely assembled from multiple generations: in one 3-minute animated episode, 17 of the final shots were stitched from 2 or more generations, and the shared grade is what reads them as one shot.
Finish with a texture pass, because AI clips diverge in sharpness as much as in color. Heavy generation runs — Seedance 2.0 output in particular — tend toward an ultra-sharp, plasticky skin quality, and the documented fix is a small amount of blur plus grain laid over the unified grade until the footage reads closer to live-action film. Run any upscale pass (Topaz Astra on invideo) before this color work, not after, so the grade is applied at final resolution. If you'd rather not work purely by eye, ask the invideo agent to walk the grade with you against your project's locked palette — one ~90-second horror short ran a structured 8-step color grading guidance process through it this way.
Beyond the grade itself: you can reduce how much grading you need by locking a style block and palette in the invideo agent's context before generating, so clips arrive closer together in the first place — but that's a generation-time discipline, not a grading fix.
Watch some of these to see what works for you:
What we tend to do is put a tiny bit of blur on top of the scene, add a bunch of grain and then play with the grade till it comes closer to live action film.
— invideo's creative team