
If you’ve got an e-commerce business, you’re probably using Facebook and Instagram ads to drive traffic to your website. But to really make the most of your advertising strategy, you need to start using Facebook Pixel.
Facebook Pixel is a data-gathering tool that can track the activity on your website. It can thereby help you run precise, targeted ads for audiences who have interacted with your business, and thus make sure you have the best returns on your investment in advertising. As of February 2022, Facebook Pixel has changed its name to Meta Pixel, though it is still referred to by both names.
While it can seem a little daunting to get started, using Facebook Pixel will ensure that you optimize your advertising for every stage of your sales funnel. That’s why in this article, we’ll be going over everything you need to get started with Facebook Pixel in 2022.
Here’s everything we will cover:
1. What is Facebook Pixel
2. Why you should use Facebook Pixel
3. How does Facebook Pixel Work?
4. Facebook Pixel Setup
5. How to use Facebook Pixel
6. Analyzing data from Facebook Pixel
BONUS: PRO Tips on using Facebook Pixel
Let’s get started!
1. What is Facebook Pixel?
Facebook or Meta pixel is a piece of code that you place on your website. It collects data that helps you track conversions from Facebook ads, optimize those ads, build targeted audiences for future ads and remarket to people who have already taken some kind of action on your website.
This small code of JavaScript records data of visitor activity when installed on your website. If you’ve ever seen ads from the same brand on multiple sites and social media platforms, you’ve seen a glimpse of what Facebook Pixel can help you achieve.
Simply put – whenever a visitor takes an action (called an event) on your website that you want to track (conversion), it records and stores the data which later directly appears in your Facebook Ad Manager and Facebook Analytics. This data can be used to create custom audiences for retargeting, to measure how effective your Facebook ads are, for dynamic ad campaigns, and to evaluate your website’s conversion funnel.
Check out this video for a more in-depth understanding of Facebook pixel:
Now that you’ve understood the basics of what is FB pixel, you need to understand how you can use Facebook Pixel to help to your business.
2. Why you should use Facebook Pixel
The greatest benefit of social media advertising is the ability to test, track, refine and target your ads with laser precision. As a business, you first have to make sure that your Facebook ad catches the attention of your audience, is relevant, and meets the objectives you have set for it. We’ve found that video ads tend to perform significantly better than still images, and you can use InVideo’s Facebook ad maker to create stunning, professional video ads with very little time and effort!
But once you’ve got a good ad ready to be published, the way to truly make it efficient is through Facebook Pixel. Here are some key ways through which Facebook Pixel impacts your business and its marketing strategy:
A. Helps you track conversions
The primary benefit of the Facebook Pixel is that you can use it to see how audiences interact with your website after seeing your Facebook ad. It even enables you to track customers across multiple devices, something that can help you to make changes to and optimize your ad strategy based on the collected data. You’ll be able to see if people watch your ads on mobile but switch to their desktop browser to make the purchase or vice versa. Facebook Pixel shows you the sales funnel data of the customer, tracks conversions, and thus helps you to narrow down on how to calculate your ROI and target ads to customers in the most efficient way possible.
Something to note is that the conversion tracking data gathered through Facebook Pixel is somewhat affected by the iOS 14.5 changes to privacy and Facebook Pixel tracking. However, Facebook is working on its Aggregated Event Measurement to make sure advertisers are still able to collect some data.
B. Helps improve the ROI on your ad expenditure
The data from Facebook Pixel enables you create a smarter, more tailored ad strategy. You can have numerous objectives for your ads, such as sign-ups, purchases, increased traffic, wider reach, and more. With Facebook Pixel you can track all of these parameters and more such actions taken by your consumers. All the gathered data can then be used to create and target ads in a way that they are seen by people who are most likely to take an action that will meet your objective. Ultimately, this improves your ad conversion rate on Facebook – thus ensuring that the ROI on your ad expenditure is also improved!
Facebook did a case study for San Francisco-based children’s educational multimedia company Little Passports. They found that since the brand started conversion tracking and creating Lookalike Audiences, they saw a 3x growth in customer base and a 60% decrease in cost per acquisition. Here’s one of the targeted ads that they display to audiences.

C. Helps you retarget customers on Facebook
Abandoned carts are a huge problem for e-commerce businesses and one way to recover at least some portion of the lost sales is to retarget customers with ads on Facebook as a way of prompting them to complete their purchases. Facebook Pixel data is extremely useful for this, and when paired with Dynamic Ads, you can show targeted ads on Facebook to people who have already visited your site but have not converted. We’ll learn more about remarketing using Facebook Pixel further ahead in this article.
D. Helps you create Lookalike Audiences
Facebook advertising offers a feature that enables you to use their tracking data from Facebook Pixel to build a Lookalike Audience. A Lookalike Audience is a list of people who have a similar demographic to people who are already interacting with your website. By curating a list of potential customers based on your current customers’ likes, interests, and other information, you can expand your reach to new pools of people who may be interested in your business. These Pixel-based Lookalike Audiences are dynamic and they update over time, so they will always be helpful in ad campaigns that are targeting completely new customers.
Now, let’s have a look at how Facebook Pixel actually works and some basic terms that will be of help when you are setting up your Facebook Pixel on your own website.
3. How does Facebook Pixel Work?
Among other things, some primary events you can use the Facebook Pixel to track are pageviews, time spent on the page, items added to the cart, and purchases made. Essentially, the Facebook Pixel code lives on your website, and it’s able to track visitors as they interact with your website. This is why if you as a customer abandon your cart before making your purchase, you’ll be shown ads for it on Facebook and Instagram. But this only explains the front end of the Facebook Pixel.
As a business, you should understand the workings of the Facebook Pixel on the backend as well. Here are the basic steps followed by brands that are using Facebook Pixel:
Step 1: Installing the Facebook Pixel
The very first thing you need to do is add a snippet of tracking code to your website. This starts the process of data tracking that will help your ads deliver the most value to you.
Step 2: Gathering insights
Once installed, you’ll begin accumulating insights about your site visitors. These can be things like the source of the traffic to the website, what device they are using, and other demographic information about your visitors.
Step 3: Reviewing behaviors
With all the data and insights from Facebook Pixel, you can analyze how people act on your website. You’ll be able to see whether they explore a product page or if they have put something in their shopping cart. These insights can help you build your audiences, thus helping you refine and narrow down your ad strategy more.
Step 4: Building audiences
You can use the data collected from Facebook Pixel events to create Facebook Custom Audiences, Lookalike Audiences. This will help you run targeted ads tailored to you’re the preferences of your audiences.
Step 5: Analyzing events
Using conversion events, you can assess and decide the best Facebook ads strategy and campaigns for your business.
For the Facebook Pixel to work effectively, you need to make a good ad as well. This can be a difficult task, but given the insights provided to you by the Facebook Pixel, you can gain a good idea of your target audience and the kind of ads they would like to see. To make your ad-creating process even more easy and effortless, you can use InVideo’s Facebook ad maker to create stunning and professional-looking video ads.
4. Facebook Pixel Setup
Now that you know the basics of how to use the Facebook Pixel and how it works, it’s time to learn how to set up a Facebook Pixel for your own website. There are 2 parts to how to setup Facebook Pixel – first we’ll learn how to create a Facebook Pixel, and then we’ll look at how to add it to your website.
Part I: Create Facebook Pixel
Step 1: Where to find Facebook Pixel
Go to the Facebook Events Manager. Open the left-hand menu, and click Connect to Data Sources.

Then, select Web and click on Connect to get started with creating your Pixel.

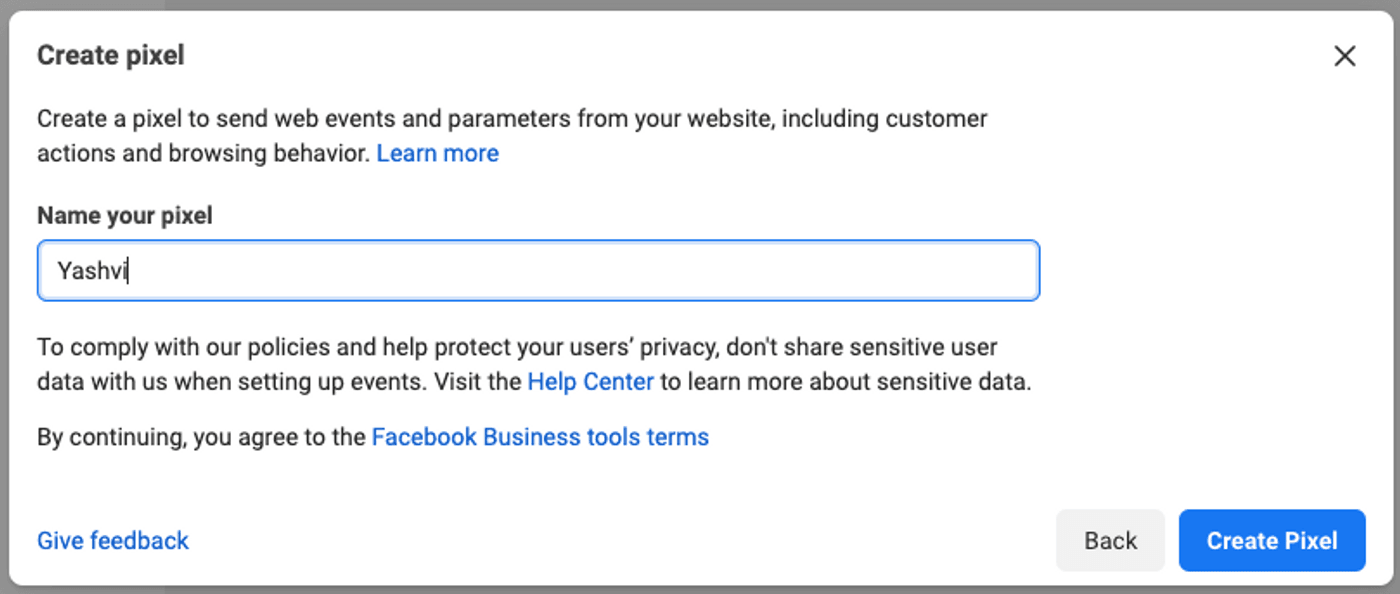
Step 2: Name your pixel and enter your website URL
Now, to Create your Pixel you need to name it first. If you are an agency and will be using Pixel for many accounts, make sure that you name them accordingly, based on the businesses and not a particular campaign, because Pixel will be synced to your Facebook Business Manager – and you get only one Pixel per ad account.
Next, you need to enter your website URL. Facebook will then check whether you’re eligible for a partner integration or if you need to set up the Pixel manually on your website. Click on Check, and then click Next to proceed ahead.

Step 3: Connecting your website
Following the creation of your pixel, you need to decide how you want to connect your website. To simplify the process and focus on the Facebook pixel’s functions, we’re going with the Pixel only option for this article. After selecting the option of your choice, click Next.

Part II: Adding Facebook Pixel to your website
Step 4: Decide your setup method
You can choose to set it up manually with a Facebook Pixel code or use Partner integration for your website.

Here, you have 3 different options that you can take action on, depending on what website and platform you are using:
- Using a Partner Integration: Facebook has teamed up with web service providers and e-commerce platforms to make Facebook pixel integration smoother. If you are using one of Facebook’s integration partners, like WordPress or Squarespace, click on Use a Partner Integration. This will walk you through the steps to connect your Facebook pixel to your website without any coding. It is the simplest way to install Facebook Pixel for your website.
- Working with a developer: If you are working with a developer or someone else who can help you edit your website code, then all you need to do is click Email Instructions (on the bottom right corner of the screen) to send your developer everything they need to install the pixel.
- Installing code manually: If you are not using a Facebook integration partner and you don’t have a developer, you’ll need to insert the pixel code directly into your web pages. In the next few steps, we’ll focus on how you can do this with ease. To start, click on Install Code Manually.
Step 5: Add the base code to your website
Click the green Copy Code button on the page. Then, paste the pixel code into the header code of your website, just above the tag. You’ll need to install this base code on every single page of your website. Click Continue.

Step 6: Decide on Automatic Advanced Matching
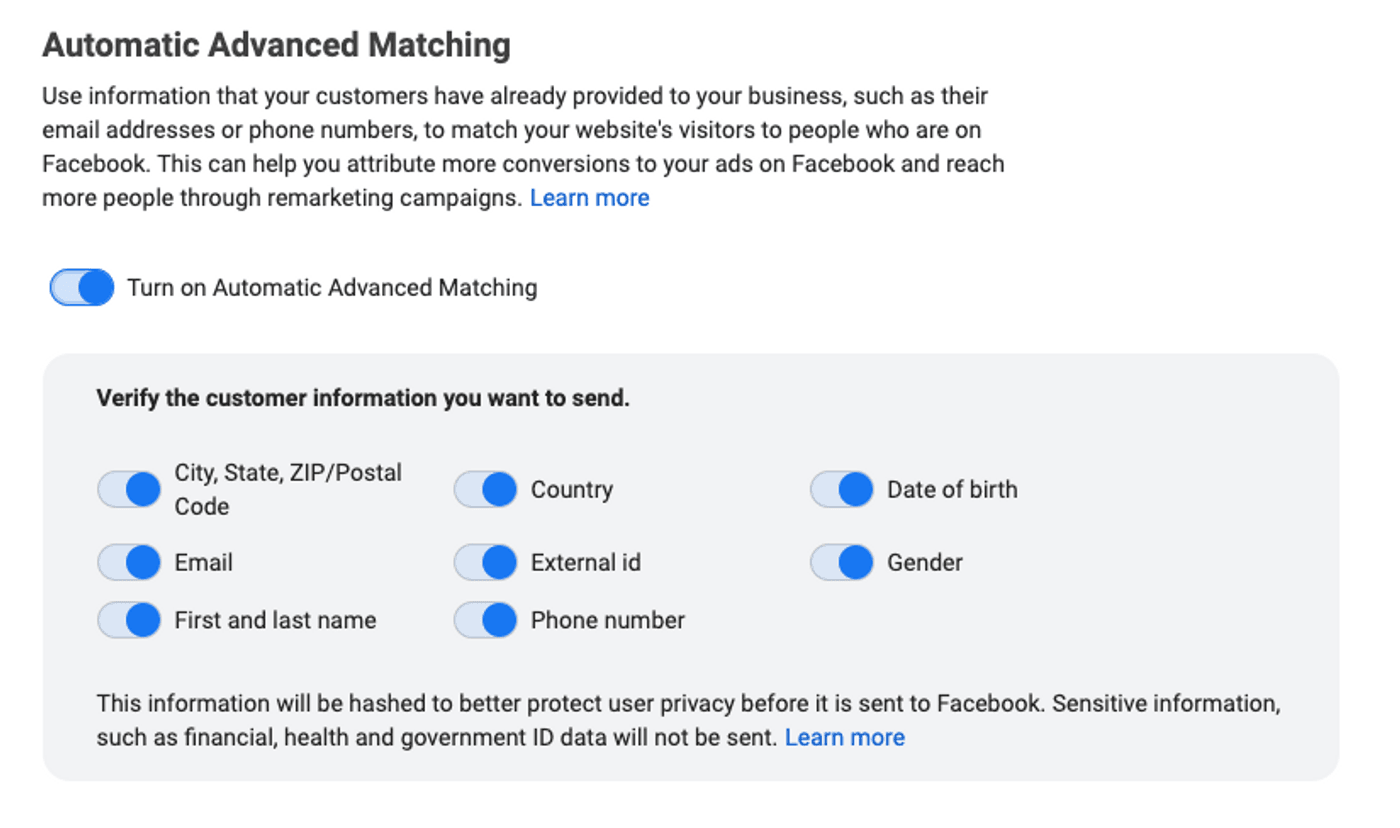
Choose whether to use automatic advanced matching. This option helps you to match customer data from your website to Facebook profiles. You can choose the data points that you wish to verify. This lets you track conversions more accurately and create larger custom audiences. Then click Continue.
Step 7: Set up Facebook Pixel events
There are 2 ways to get started on this.
First, you can directly click the Open Event Setup Tool button as is shown in the picture below.

The other option is to go through your Facebook pixel ID. What is a Facebook pixel ID? It is your account recognition for Facebook ads. For this step, choose your Facebook pixel ID and go to your Settings. Scroll down until you see the option to Open Event Setup Tool, and click on that.

Then finally, you need to add your website URL and click on Open Website.

Step 8: Add events
Facebook will provide you with a list of suggested events. You’ll need to click Review next to each event. Then depending on whether or not you want to track that event, choose to Confirm or Dismiss the event. Click Finish Setup to continue.
And with that, your Facebook Pixel setup is complete! Check out our PRO tips at the end of this article to make the most out of Facebook Pixel. For now, let’s have a look at how to use Facebook Pixel to get the best results for your business.
5. How to use Facebook Pixel
At its core, Facebook Pixel offers five primary functions to help you get a better ROI on your ad and marketing campaigns. These are the things you’ll have to keep in mind when analyzing the data you’ve gathered from Facebook Pixel. Consider them the five building blocks that will help you learn better about how to use Facebook Pixel efficiently.
#1 - To create custom audiences for remarketing
If you have the Facebook Pixel installed on your website, it will track the movements of all the visitors on your website who are simultaneously logged into Facebook. This helps Facebook create Custom Audiences for you – which essentially becomes a list of all of the people who have interacted with your website and are a part of your target audience. This list then helps you retarget to the people who have interacted with your website but have not converted yet, and it can also be helpful to upsell to those who have already made a purchase. Here are the different sources you can use to create your Custom Audience List:

The Facebook Pixel tracks activities on your website such as:
- Which pages are visited by a user
- The time a user visited a page
- Scroll depth, i.e. how far into your website did they scroll
- Time spent by a user on a page
You can use the same function to exclude specific groups that have either already converted or are not highly engaged and thus are unlikely to convert. You can also create other groups with this data, such as Lookalike Audiences.
Some examples of groups you can target and advertise to based on their shared behavior are:
- People who have visited your website in the past 24 hours
- People who have visited your website in the past 180 days but have not been back in 30 days
- People who have visited a specific landing page on your website
Your audiences will be created independently from ads. So once you’ve created an audience, you can choose what ads to show them and when.
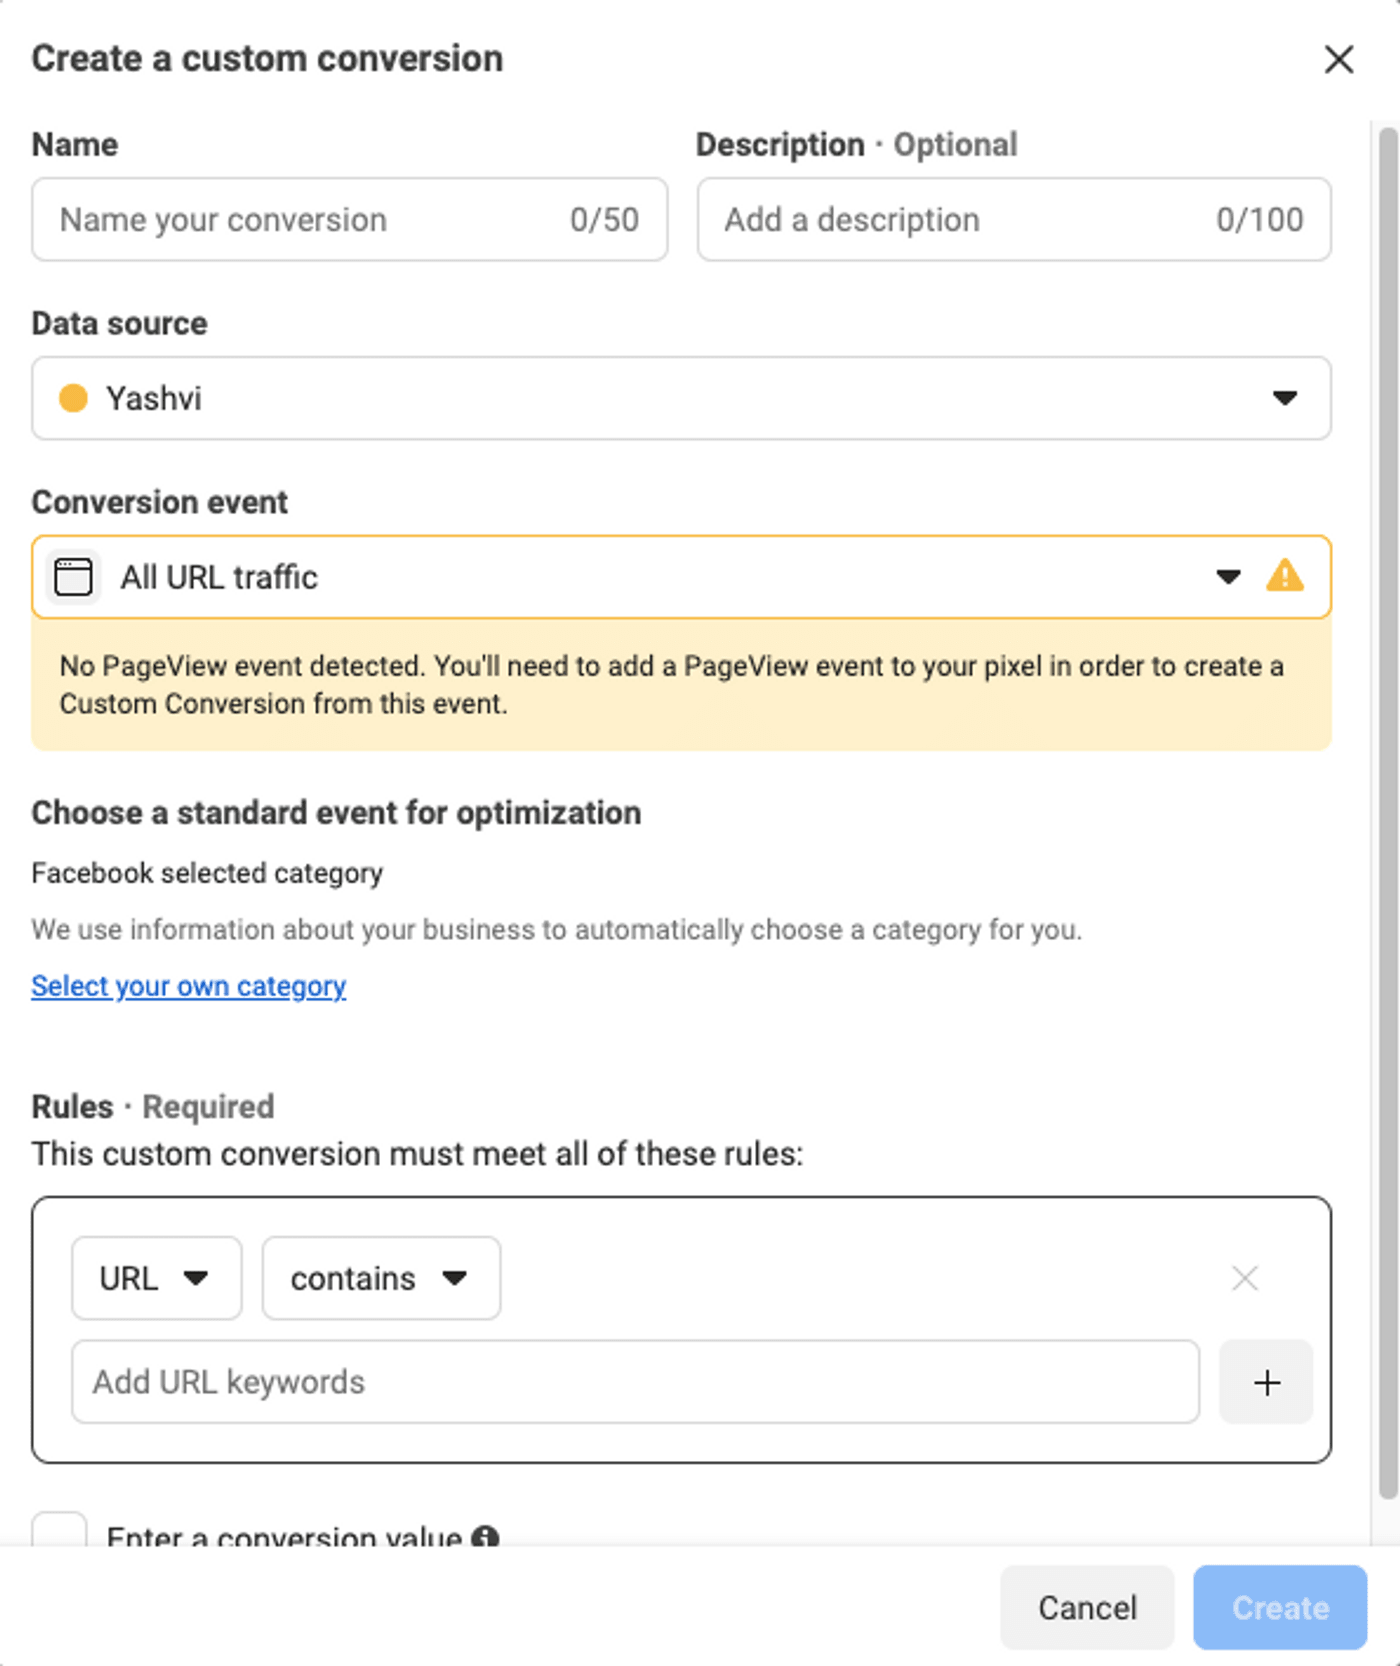
#2 - To understand custom conversions
Custom conversions are a great way for you to use Facebook pixel to evaluate the ad spend and ROI of your business. A custom conversion is essentially when a customer reaches a completion page once they have made a purchase. This customer activity is tracked by the Pixel. Usually, this is some kind of a post-purchase ‘thank you’ page. You can create a custom conversion by selecting a completion page and naming the conversion. Here’s what creating a custom conversion looks like:
Some examples of such completion pages are:
- Thank you for shopping. Your order is on the way.
- Thanks for signing up. You’ll receive your first email from us shortly.
- Thanks for your comment. Here’s your free download.
- Thank you for supporting us. Here’s a code for a 20% discount on your next purchase.
You can also track your ad spend and ROI by choosing a category for a conversion and then entering a money value for the conversion. If you have a product priced lower than your expenditure for every conversion, you’ll want to make some changes to your ad campaign.
Because the tracking pixel already tracks all the activity on your website pages, it can easily track when someone visits a completion page, and this includes people who have clicked on your Facebook ads. To optimize ad groups for custom conversion, you’ll need to set ‘Website Conversion’ as your Facebook advertising objective. Then, type in your website URL and choose the conversion that you want to track and improve. Currently, one ad account is limited to 100 custom conversions, but Facebook gives you the freedom to delete them at any time if they aren’t being used.
If you want to take things up a notch and make a great ‘Thank You’ page for your completion page, we recommend making a fun thank you video! You can use InVideo’s online editor to do this with ease and minimal effort – and here’s a customizable template from us that we think would work well.
#3 - To track standard and custom events
When someone takes an action on your website, it’s logged in the Facebook Pixel as an event. The pixel can be used to track two different types of events:
1. Facebook Pixel standard events
These are predefined actions that Facebook recognizes across ad products. There are 17 standard Facebook Pixel events that you can use by copying and pasting a simple event code:
- Add payment info: A customer adds and saves their payment information during checkout.
- Add to cart: Someone adds an item to their shopping cart on your website.
- Add to wishlist: Someone adds an item to their wishlist on your website.
- Complete registration: Visitors sign up for an event, email subscription, or service provided by your business.
- Contact: Someone submits a query and contact details to get in touch with your business.
- Customize product: Someone chooses a variant of a product, like selecting a color or size.
- Donate: Someone donates to a cause through your website.
- Find location: To help a visitor locate a store or a service center for your business.
- Initiate checkout: Someone starts the checkout process to purchase something by clicking a Checkout button.
- Lead: A visitor identifies themselves as a lead on your site by submitting a form or signing up for a trial.
- Purchase: Someone lands on a Thank You or confirmation page after completing a purchase.
- Schedule: Someone schedules an appointment with your business.
- Search: Someone uses the search function to look for something.
- Start trial: A visitor signs up for a trial of a product or service.
- Submit application: A visitor submits an application for a product, service, or program – such as a credit card.
- Subscribe: Someone signs up for a paid product or service.
- View content: Someone visits a landing or product page that you have promoted or marked as important.
2. Custom events
This is an event that is not covered by Facebook, which you have to name at your discretion. Custom events don’t need to be tied to a URL the way that custom conversions are. They can just be tracked by adding an additional piece of code to your page of interest. They are typically used in order to collect more specific data than a standard event is able to provide. This could be all sorts of different things. Some common examples are scroll depth, button clicks, and video tracking. Having custom events helps you to tailor your data tracking to your business and advertising objectives. For example, if you are testing out a new free ebook, you might want to track the success of your launch using a custom event like tracking file download links.
#4 - To create dynamic ads
If your business has an e-commerce site, you can use the Facebook Pixel to run dynamic ads. Using this feature shows tailored ads to customers that have visited your site. Dynamic ads enable you to automatically promote your entire product catalog across Facebook without having to create thousands of individual ads. For e-commerce brands that have a large inventory of products, this is an incredibly helpful and efficient way to target many different customers who are all shopping for products completely different from each other. Here’s a dynamic ad from Borjan shoes displaying different products from their catalog:

All you have to do for this is upload your product catalog and relevant product information to Facebook Business Manager. You’ll have to use Facebook Pixel and Custom Audiences in tandem and modify your audience group to report on the buying behavior of your customers. Then you will be able to create a dynamic template to display Facebook ads for e-commerce to customers who have viewed specific products on your website already.
To understand better how you can use Facebook ads to your advantage, check out this comprehensive guide.
#5 - To build lookalike audiences
If you target an audience that is not fully interested in your business, they won’t be very receptive to your e-commerce Facebook advertising, no matter how good the content of your ad is. The Lookalike Audiences feature that Facebook offers is a way to solve that: they use their data and the algorithm to find new people who have qualities and interests similar to your existing customers. Here’s how to start the process to create Lookalike Audiences:

One tip that Facebook offers is to make your lookalike audience using only your best pool of customers instead of your entire customer pool – you may get better results doing this, especially when efficient digital marketing is key for running Facebook ads for e-commerce.
The Facebook Pixel code tracks all the activity on your website, and Facebook can then use that data to identify people who share similar traits as your visitors. So if your ‘best customer’ base is full of 25-35-year-old females who live in urban areas and have some other demographic similarities, Facebook can create a Lookalike Audience of other 25-35-year-old females who live in urban areas with the same demographics.
6. Analyzing data from Facebook Pixel
As part of Facebook’s initiative to consolidate business tools, the standalone Facebook Analytics and Audience Insights tools have been discontinued from July 1, 2021. You can now use a combination of Insights in the Meta Business Suite, Facebook Ads Manager, and Facebook Events Manager to continue your data analysis efforts for your marketing strategy. The Meta Business Suite Insights is a tool that provides you with Facebook metrics and helps you understand the results of your organic and paid social media efforts across Facebook and Instagram in one place.
With Insights, you will be able to view trends and metrics on the performance of your Facebook Page and Instagram business profile. This will help you understand which marketing strategies work well and where you need to make improvements. With that, you can optimize the way you are spending your time and resources. You’ll be able to gain insights about your account, platform, and post level. This includes things like your ad account’s cross-platform spend, your content engagement statistic, and demographic summaries of people engaging with your content marketing.
Now, let’s take a look at how to use a few important areas of the Insights tab in Facebook Business Suite to analyze the data gathered by your Facebook pixel:
#1 - Identify key trends
You’ll be able to quickly view insights and trends regarding the reach of your ads. This can be helpful to track whether your business is expanding and if your audience is growing.
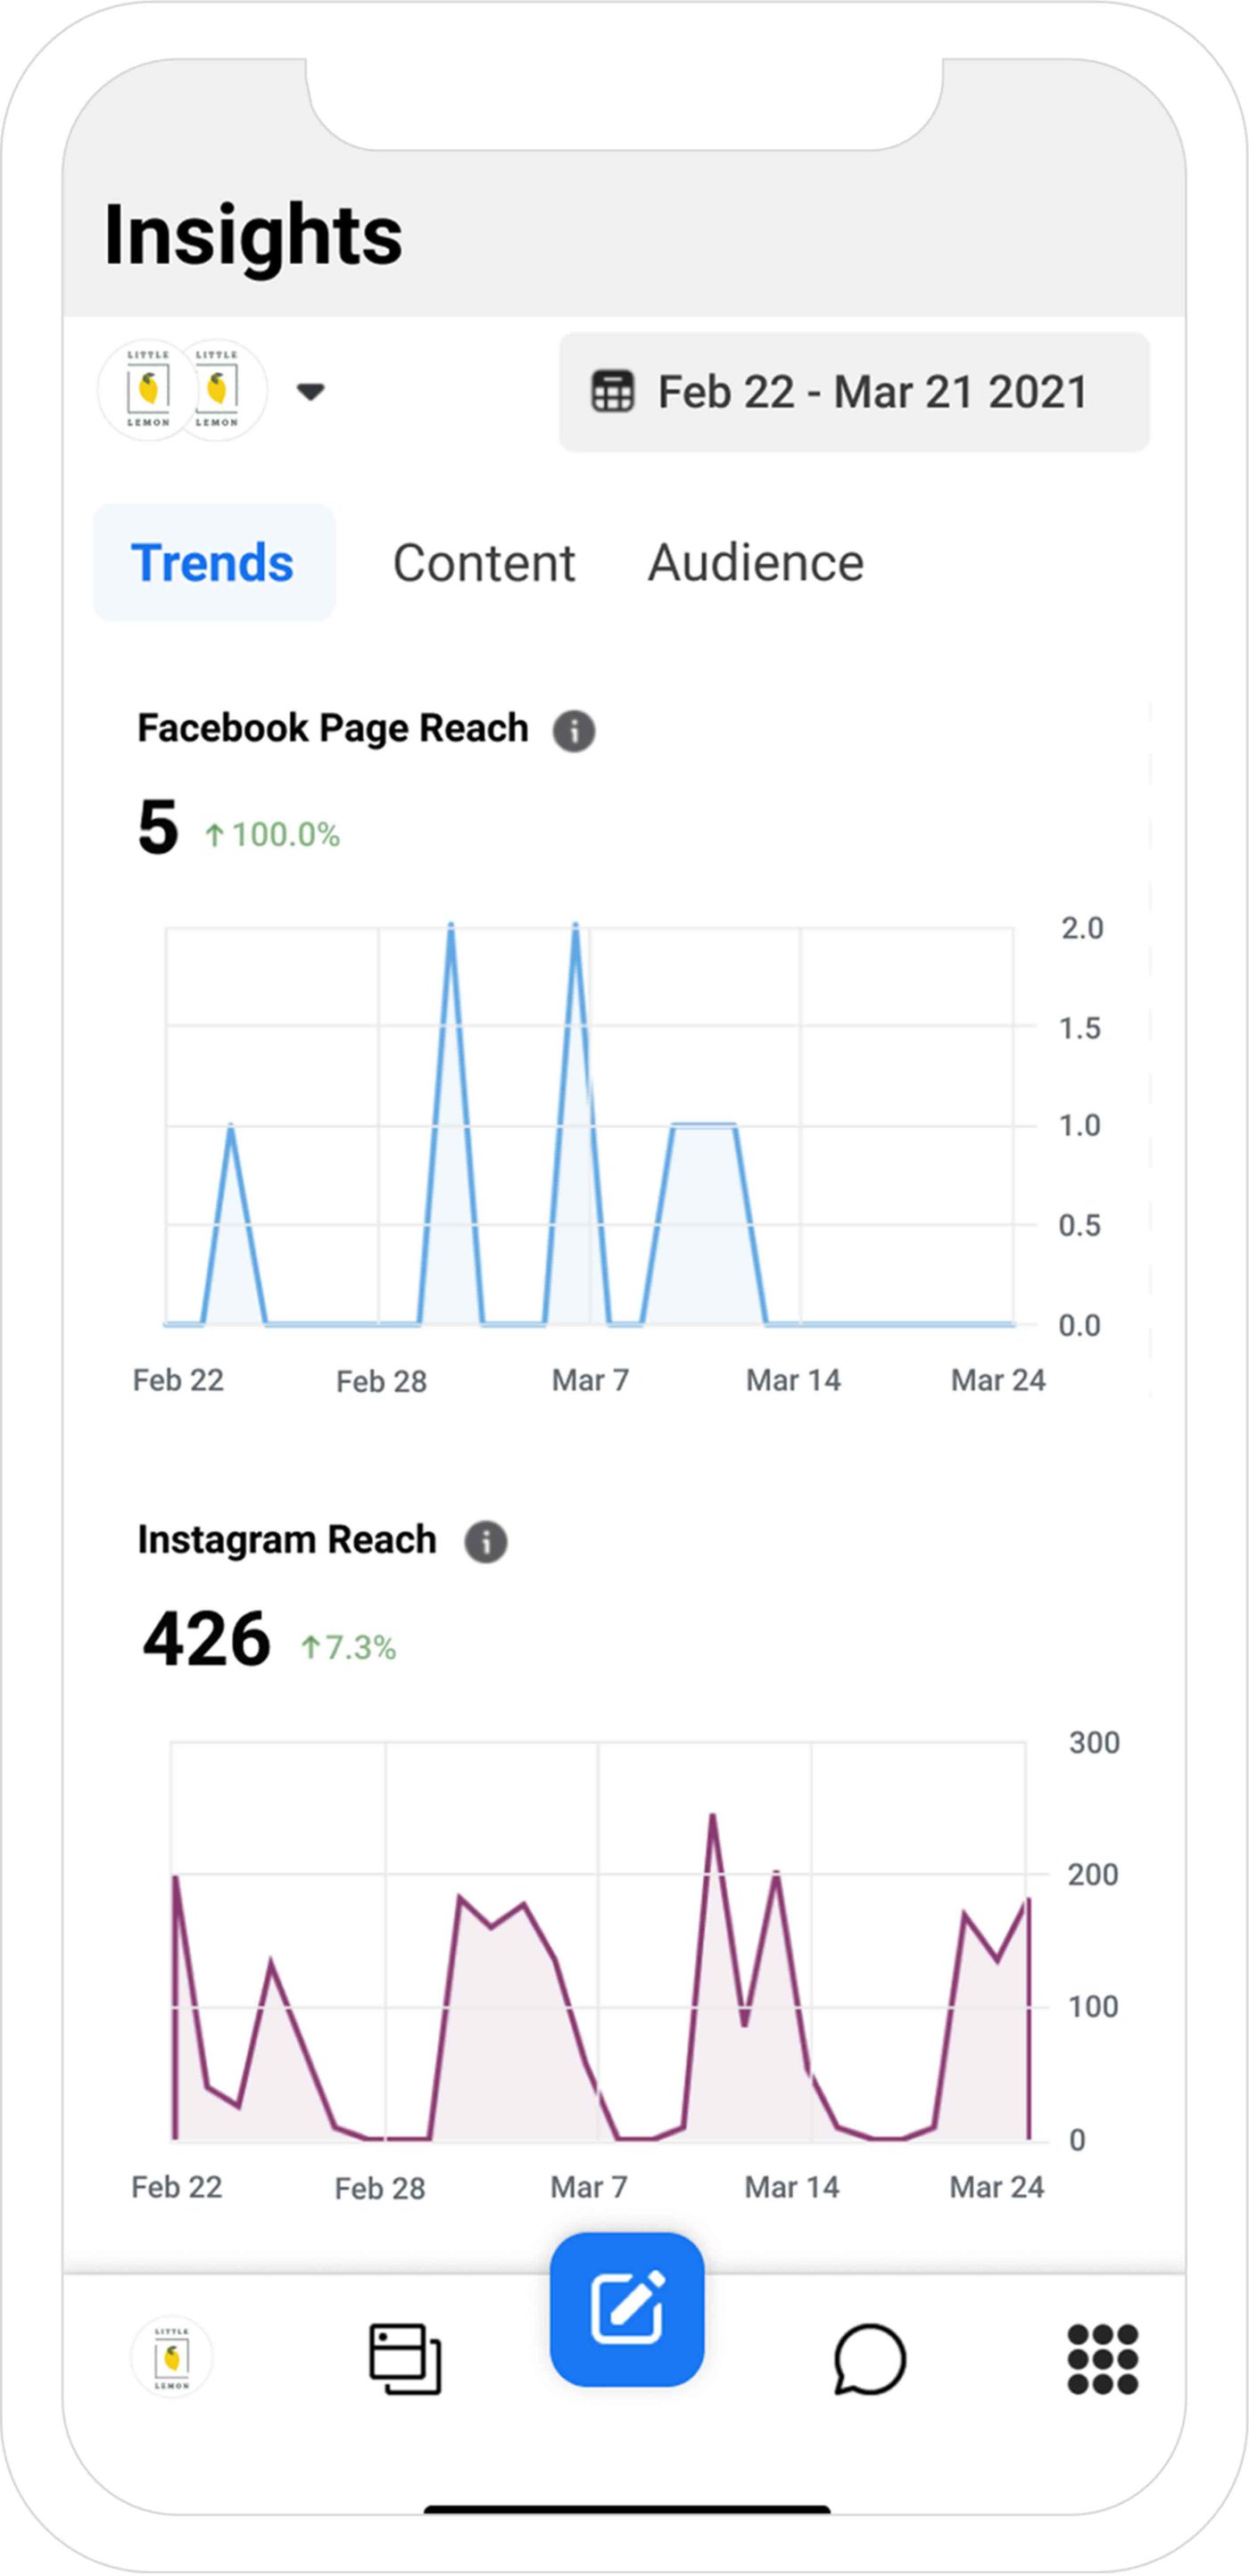
Source: Facebook
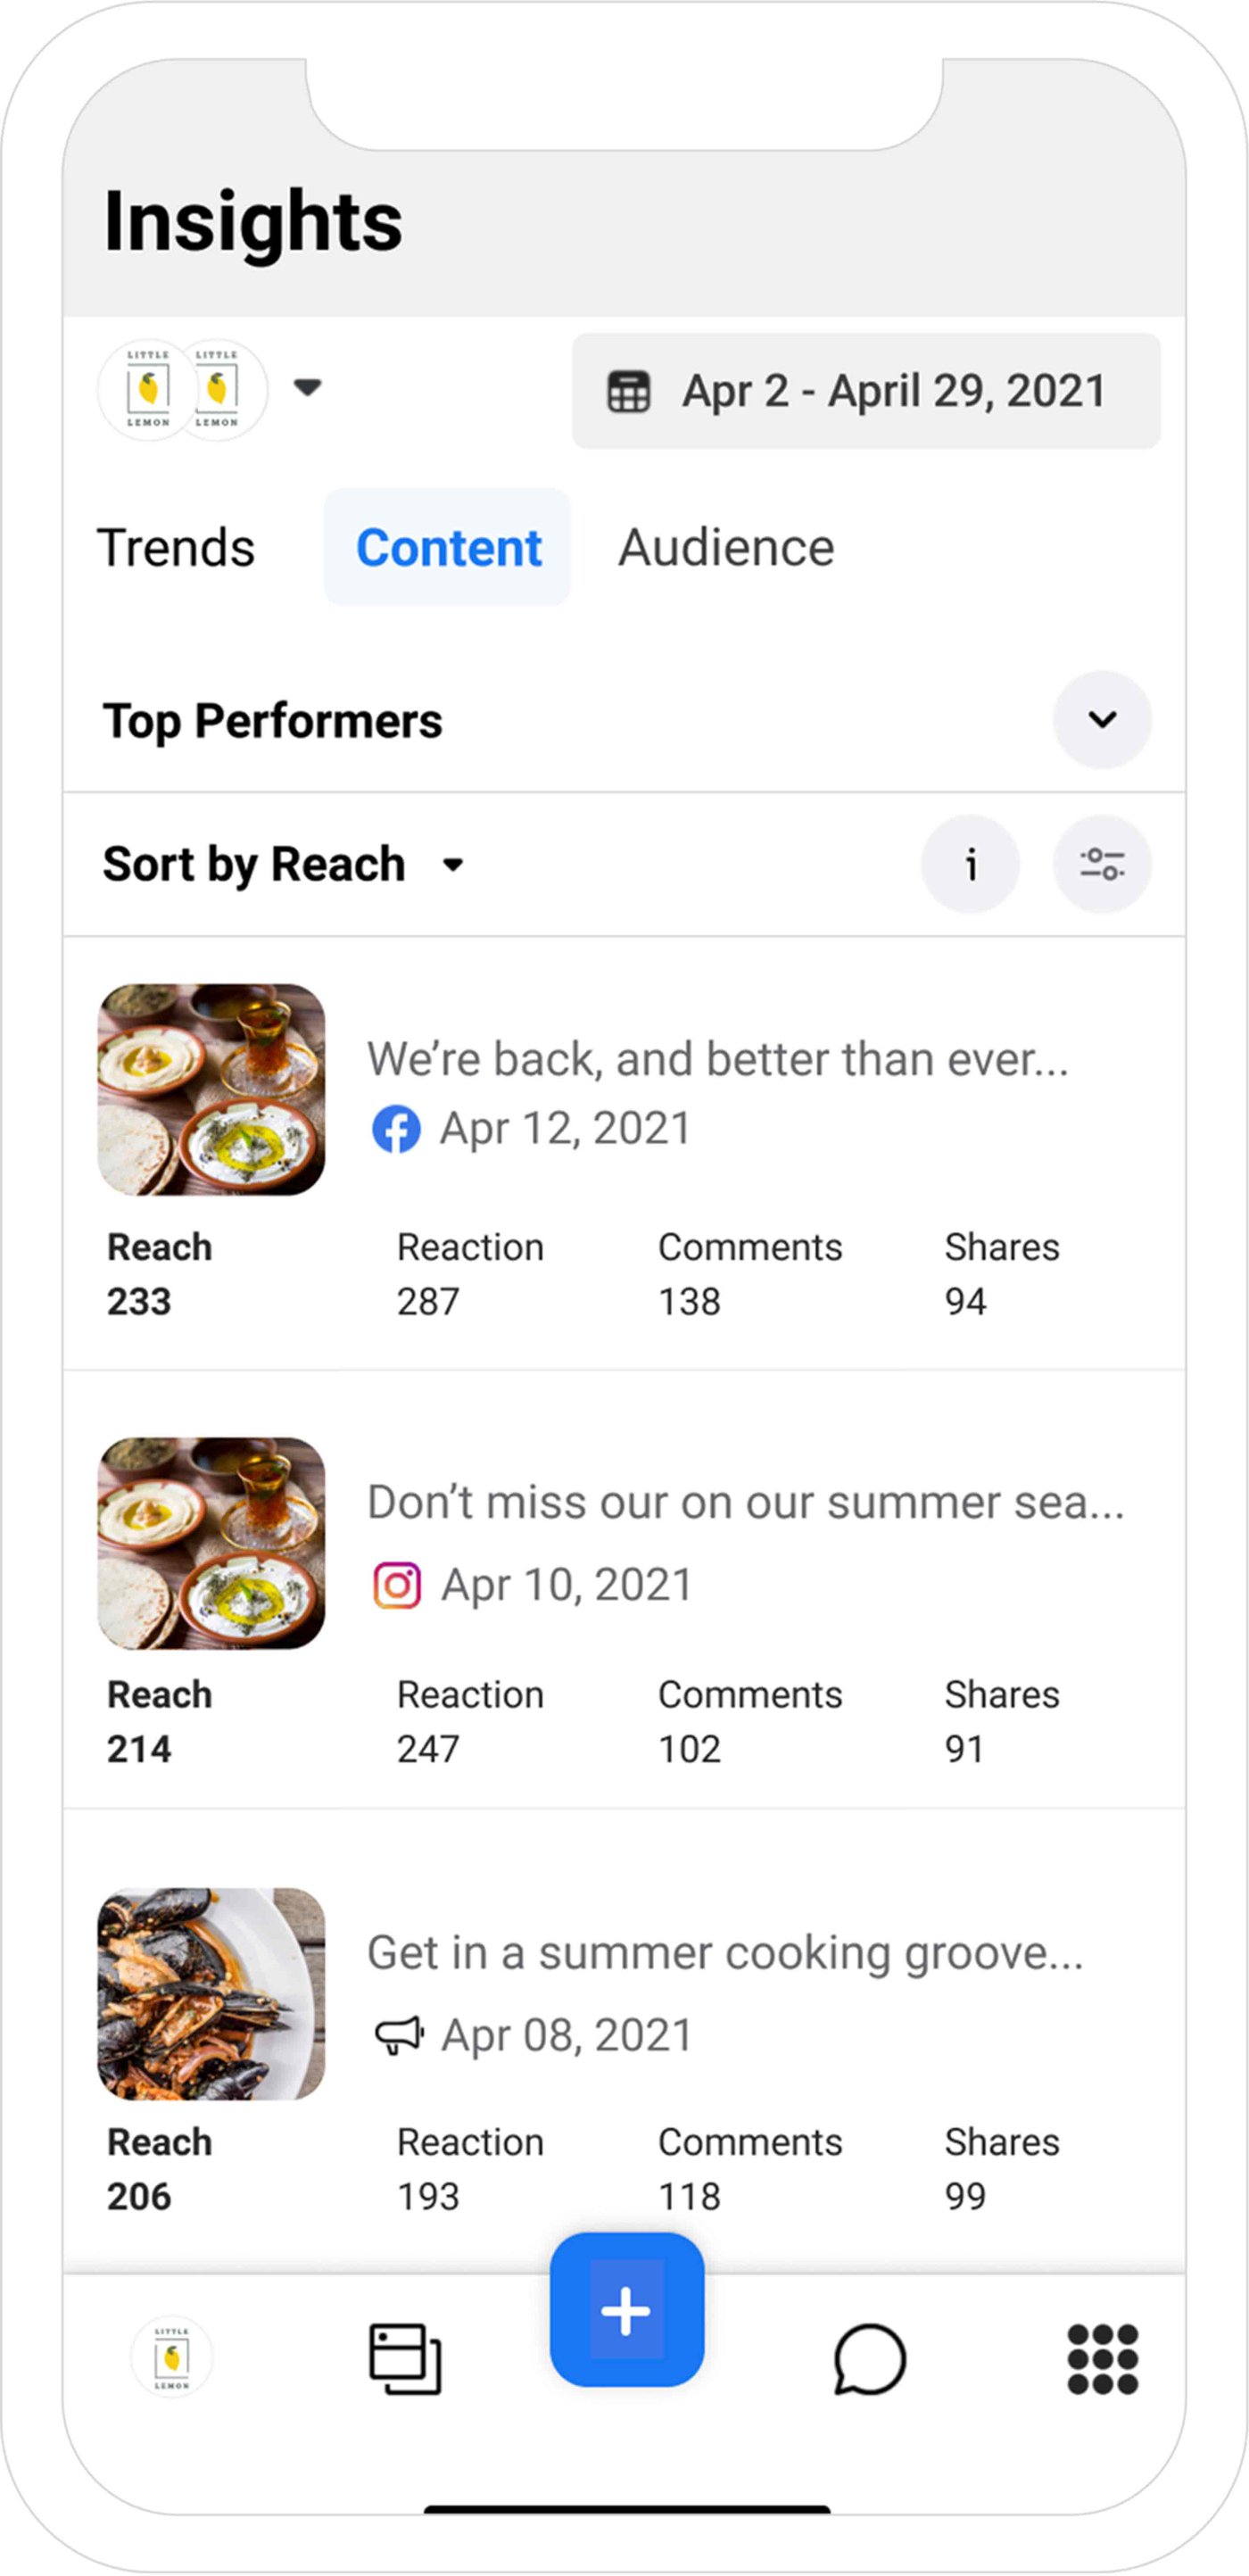
#2 - Assess the performance of your content
It’s essential to know how your content is performing to learn whether your Facebook advertising strategy is successful or not. Your Business Suite Home screen will provide you with an overview of how your content is doing in areas like reach. For a more detailed view of your ad performance, you can find additional metrics in the Insights tab of your Business Suite. You’ll be able to see metrics such as results, costs per result, and the number of link clicks.
Source: Facebook
To understand what kind of content performs the best, you should be drafting and scheduling different types of content in the Business Suite. You can then use the Insights section to monitor the performance and adapt your ad strategy accordingly. Video content is known to perform better on Facebook and Instagram, so we’d recommend starting there. You can check out InVideo’s online editor for lots of free templates that can help you make thumb-stopping ads effortlessly.
#3 - Understand your audience
Learning about your audience is the most important thing when it comes to any business. That’s why the Facebook pixel exists – to track the behavior of your audience and gain an understanding of what your target audience is like. Apart from Custom and Lookalike Audiences, another way to help you understand your audience better is through Insights in Business Suite.

Source: Facebook
The Potential Audience section of Insights is there to help you get a sense of your potential audience size. You can filter for different demographics and points of interest based on your knowledge of your current audience. This will help you arrive at an audience size that you can then target with your ad strategy.
BONUS: PRO Tips on using Facebook Pixel
Now that you know what Facebook Pixel is, how it works and how to use Facebook Pixel, you’re almost fully equipped to revolutionize your ad strategy. Here’s our list of PRO tips that you should keep in mind before you get started:
Tip #1 - Enhance Facebook pixel data with Conversions API
The Conversions API is a similar tool to the Facebook Pixel, but it’s made to take your brand’s marketing data into account along with Facebook’s systems that help optimize ad targeting and decrease costs per action across Meta technologies. The key with Facebook ads for e-commerce is to give your ads enough time to start learning and automating a lot of the market analysis for you.
With the data-loss effects of the iOS 14.5 changes, Facebook Pixel can lose some of its tracking ability and efficiency. That’s why Facebook introduced Conversions API. Instead of using cookies and web and mobile browsers for data collection, Conversions API gathers information straight from your servers. If you combine the use of Conversions API and the Facebook Pixel, you’ll be able to track data in a much more reliable way, even if some information is lost by the pixel. Conversions API can help to fill in data that your Facebook pixel is missing. By combining Conversions API with the Facebook pixel, you’ll have access to more reliable data, even if the pixel loses information.
If you are using one of Facebook’s integration partners, like Shopify or WooCommerce, you can turn Conversions API on without writing any code. Facebook provides detailed instructions for setting up the Facebook pixel Shopify Conversions API integration. If you aren’t using one of Facebook’s integration partners, you’ll have to create code manually, and you may have to work with a developer. For that, you can follow Facebook’s detailed steps for implementing Conversions API manually. The backend process for implementing Conversions API looks similar to that of the Facebook Pixel:

Tip #2 - Confirm your pixel is working with the Facebook pixel helper
You need to confirm that your Facebook pixel is tracking data properly before you start relying on and working with that data. You can do this with the Google Chrome browser extension called Facebook Pixel Helper. This is only available for Chrome, so you’ll need to install Chrome if you aren’t already using it.
To use it, you need to visit the webpage on which the Facebook pixel has been installed. Then a popup from the extension will indicate how many pixels it finds on the page and if the pixel is working properly. If it’s not working properly, the extension will provide information on the error so you can make corrections and get it working properly again.
Tip #3 - Add a Facebook pixel notice to your website
When using the Facebook pixel, you have to make sure you’re complying with Facebook’s terms, as well as that of the law. To do this, you need to make sure that the people who visit your website know that you’re collecting their data. You should ideally do this by providing a clear notice that you’re using the Facebook Pixel and that their information may be collected through cookies or other methods. In the same notice, you must let people know that they can opt out of having their data collected.
For all the details on this, go to the Facebook Business Tools Terms and scroll down to point 3: Special Provisions Concerning the Use of Certain Business Tools. Additionally, you should have a look at Facebook’s Cookie Consent Resource.
Tip #4 - Protect Your Pixel
With Facebook advertising, it’s imperative to audit your assets every so often. By doing this, you’ll be able to see who has access to your pixel and remove anyone who has access who shouldn’t anymore, such as an old employee. Without this, you may experience the misuse of your Facebook pixel. AdEspresso went through this when they discovered that their Facebook pixel had been installed on a completely different website. This was wasting their time and money because they were retargeting people who were not actually interested in their product. Doing a quick audit of their Pixel solved this problem for them easily.
All of these points are important when it comes to optimizing the Facebook pixel itself, but one crucial thing to keep in mind is that for your targeting strategy to work successfully, you need to have a good ad as well. InVideo’s online editor can help you with that to create quick and professional video ads in no time!
Wrapping Up
At first glance, the Facebook Pixel may seem intimidating and complicated to use - but its data tracking capabilities can change the course of your business. Now that we’ve covered everything about Facebook Pixel in this guide, you’re ready to effectively meet your brand’s needs and objectives. To propel your brand’s reach even further, make sure to include video ads in your marketing strategy.
If you want to dive deeper into Facebook Pixel, tune into this discussion we had with Pam Curry – it’s exclusively available for the InVideo community here. And if you prefer learning via videos, you should definitely check out our YouTube channel where we share daily video creation tips and tricks, the latest video trends and ideas, and help you make more money as a video creator.
This post was written by Yashvi and edited by Adete from Team InVideo