


YouTube is one of those places where most of us look for inspiration, motivation, entertainment, and educational materials.
With about two billion logged-in monthly users, we can safely say that it’s one of the most popular content platforms out there. Next to being the perfect stage for thousands of content creators, it’s also a fantastic spot for marketers to educate their audiences, build brand awareness, and present their best products.
This is all because of the power of video. It’s an effective method for grabbing your audience’s attention and increasing conversions. Consider the fact that businesses that use video generate revenue 49% faster than those who don’t. It’s no wonder that 85% of marketers focus on creating engaging YouTube videos.
There’s a wide range of elements that can make your video successful. A fantastic idea isn’t enough—you need to execute it properly and edit the material to look professional. The quality of your video has to meet your audience’s expectations.
Captions are one of the elements that can improve your video’s performance. This is because they increase accessibility and engagement. As a result, your videos are likely to get more views.
If you don’t know how to add captions to YouTube videos, we’re here to help you out. Let’s start by checking out how it’s done by using the tools that YouTube has to offer.
How To Add Captions to a YouTube Video in YouTube Studio?
While it may not be difficult to add captions to your video using YouTube Studio, it comes with a few downsides that make plenty of users look for alternative options. You have two options—you can either upload a script or rely on automatic captioning to do the job for you.
Before we get down to the notable downsides of using the YouTube Subtitle Editor, let’s take a look at how you can add and edit your captions step-by-step. You need to:
- Click on your YouTube profile in the top-right corner
- Go to YouTube Studio
- Find the Content tab in the menu on the left and click on it
- Look for the video you want to edit
- Hover your mouse over the video and when the contextual menu appears, click on Details
- Go to More Options in the top bar
- Find the section labeled as Subtitles and CC for Original Language
- Upload a script or use the English for YouTube (automatic) bubble
Using the English for YouTube (automatic) option means relying on automatic captions created by YouTube. For this solution, you need to:
- Click on the three dots next to the English for YouTube (automatic) bubble
- Choose Edit on Classic Studio from the drop-down menu
You’ll be taken to the Subtitles Editor, where you’ll find automatically generated captions and timestamps.
The Downsides of Adding and Editing Captions in YouTube Studio
The most notable downsides of YouTube Studio are:
- Low quality of automatically generated captions
- Limited options of the YouTube Subtitle Editor
Low Quality of Automatically Generated Captions
Using the automatically generated captions may sound like a good idea, but the fact that they’re created by machine learning algorithms means that they vary in quality. The problem is that they are most often nonsensical and full of errors, which is why plenty of users agree that they’re awful.
YouTube claims that the captions are bad because of the content being misinterpreted due to:
- Accents
- Dialects
- Mispronunciation
- Background noise
In truth, many videos with native speakers talking without any disruptive noise in the background don’t come up with satisfying results.
This means that having automatically generated captions as a starting point most often doesn’t imply there will be less work for you to do. You need to correct the words and punctuation in almost every sentence. On top of that, you have to pay special attention not to leave any misinterpretations behind.
While YouTube’s speech recognition technology may be improving, it’s still far from being useful in a large number of cases.
Limited Options of the YouTube Subtitle Editor
While the YouTube Subtitle Editor may be handy, it has limited options. The reason is that it’s a separate tool made exclusively for editing captions.
The editor provides you with a simple overview of the script and the audio behind each line. It’s a practical solution for setting up the right timing for every sentence, but it doesn’t offer much more than that. It lacks the capabilities of third-party video editing software solutions. You’re stuck with the unified YouTube font, size, positioning, and text style.
How To Add Captions to YouTube Videos Using InVideo
Our InVideo cloud-based service is a great solution for adding captions to your video. The primary reason is that our video editing software provides a wide range of options while being incredibly easy to use at the same time.
The user interface is simple to navigate, and even if you have any trouble figuring out what to do, you can check out one of the many video tutorials we have on our YouTube channel.
InVideo Text Tab

Let’s take a look at how you can edit captions and add them to your YouTube video using InVideo. You need to:
- Click on the Text tab in the left panel
- Insert multiple text boxes by clicking on any of the style options
- Click on a particular text box that you want to customize
- Go to the Edit menu on the right
- Set up the text in line with your preferences
- Click on any text box for a contextual bar to appear on top of the video timeline in the lower half of the screen
- Set up the start time and end time in line with the voiceover by dragging the edges
You can set up each line of your script by implementing advanced text features and export the video in just a couple of minutes. Let’s take a look at some of the many benefits of using our InVideo software for your video editing efforts.
The Benefits of Adding and Editing Captions in InVideo
Our InVideo platform offers an extensive collection of video editing features. When it comes to captions, it provides you with a wide range of options and enables you to be creative with your script. Such eye-catching captions are an effective solution for promotional YouTube videos.
Some of the primary benefits that InVideo has to offer when it comes to advanced text editing come in the form of:
- Styles and effects
- Editing features
Styles and Effects
InVideo provides a wide range of options for applying different styles to your captions.
InVideo Text Styles

When adding new text boxes, you can choose a particular style that suits your video. This includes:
- Standard text—Headings, subheadings, and body text
- Premade text boxes—Classic, modern, text styles, location boxes, social media credits, and more
When you add a text box, you can customize it further via the Edit menu on the right side of the dashboard.
InVideo Edit Menu Options

Here you can set up a variety of options for making your YouTube video captions enticing. This includes:
|
InVideo Advanced Text Editing |
|
|
Style |
Choose the primary font and set up the size, style, height, and alignment |
|
Colors |
Pick the colors for the box and the text, and set up the opacity |
|
Drop Shadow |
Add a shadow for the text and set up the desired color |
|
Animation |
Create in and out animations for a word, line, character, or the whole text |
|
Textbox Animation |
Animate how the entire text box appears |
Editing Features
InVideo is an extensive video editing platform where you can make your YouTube videos shine. When adding captions, you don’t have to use a separate editor. You can create advanced textual content and set up how it works with all the other video elements.
InVideo Timeline

Aside from the regular timeline where you can drag and drop text, images, and videos, you can also use the advanced timeline. You can open it by clicking on the Advanced Timeline button on the right.
InVideo Advanced Timeline
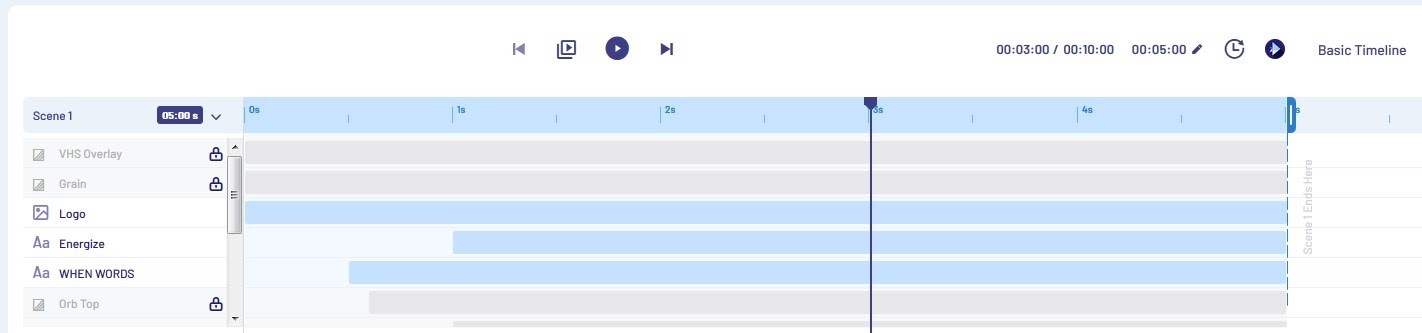
In the advanced timeline, you can view all the elements of each video scene as layers. You can set up the way your captions appear against the background or any other element by moving the layers around. You can also set up the duration of each element by dragging the edges.
How To Create a YouTube Video Using InVideo Templates?
Our award-winning platform includes a YouTube Video Editor that makes creating videos a quick and easy task. You can make professional-looking videos in less than ten minutes. InVideo provides more than 2,000 amazing templates to choose from.
InVideo Dashboard

All of the templates are fully customizable. Aside from adding and editing text boxes, you can insert a variety of other elements, such as:
- Media
- Music
- Stickers
- Effects
- Shapes
- Enhancers
We’ve got an extensive library of over a million royalty-free songs, images, and video clips that you can use. Our collection has a solution for everybody. If you cannot find what you are looking for, you can upload any media content that you’ve created yourself.
You can click on the media to preview it before adding it to your video. When you find what you need, all you have to do is drag and drop it into the scene that you’re editing. Once you’ve set up your scenes, you can arrange them and change their duration.
You can also add different animated transitions. The default one is fade, but you can click on the linking arrows between the scenes and change it to another, such as:
- Impact
- Zoom out
- Curtain call
- Rewind
- Blur
- Cross zoom
- Blink
Our template library has an assortment of solutions made specifically for YouTube video creators. This includes:
|
InVideo YouTube Templates |
|
|
A neat solution for creating an enticing YouTube video intro that leaves a strong first impression |
|
|
When someone finishes watching your video, they’re likely to be interested in watching more and learning more about you. This template includes premade elements such as a subscribe button, social media icons, and links to related videos |
|
|
A template that focuses on video suggestions, such as a previous video and a recommended video. After grabbing the viewer’s attention, it lets social media icons slide in at the bottom |
|
|
A vertical template that provides an engaging intro for a YouTube live show. It contains scenes for introducing you as the main speaker and your special guests |
|
Other Ways You Can Create YouTube Videos With InVideo
Our premade templates are the quickest solution if you don’t want to spend too much time on specific elements. In case you want to get more creative, InVideo provides two other options for crafting amazing YouTube videos. These are:
- Text-to-video
- Blank template
Text-To-Video
Our text-to-video feature is based on templates that get automatically filled with the content you upload. This includes:
- Scripts
- Website URLs
- Media files
When you upload a script or a link to an article, you can use our text-to-speech technology to convert the text into audio. This is a great solution for creating voiceovers for your videos.
When it comes to media files, you can upload various formats, such as JPG, GIF, PNG, MP4, and MOV. The upload size of the files is limited to 20MB. The reason for this is ensuring that they load properly and don’t hinder the performance of your videos.
When you upload your content, InVideo will create scenes automatically and load them into the timeline. You can do whatever you like with them, such as:
- Edit
- Extend
- Duplicate
- Delete
Blank Template
The blank template feature is made for providing you with full creative freedom. It enables you to start from scratch and control every step of the video creation process. You can design the template yourself by inserting a variety of elements of your choosing.
The Benefits of Using InVideo To Create YouTube Videos
Our video editing platform comes with plenty of benefits. One of the most prominent ones is that it’s efficient and easy to use. You can create high-quality YouTube videos rich with fantastic features in a short amount of time.
We are aware that even the easiest of tools may have a user scratching their head because they can’t find a particular feature or determine how to perform a specific action. This is why we provide a wide range of tutorials covering every single aspect of our software.
Not only that, but we provide 24/7 customer support. We’re not exaggerating — if at any point, be it day or night, you have trouble using InVideo, you can contact our team and we will help you in any way we can.
To help you make flawless videos, you can rely on our Intelligent Video Assistant (IVA). IVA relies on artificial intelligence to recommend corrections while you’re working. It checks various aspects of your videos, including:
- Colors
- Text alignment
- Animation speed
As soon as it spots a mistake, IVA will inform you about it and let you know the best way to fix it. Our AI registers even the smallest of elements, most of which you’d likely overlook.
Another aspect that makes InVideo stand out as an effective solution is that it’s a cloud-based platform. This means that you can use it on any device without worrying about the platform’s performance. InVideo is a fantastic video editor for Mac and Windows users alike.
InVideo Pricing
InVideo’s pricing is another reason why you should consider using our video editing platform. One of the best parts of our offer is that you can sign up for an InVideo account and use the software for free forever. This includes making the most of all the features InVideo has to offer.
The only limitation of the free plan is that you can create and export up to 60 videos per month and that they will have the InVideo watermark on them.
To remove the watermark, you can subscribe to our Business plan that comes at the price of $20 per month. The Unlimited plan costs $60 per month and—as the name suggests—doesn’t limit your options.
To make our offer even more enticing, we provide a 50% discount if you sign up for an annual arrangement.
Are you ready to start creating videos that your audience will be crazy about? Sign up here and you can make it happen right now!