


PowerPoint is, by far, the most popular tool people use to make presentations, whether for school projects or work-related activities, such as staff training or pitching a product idea to investors.
PowerPoint is genuinely a great tool. It’s simple and easy to use, offers hundreds of themes, and if you spend a bit of time playing around with all the different options inside the program, you can make professional presentations that will captivate your audience.
The only issue regarding PowerPoint—more specifically, presentations in general—is the limited usability of PPT files. You can’t upload a presentation on YouTube, for example. You could technically share it on your website or on social media, but a presentation without a presenter is just a random compilation of images.
Unless the person who created the presentation takes the time to weave the story, explain all the concepts, and expand on the bullet points the audience sees on the slides, the presentation won’t have the desired impact.
Does that mean that presentations are only viable in a face-to-face setting? Not exactly. There are a number of different ways to utilize presentations, but they all involve converting the PPT file into a video.
Now, the question begs itself—how do you make a video out of a presentation?

Creating a Video from PowerPoint
The first thing that will go through most people’s minds is a webinar. When you stop to think about it, a webinar is nothing more than a glorified presentation. Someone takes the time to record themselves as they’re going through all the different slides and explaining everything in detail.
A webinar is a rather specific form of content, and it takes a lot of time and effort to put one together and to get enough people to watch it to make it worthwhile. Unless you’re an experienced salesperson who is adamant about selling a product and firmly believes that the best way to do so is to blabber about it for two hours, you’re probably looking for a faster, less painstaking way to turn a PowerPoint into a video.
Thankfully, there are a number of different ways to do so. In fact, PowerPoint itself gives you the option to convert the presentation into a video. In this article, we’ll walk you through the entire process step by step and show you how to make a video PPT using all the different versions of the program.
How to make a video from PowerPoint?(Office 365, PowerPoint 2019, PowerPoint 2016)
Although the option is there, keep in mind that it’s not as simple as clicking a Convert to video button. You do need to record narration and laser point gestures (mouse movement on-screen) beforehand.
The reason for that is simple and technical in nature—unless you record narration and timings beforehand, PowerPoint will default to five seconds per slide when creating a video.
You can change this by clicking the upward arrow next to the Timing under the Create a Video option, but keep in mind that you’ll be adjusting the time for all slides simultaneously. There is no option to adjust how long each individual slide will appear on the screen.
If you want to use different timings per slide, as well as record narration, select the Recording option inside PowerPoint and create a video.
Here’s how you’ll enable recording inside Office 365 PowerPoint, as well as PowerPoint 2019 and 2016:
1. Click on File and select Options on the left-hand side of the screen
2. Choose Customize Ribbon (A) from the drop-down menu
3. Check Recording (B) in the pop-up window and hit OK (C)
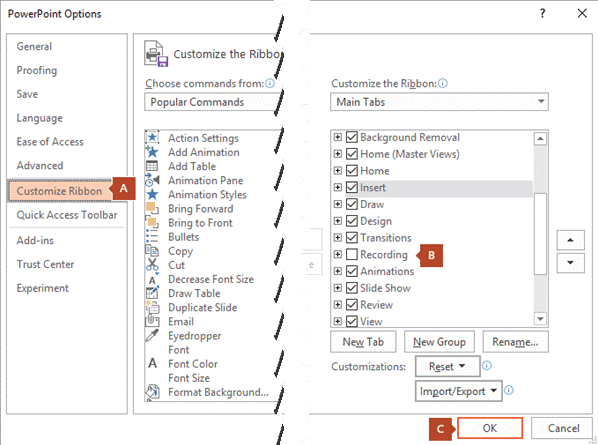
Image source: Microsoft
You’ll see a new option appear on your screen under the Recording tab, titled Record Slide Show. Clicking on the downward pointing arrow will allow you to choose whether you want to start recording the slideshow from the start or from the slide you’re currently on.
You can also choose to record the narration as audio or video, and you will be able to leverage a variety of different tools, such as pens and markers, to highlight certain elements on your slides.
As you’re recording, the red circle next to the Record Slide Show button will be blinking, indicating that the audio and/or video is being captured. Once you go through all the slides, you can either:
- Click on the square Stop button
- Press S on your keyboard.
Exporting your video
The easiest way to export the video you just recorded is to navigate to the Recording tab and select Export to Video. This will open up a new menu, and PowerPoint will prompt you to choose the video quality.
|
Office 365 PowerPoint Video Quality Options |
||
| Option | Resolution |
Best For |
|
Standard (480p) |
852 x 480 | Portable devices like phones and tablets |
| HD (720p) | 1280 x 720 |
The Internet |
|
Full HD (1080p) |
1920 x 1080 | Computer monitors and HD screens |
| Ultra HD (4K) | 3840 x 2160 |
Large TVs |
One thing to keep in mind is that the Ultra HD option is available only on Windows 10.
Next up, you’ll need to either set the timings for the slides or select the Use Recorded Timings and Narration option.
Then, click on Create a Video, name your file, and choose where you want to save it.
Finally, select the Save as Type option and choose between two available formats:
- MPEG-4 Video
- Windows Media Video
PowerPoint will start converting the slideshow into a video automatically. Depending on the video quality and length, this process might take a while, so we suggest timing it so that you don’t have to use the computer during that time. For larger, Full HD or Ultra HD videos, it’s best to keep the program running overnight.
PowerPoint 2013
One notable difference with the 2013 version of PowerPoint is that the video quality options are slightly different. Ultra HD (4K) was just entering the scene, and not a lot of people owned devices that supported the 3840 × 2160 video resolution, so it’s no surprise that the option doesn’t exist in this version.
|
PowerPoint 2013 Video Quality Options |
||
| Option | Resolution |
Best For |
|
Presentation Quality |
1920 x 1080 | Computer and HD screens |
| Internet Quality | 1280 x 720 |
The internet |
|
Low Quality |
852 x 480 |
Portable devices |
The interface didn’t change much over the years, so if you happen to be running PowerPoint 2013, you’ll go through the exact same process as with the newer versions of the program:
1. Navigate to File, click Export, and choose to Create a Video
2. Select the resolution
3. Set timing parameters or use recorded timings and narration
4. Click on Create Video
5. Choose Save as Type and select between MPEG-4 or Windows Media Video
PowerPoint 2010
If you are still using the 10-year-old version of PowerPoint, the options for creating a video out of your slideshow will be a bit different.
The first thing to keep in mind is that PowerPoint 2010 only supports .mp4 files and that the maximum resolution for the videos is 1290 x 720, which isn’t exactly ideal. If you want to create a professional-looking video from your PowerPoint presentation to share with business partners or your audience, you might want to consider a less restrictive alternative.
Here’s how you would turn your slideshow into a video in this outdated version of the program:
1. Select Save & Send under File
2. Choose the option Create a Video at the very bottom of the right-hand side of the screen
3. Find the Create a Video tab if you want to see the available video quality options
4. Click on the downward-pointing arrow next to the Computer & HD Displays option and choose from the three available options
5. Choose between Use and Don’t Use Recorded Timings and Narration depending on whether you want to use recorded timings and narration
6. Click on Create a Video, name it, choose the destination folder, and hit Save
|
PowerPoint 2010 Video Quality Options |
|
| Option |
Resolution |
|
Computer & HD Displays |
1920 x 1080 |
| Internet & DVD |
1280 x 720 |
|
Portable Devices |
852 x 480 |
PowerPoint Video Drawbacks
It’s always great when you can use the same tool for various different tasks. In the case of PowerPoint, you can both create the presentation within the program and convert it into a video on the spot.
That said, PowerPoint isn’t a video editing tool. What we mean by this is that you are severely limited in terms of what you can do with the video you create from your PPT. There are no transitions, you can’t leverage fade-ins and fade-outs, and there is no music, among other things.
No matter how you look at it, the videos created through PowerPoint will be bland. PowerPoint’s PPT to video conversion might get the job done if your only goal is to share a presentation internally with your team. Even then, it only makes sense in a remote work environment, where you can’t physically hold the presentation to your coworkers.
If you’re planning on using the presentation as a core part of your marketing strategy, then the video quality—and we don’t mean the resolution here—you’ll get from PowerPoint won’t suffice. No matter how professional you sound during the narration, the videos created through PowerPoint will still give off the impression that you didn’t try all that hard.
When you see the production value of the videos that businesses share on their websites, YouTube channels, and social media, it’s painfully obvious that PowerPoint videos can’t compete. This doesn’t mean you have to spend months learning video editing or spend a small fortune hiring a professional videographer to make and edit the videos for you.
With InVideo, a powerful yet easy-to-use online video editor, you can create stunning videos from your presentations in minutes! We’ll walk you through the whole process to show you how easy it is to create breathtaking videos from presentations with InVideo.
How to make a video from a PowerPoint Presentation using InVideo?
Videos are quickly becoming an integral part of every business’s marketing strategy. Whether you’re a startup, an enterprise, a medium-size business, or a solo entrepreneur, you will need to use videos if you want to attract as much traffic to your website as possible. The same goes for influencers and bloggers—videos beat any other type of content when it comes to user engagement.
InVideo makes video editing quick, easy, and fun. Thanks to our intuitive, drag-and-drop video editor, professionally designed video templates, and an extensive library of photos and audio tracks, you can create killer videos in no time, even if you have absolutely no video editing experience.
Our platform is cloud-based, meaning you can access it from any browser on your computer and laptop. This also means that your video editing capabilities won’t depend on how powerful your machine is, meaning you can create HD and Ultra HD videos even with a low-end PC or laptop.
The best part about InVideo is the fact that you can export up to 60 videos per month for free! With our free plan, you’ll have access to all of InVideo’s features so that you can play around with all the different options and learn video editing at your own pace. We also have dozens of video editing tutorials for different use-cases, so you can get started right away.
Creating videos from photos and PowerPoint presentations is one of many things you can do with InVideo.
Here’s are the simple steps you can follow to create a stunning video from your presentation with InVideo:
Step 1: Create an account
To get started, you’ll need to create an account.
Navigate to our website and click Sign Up in the top right corner. Input your email, set up your password, and you’re good to go. We’ll never ask you for your credit card information or phone number. We won’t bombard you with emails either—we hate spam as much as you do.
Step 2: Select a Template or start from scratch
Once you log in, you’ll see several different options on the homepage:
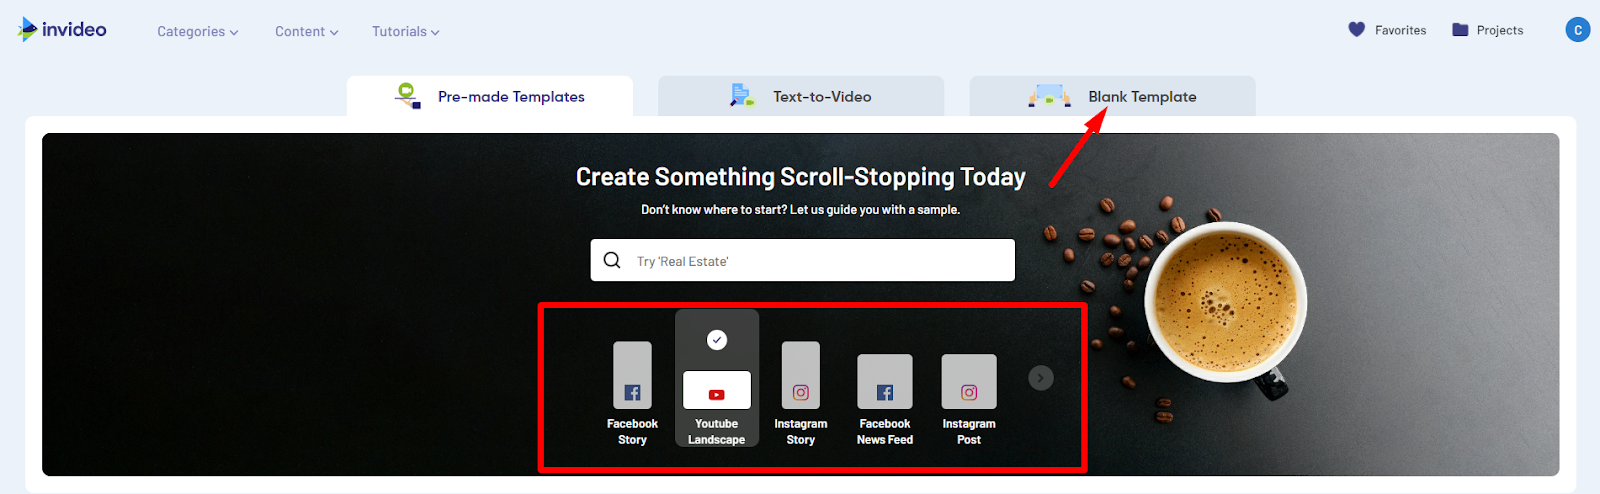
The Pre-made Templates option will be selected by default. While there are over 5000 stunning video templates in our library, we strongly suggest that you go with the Blank Template option for this purpose.
You will be starting from scratch, but it’s not as scary as it might sound. The blank template is the most convenient option since you’ll be treating each slide as a separate scene and editing them individually. Here’s how to do it:
- Choose how long each slide appears on the screen
- Add the appropriate narration
- Throw in effects, filters, transitions, etc.
Step 3: Upload your media
Assuming you are the one who created the presentation, you should have all the necessary media on your device—photos, slides, and the script. To add it to the video, you’ll first need to upload it through our video editor.
From the menu on the left, select the Uploads option and click on the Upload button at the bottom of the screen.
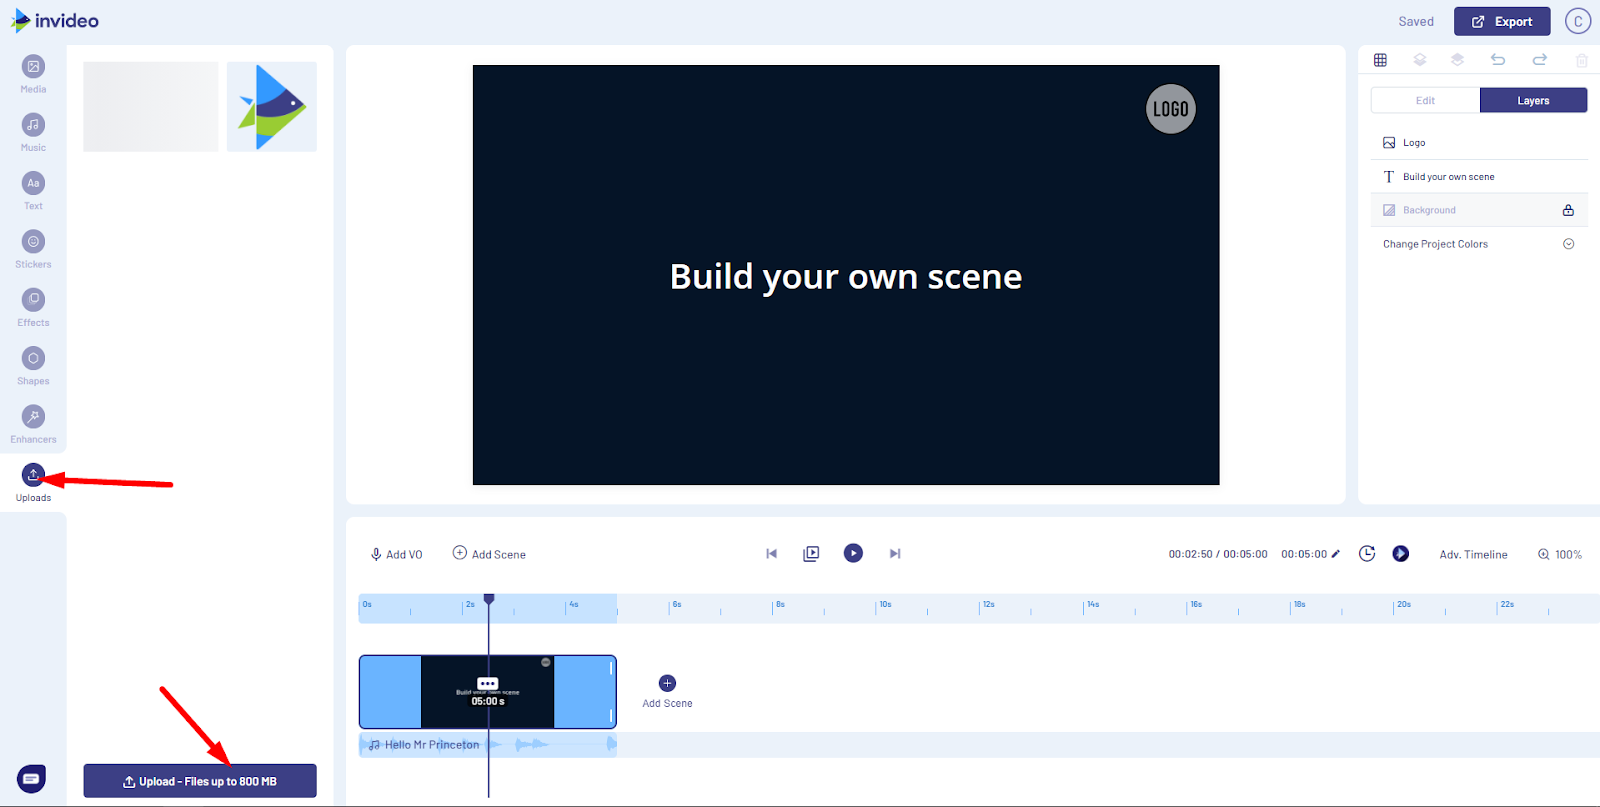
You can upload files up to 800MB at a time. If you have all the photos neatly sorted into a folder, you can upload the entire folder in one go. All the media you upload will be available immediately to the left of your video—for this and all future projects—and you can drag and drop images to the center of the screen to add them to the timeline.
Step 4: Add the photos
Let’s start with a single scene—the intro of your presentation. Drag and drop the desired image from the Uploads library onto the screen to add it to the scene.
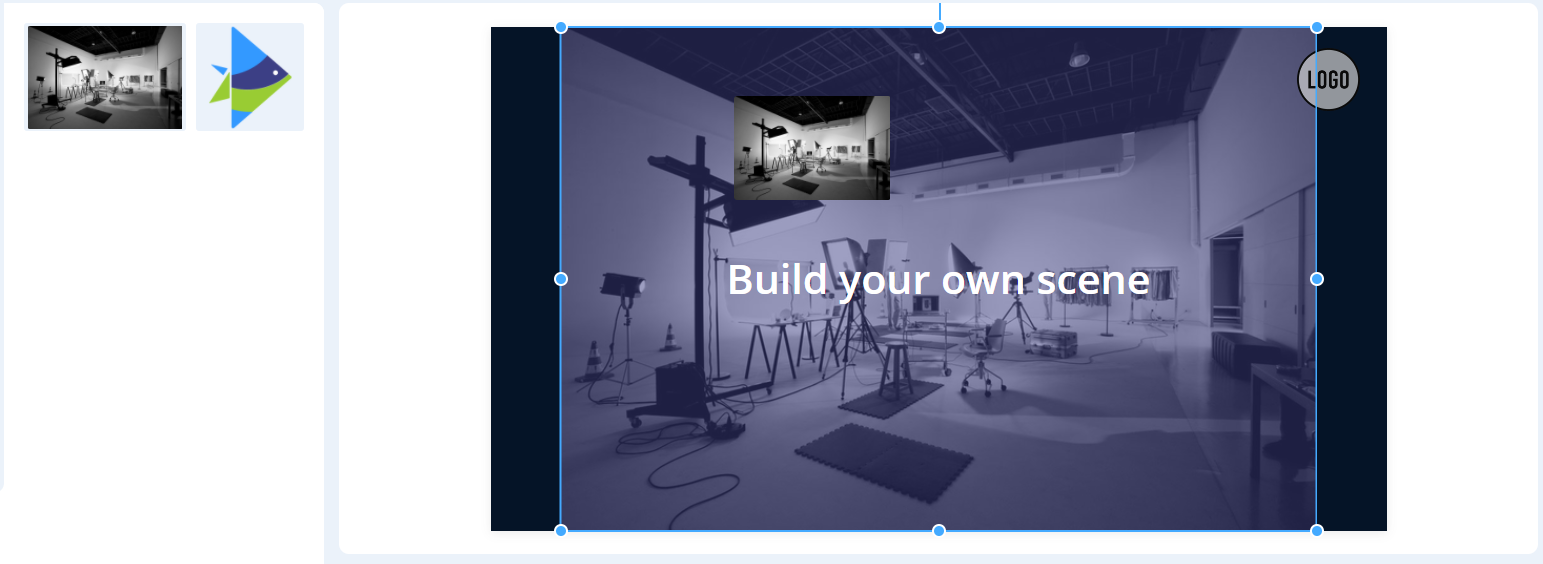
The video editor will show you what the image will look like in the video. When you drop the photo, you’ll need to select one of the two options:
- Replace
- Add as a layer
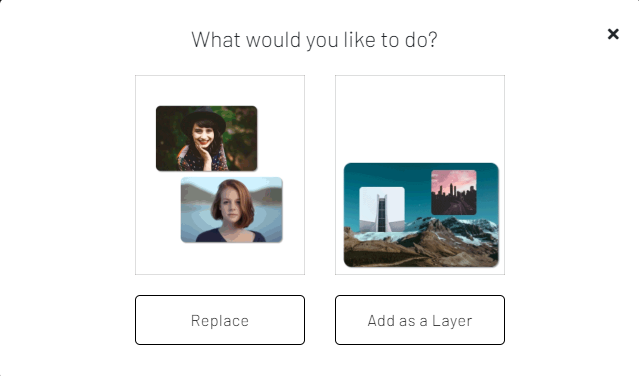
If the slide consists of a single image, choose Replace. Since we’re not using a pre-made template here, the image you chose will replace the black background.
If you would like to add additional images on top of it—such as graphs, screenshots, product photos, or lifestyle images—drag and drop them to the center of the screen once again, but this time select the Add as a Layer option. This will put the new image on top (in front) of the background one, making the first one act as a backdrop.
Step 5: Edit the Scenes and add text
By default, scenes will be about five to six seconds long, which probably isn’t sufficient for the narration. You can edit how long each slide—referred to as a scene in the video editor—will be on the screen for on the timeline.
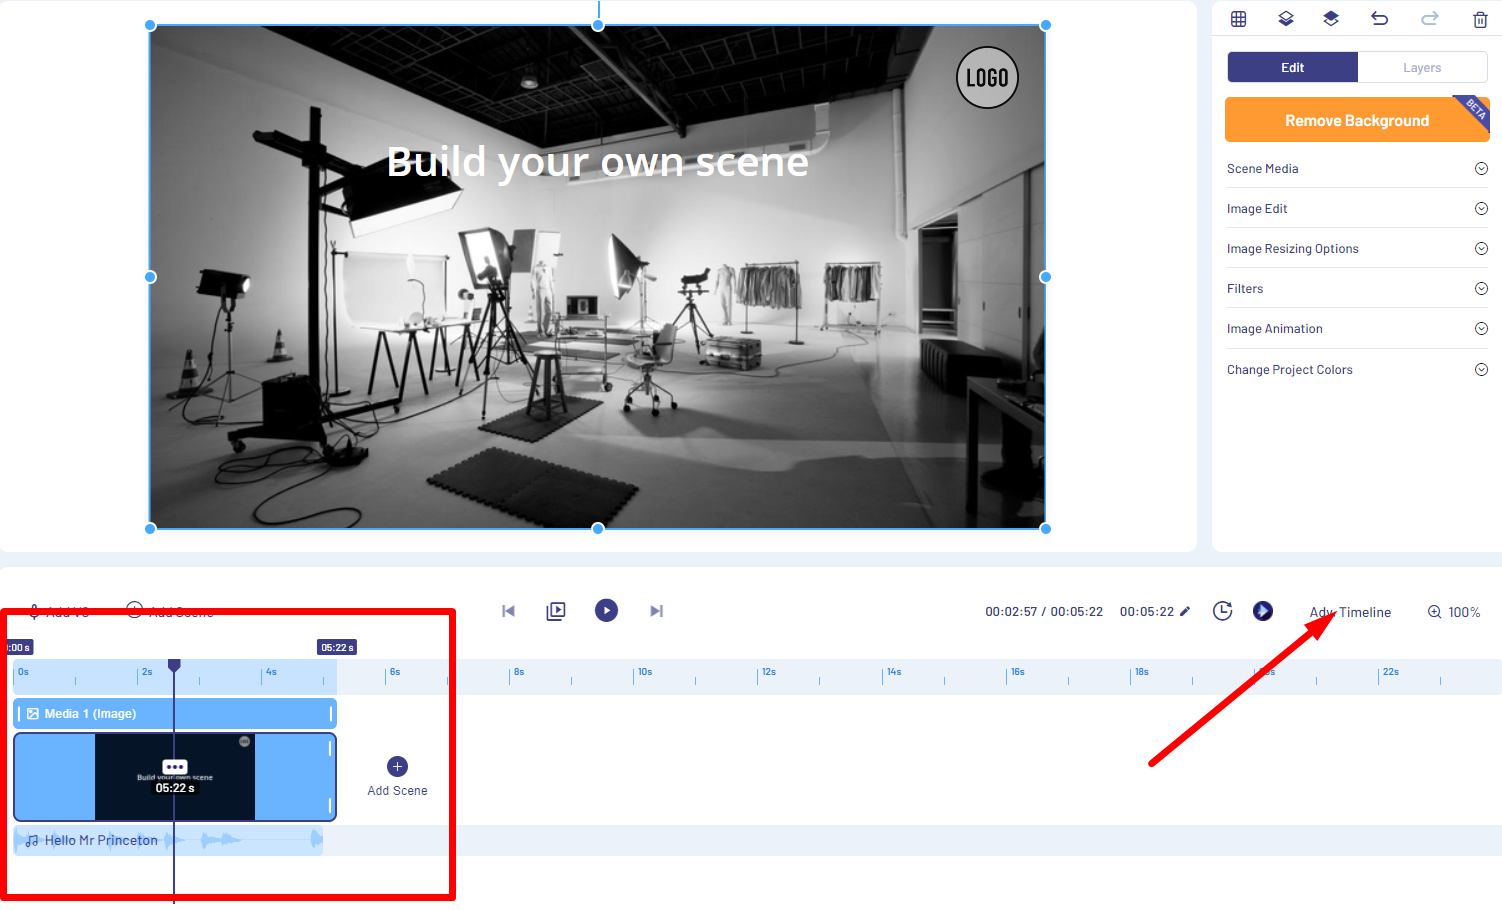
The image above shows the basic timeline, which is great for having an overview of all your scenes. To edit a specific scene, click on it on the timeline and select the Advanced Timeline option in the top right corner.
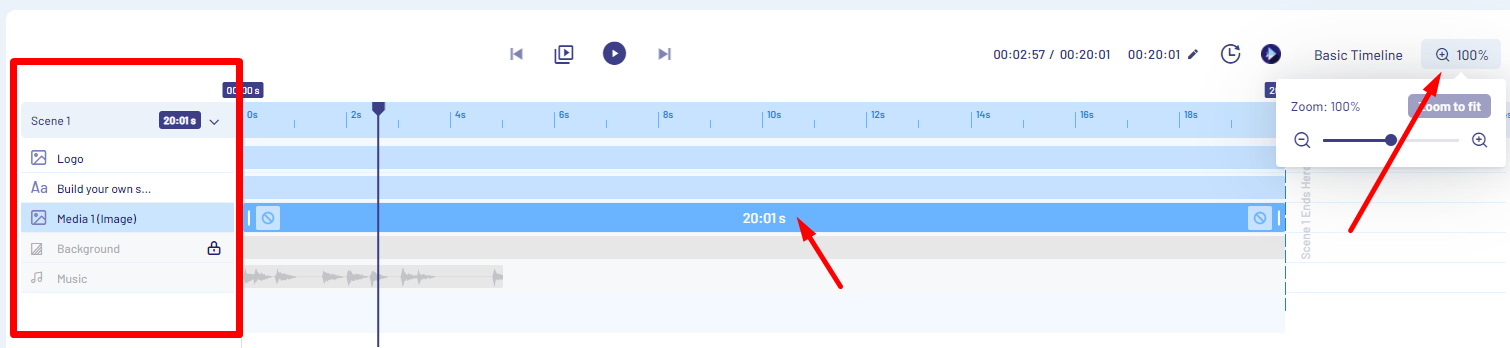
On the left side, you’ll see all the different elements that make up the scene. Select each one you’d like to edit, whether it’s a logo, the text, or the image itself.
The middle of the timeline is reserved for the length of the scene. To adjust how long this scene will be in the video, move the sliders left or right. The duration of the scene will always be displayed in the center.
On the right side, you’ll be able to zoom in and out, so you can edit the timeline more easily.
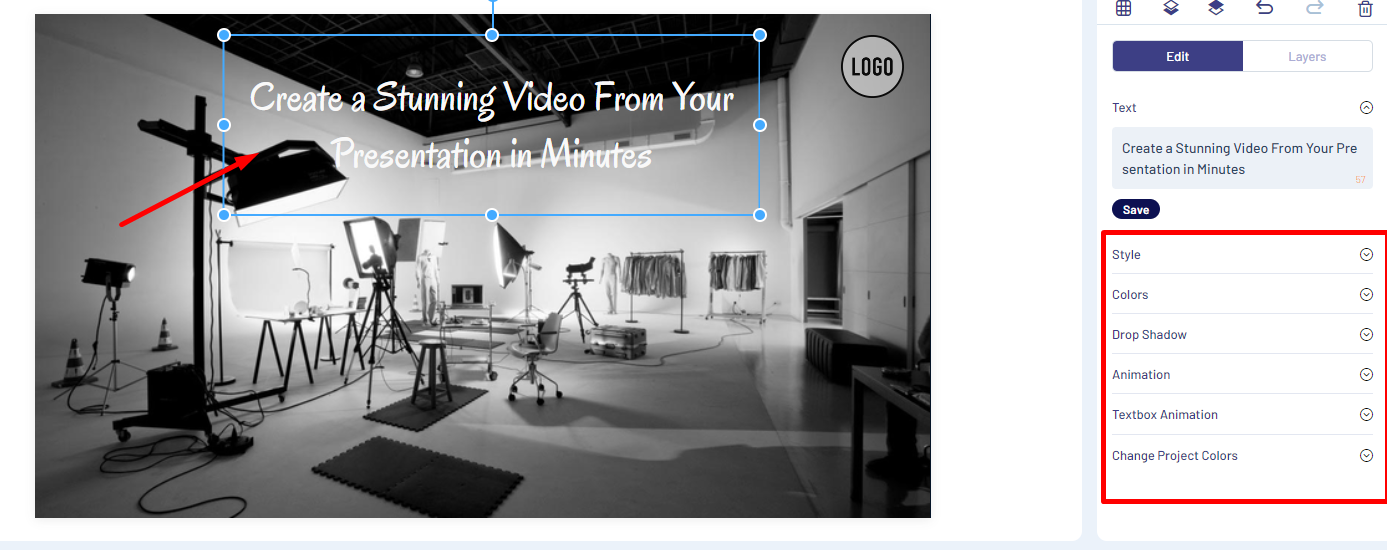
As far as text editing is concerned, you can do so either from the timeline or by selecting the text box on the screen. You’ll be able to drag and drop the text box to adjust the positioning, rotate the text, change the colors and font, and more. To add multiple text boxes, select the Text option from the left-hand menu and drag and drop the new box onto the screen.
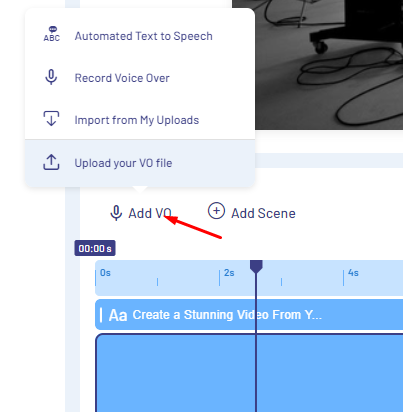
Step 6: Add narration
All that’s left to do is add narration. If you’ve recorded the audio already, you can add it through Uploads, the same way you did with photos. If not, you can add a voice-over to each individual scene. Select the Add VO option and import an existing voice-over or choose to record it on the spot.
Step 7: Export the Video
After you record or upload the VO, add the photos, and edit the length of each scene, you’re good to go. You can play around with filters, effects, and transitions if you’d like, but the base video is complete and ready to be shared with the world!
All that’s left to do is to click on Export in the top right corner and wait for the video to render. After a few minutes, depending on the video’s length, you’ll be able to download it, post it on YouTube and social media, or copy the shareable link and use the video in your marketing campaigns.

That’s how easy it is to create stunning videos with InVideo. Click here to get started today for free and turn your PowerPoint presentations into breathtaking videos in no time!