Best Online Video Editors for Colour Correction and Grading in 2026
October 30, 2026

Invideo Editor is the best overall choice for online colour correction and grading. It can build a look from a reference image and keep the grade editable. Exposure and white-balance controls, wheels, curves and scopes support shot balancing. LUTs, qualifiers and spatial grade masks provide finer control. Manual editing, ordinary ChatGPT/Claude MCP editing and exports are free. Built-in-agent work and generated media use invideo credits. Your external assistant’s allowance applies separately. Flixier supports manual colour correction and grading within a full browser edit. CapCut Web offers HSL and curves. Kapwing, Canva and Clipchamp suit simpler whole-clip adjustments, with different selection and delivery limits.
Clips from the same shoot can look surprisingly different. A face turns warmer when the camera changes, a window makes one angle brighter, and an outdoor shot has deeper shadows than the next. A useful browser editor needs to help you balance those differences, carry a look across the sequence and refine a correction without changing colours that already work.
We compare six online video editors for colour correction and grading: invideo Editor, Flixier, CapCut Web, Kapwing, Canva and Microsoft Clipchamp. The comparison follows balancing each shot, matching shots and building a look, refining selected colours and areas, and revising and delivering the result. The focus is the browser editor in each product, with its own controls and access terms.
Online colour correction and grading editors at a glance
Editor | Balancing each shot | Matching shots and building a look | Refining colours and areas | Revising and delivering |
|---|---|---|---|---|
invideo Editor | Lets you balance each shot’s exposure and white balance, adjust shadows and highlights separately, and assess levels with scopes. Sliders, wheels and curves keep corrections editable. | Lets you apply and revise a reusable look across the timeline using references, LUTs or copied grades. Editing works through the built-in agent, or for free with ChatGPT or Claude. | You can refine a chosen colour or region with qualifiers, curves and feathered masks, while keeping separate control over the surrounding image. | Keeps alternate looks editable on separate timelines. Watermark-free video exports and supported editable-project handoffs are free. |
Flixier | Lets you brighten or darken footage, shape contrast and adjust colour intensity. Separate red, green and blue gamma controls let you rebalance the image’s colour channels. | Matches clips to an image or timeline reference and saves reusable LUTs. Using one LUT across differently lit clips can still require individual balancing. | Lets you rebalance channels or shift colours across the shot. RGB gamma and hue rotation do not isolate an object, so other colours may change too. | Delivers clean 1080p through the Starter plan or 4K through the Creator plan. The free plan allows watermarked 720p and ten export minutes monthly. |
CapCut Web | Automatic correction and manual controls let you balance exposure, warmth, contrast and colour intensity in the browser, with direct control over the final picture. | Filters and custom curves help carry a shared look through the sequence. Different lighting still needs individual correction, so copied settings can leave shots mismatched. | Lets you change individual colour ranges with HSL and shape contrast with curves. Similar hues change together, so the correction can also affect other objects. | Lets you choose export resolution, frame rate, format and quality. Premium effects or LUTs can require the Pro plan, adding a cost even to 1080p delivery. |
Kapwing | You can correct colour casts and balance bright and dark areas without leaving the layered Studio project, keeping footage, captions and other finishing work together. | Filters and manual adjustments help build a shared look, but differently lit shots need individual balancing, adding work across a sequence. Brightness, contrast and saturation can animate the treatment. | Lets you adjust the selected layer’s colour. Warmth and tint cannot be keyframed, so a changing white-balance correction needs separately adjusted sections or another workflow. | Exports watermark-free videos up to 4K and two hours with the Pro plan. The free plan limits delivery to watermarked 720p videos up to four minutes. |
Canva | Colour correction stays inside the branded design: you can balance bright or dark footage and correct colour casts, using auto-adjust or manual controls. | Applies a shared look across the design through Apply to all media. Different source exposures still need individual correction, so one treatment can leave mismatched clips. | Lets you change the whole clip’s colour. Photo area and object-colour selections are unavailable in Video Adjust, so correcting one video region needs another workflow. | Keeps the design editable and supports watermark-free delivery with your own or free assets. Premium elements need licensing, so paid stock can add an export cost. |
Microsoft Clipchamp | You can lighten or darken footage, control contrast and colour intensity, and adjust warm or cool casts. Reset restores the clip’s starting settings. | Applies adjustable filters across selected clips, but different lighting can still need individual balancing. Premium filters require eligible paid access. | The selected clip can be made warmer or cooler, but temperature changes the whole image, also shifting areas whose colour already looks right. | Provides watermark-free 1080p exports for personal accounts. 4K needs eligible paid access; qualifying Microsoft 365 subscriptions may already include it, while work and school licences differ. |
1. invideo Editor: Best overall for online colour correction and grading

Balaram Paul’s invideo demonstration at 04:00 shows the colour workspace with product footage, wheels, waveform and manual correction controls.
Invideo Editor brings shot balancing, reference-led looks and selective corrections into a full browser editing suite. You can direct the work through the built-in agent or connect ChatGPT or Claude through MCP for free, then refine the same grade by hand. Picture, titles, sound and the timeline stay together while you finish the video.
Exposure, brightness, contrast, highlights and shadows give you direct control over a shot’s tonal balance. Temperature and tint address blue/yellow and green/magenta casts. Lift, Gamma and Gain wheels separate shadows, midtones and highlights, while the Global wheel affects the whole image. RGB and luminance curves give finer control over individual channels and contrast. The waveform, RGB parade, vectorscope and histogram help you judge levels and colour distribution alongside the monitor.
The invideo editor also lets you build a look from a reference image and keep the grade editable in the same video project. The editing agent can apply and revise the look across clips. Imported .cube or PNG LUTs and copied grades offer other starting points. LUT strength and colour controls remain available for refinement, while exposure and balance adjustments account for lighting differences between shots.
Selective controls let you develop the look beyond a whole-shot correction. Hue curves can shift, brighten or reduce the saturation of a chosen colour range. Hue, saturation and luminance qualifiers narrow the pixels included in a correction, with softness and mask blur to smooth the boundary. Circle, rectangle and gradient masks restrict the grade spatially; feathering, inversion and additive or subtractive masks help include the area you want and exclude neighbouring regions. The Canva controls comparison explains why this distinction matters when a global adjustment would change too much of the frame.
You can also ask your AI assistant to revise the grade for selected shots while preserving an approved section or create alternate grades on separate timelines. Manual controls remain available between requests, and the same project carries on through captions, graphics and sound finishing. Finished-video exports deliver the look, while supported editable-project exports provide another route for continuing the cut in Premiere Pro, Final Cut Pro or DaVinci Resolve.
Manual editing, watermark-free video exports and editable-project exports are free. Ordinary editing through ChatGPT or Claude over MCP is also free, with your assistant’s own subscription and usage allowance applying separately. Work assigned to invideo’s built-in agent uses invideo credits, as does generating new images, video or audio.
Invideo is the strongest overall choice because detailed balancing, reference-led grading, colour-range selections and spatial masks work together in the same editable video project. Agent assistance and free manual control let you carry that work from the first correction through the finished export.
2. Flixier: For colour correction and grading within a full video edit

Flixier’s official Color Match demonstration shows reference choices, Color and Tone controls, and save/download actions above the timeline.
Flixier combines manual colour correction and grading with a browser timeline editor. Brightness, contrast, saturation, hue rotation and separate RGB gamma controls let you balance shots and shape their colour. Those adjustments stay within the project as you continue editing the video.
Its manual colour panel also offers brightness, contrast, vibrance, saturation and hue rotation, plus separate red, green and blue gamma sliders. Gamma gives you channel-level influence over midtones, while blend colours and blend modes offer another way to tint the image. This goes beyond applying a preset filter.
Color Match accepts an uploaded image or a frame from the timeline. It creates a look that you can refine with Color and Tone sliders, save to the project and download as a 3D LUT. The same reference can guide several clips, with the timeline still available for the rest of the edit.
The controls serve different purposes. Hue rotation shifts the overall colour spectrum; RGB gamma changes channel balance. Neither operation by itself selects one physical object, so changing the shot through those controls can also move colours you wanted to retain. A downloaded LUT carries a colour transform, rather than the complete layered edit or a spatial selection. Reusing it across differently exposed or lit clips can still require individual balancing. Keep the Flixier project when you need to revise the cut and its settings together.
The free plan limits exports to watermarked 720p and ten minutes of video per month. The Starter plan provides watermark-free 1080p exports, with 60 export minutes per seat each month. The Creator plan adds 4K, unlimited video exports and full Color Grader access.
Monthly pricing is US$19 for the Starter plan and US$39 for the Creator plan, with regional prices and annual offers varying. Generation and transcription have separate AI-credit allowances.
Flixier is a suitable option for manual colour correction and grading within a full browser edit. Reference matching and reusable LUTs extend those controls, but watermark-free exports require a paid plan.
3. CapCut Web: For HSL adjustments and curves in a social-video workflow

CapCut’s official browser colour-panel example shows Basic, HSL and Curves. A still image is selected in this example; the red outlines belong to the source.
CapCut Web combines colour work with its online multitrack editor, captions, text and social-video finishing tools. The browser’s colour panel includes automatic correction and manual temperature, hue, contrast, saturation and exposure controls. You can use the automatic pass as a starting point and then adjust the picture yourself.
HSL controls let you change the hue, saturation and lightness of individual colour ranges, while curves shape contrast through a graph. Filters supply another starting look. Those controls make CapCut Web more capable than a browser editor limited to one global saturation slider.
However, copying settings across clips does not balance their different lighting automatically. A darker or warmer source may still need its own correction. HSL is also a colour-range operation: similar hues elsewhere in the frame can change together. Check the entire image when the intended adjustment belongs to a particular face, item of clothing or background area.
The cost can also become apparent at delivery. Premium effects, transitions or LUTs can trigger a Pro requirement during Web export, even when you choose 1080p. Remove the premium elements or use the Pro plan to deliver with them. The Pro plan has a US$19.99/month reference price; sign-in, region, taxes and offers determine the account’s final price. Check the selected tools and export settings before developing the look around them.
CapCut Web suits editors who want HSL and curves alongside a social-video toolkit, with time for individual shot matching and a clear view of premium export requirements. Check out the invideo Editor vs CapCut comparison to see how both tools handle project sharing, review and handoff.
4. Kapwing: For shared Studio edits with animated tonal adjustments

Authentic Kapwing Studio capture, 30 October 2026: the supplied sample video beside colour and lighting adjustments. Keyframe diamonds appear on supported settings.
Kapwing keeps colour correction inside its collaborative, layered Studio editor. Warmth and tint address colour casts, while exposure, contrast, highlights, shadows, whites and blacks shape the image’s light range. Filters provide a stylistic starting point, but differently lit shots still need individual balancing, adding work across a sequence. The project remains available for text, captions, sound and further timeline changes.
Its adjustment keyframes let brightness, contrast and saturation change during a clip. That is useful when a tonal treatment needs to develop over time, with editable points rather than a fixed setting for the entire layer.
However, warmth and tint cannot be keyframed. If a white-balance correction needs to vary during a continuous take, those two sliders cannot make the gradual change directly. Splitting the take into separately adjusted sections may handle a simpler change; a smoothly varying correction needs another approach. The Adjust panel also treats the selected layer as a whole, so its saturation control does not isolate one hue or object for separate grading.
The free plan provides manual editing but limits exports with watermarked 720p videos of up to four minutes. The Pro plan removes the watermark and supports up to 4K and two-hour exports. Its annual price is US$16 per member per month, billed yearly. AI features have their own credit allowances, separate from adjusting a slider manually.
Kapwing suits shared Studio projects that need straightforward colour balancing and animated tonal changes. The creative-control comparison explores the extra finishing controls when the grade needs more selective treatment.
5. Canva: For balancing clips within a shared branded design

Canva’s Video Adjust panel with temperature, tint and light-range controls beside a selected clip.
Canva combines video editing and colour correction with graphics, templates and typography in one editable project. The Video Adjust panel includes temperature and tint for correcting colour casts. Brightness, contrast, highlights, shadows, whites and blacks shape the image’s light range, while vibrance and saturation adjust colour intensity.
Auto-adjust, filters and Apply to all media offer a starting treatment and a way to carry it through the design. However, different lighting can leave clips mismatched after the same settings are applied. Each clip may still need separate exposure and colour adjustments.
The important boundary is between Canva’s photo and video tools. Selective foreground, background and object-colour adjustments for photos do not provide the same selection controls for video. Native Video Adjust changes the whole clip, so a saturation change intended for one object also affects other colours. A separate selective correction needs another route before the finished shot returns to the design.
The free plan can cover editing and watermark-free delivery when you use your own or free assets. Premium elements need the appropriate licence; purchase access or replace them before a clean export. A paid asset or subscription decision is separate from using the basic adjustment sliders on supplied footage.
Canva suits projects where whole-clip balancing is enough colour control. Isolating a specific colour or region for correction needs another workflow.
6. Microsoft Clipchamp: For straightforward correction and free HD delivery
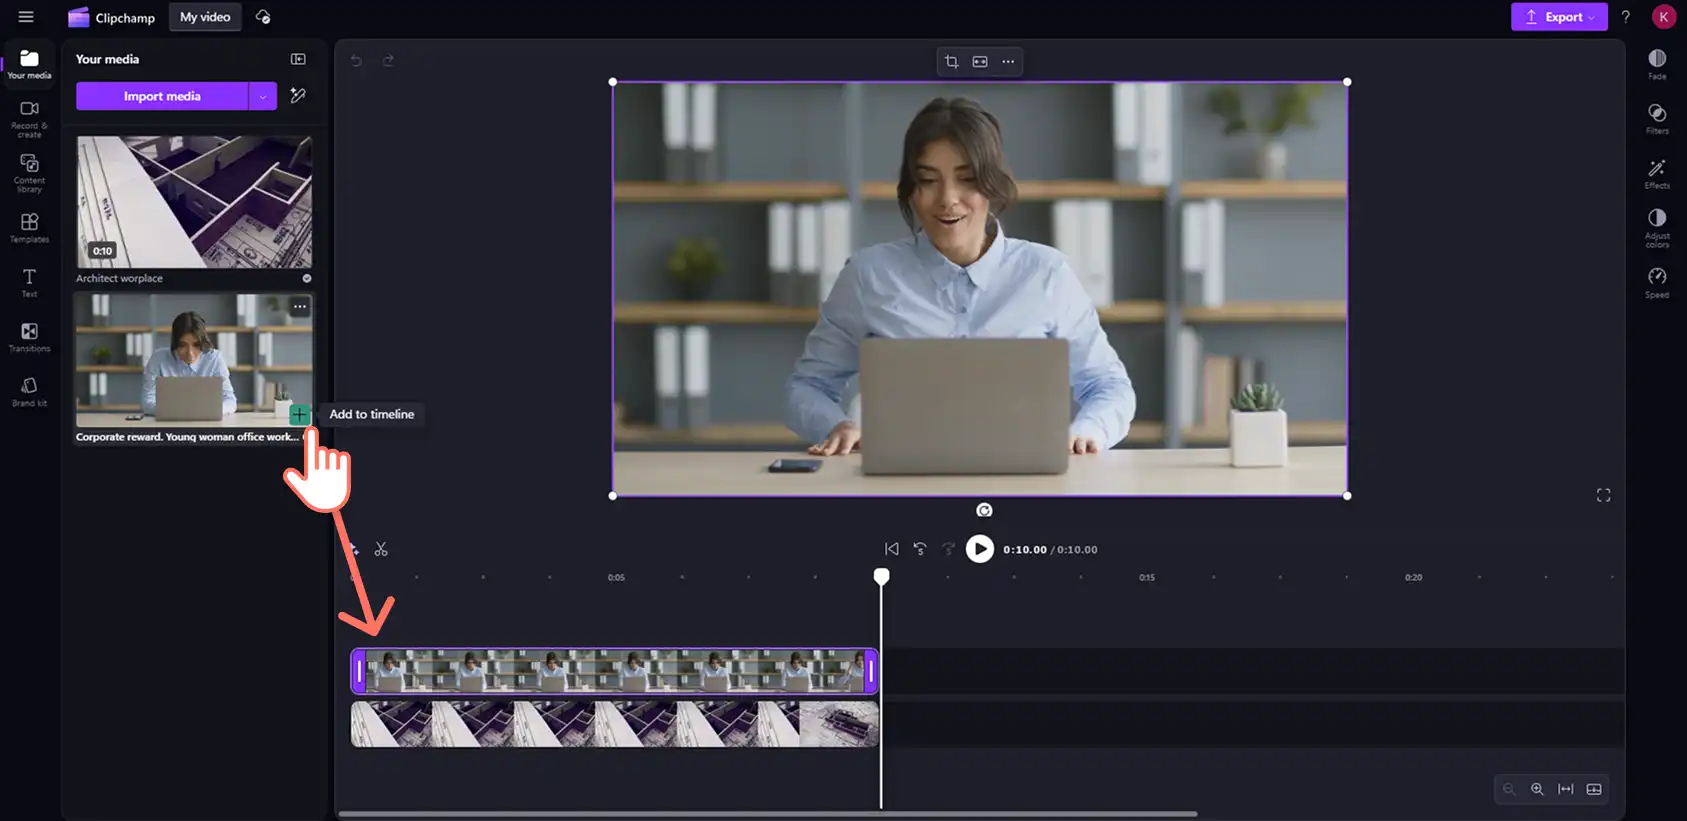
Clipchamp’s browser editor with two video layers. The arrow is part of Microsoft’s tutorial image.
Clipchamp provides an accessible route for correcting supplied clips and completing a straightforward video. Its Adjust colors panel combines exposure, contrast, saturation and temperature. You can lighten or darken the shot, change its contrast, reduce an intense palette or adjust its warm/cool balance. Reset restores the selected clip’s colour settings.
Filters with adjustable intensity offer a quick look that you can keep subtle, while titles, transitions, separate tracks and sound controls support the finished sequence. Colour work stays inside the project for later revisions. The same filter can be applied to several selected clips together. Different source exposure or white balance can still need individual colour adjustments.
Clipchamp’s temperature control can also make the selected clip warmer or cooler. However, the change affects the whole image, including areas whose colour already looks right. If your correction needs to treat a specific colour range or region independently, plan that selective work separately rather than expecting a global slider to isolate it.
Personal accounts include free watermark-free exports up to 1080p. Premium filters, effects and 4K export require eligible paid access, including qualifying Microsoft 365 subscriptions. Work and school licences differ: their Standard offering can include features that require premium access in personal accounts. Check the benefits already assigned to your account before buying another subscription.
Clipchamp suits uncomplicated whole-clip corrections with a free HD finish, especially when the editor is already included in your Microsoft workflow.
Frequently asked questions
Which online editor can match clips shot in different lighting?
Invideo Editor can balance exposure and white balance on individual clips, then carry a shared look across the timeline with LUTs or copied grades. Wheels, curves and scopes support further refinement, and each shot’s settings remain editable to account for different lighting.
Can AI build a video colour grade from a reference image?
Invideo’s editing agent can use a reference image to build, apply and revise a look on supplied footage. The resulting grade stays editable in the same video project, with manual colour controls available for refining the look and balancing differences between shots.
How can I correct one colour or area without changing the whole image?
Invideo Editor combines colour qualifiers with spatial grade masks for selective corrections. A qualifier narrows the pixels selected by colour, while a mask restricts where the adjustment applies. Together, they allow a correction to target a colour within a chosen region while keeping the surrounding image independently adjustable.
Can ChatGPT or Claude colour grade a video for free?
Ordinary colour correction and grading through ChatGPT or Claude connected to invideo Editor over MCP is free. Your external assistant’s subscription and usage allowance apply separately. Manual editing and exports are also free. Built-in-agent work and generated media use invideo credits.
Features and displayed prices checked on 30 October 2026. Billing term, region and account entitlements affect the final cost.