


Changing the speed of a video is a simple yet captivating method for creating a stunning visual experience.
Ever since The Matrix, it has become increasingly popular to create slow-motion videos for various types of scenes. It’s also fun to speed your video up and come up with comical clips where the characters are moving fast and speaking in chipmunk voices.
Are you looking for a way to change the speed of a video clip just to see what it looks like? Is your goal to find a solution to help you speed up and slow down video clips as a part of a more complex project?
To see what a video looks like with altered speed, you can change the playback options in your favorite video player. If you want to edit videos and come up with amazing projects for platforms like YouTube, you’ll need a handy video editing app.
A robust video editor will enable you not only to change the speed of your footage but also to add stunning features and create visual experiences where you can get as creative as you want to be. This can be a fantastic approach if you’re figuring out how to make a music video.
Before we get down to the nitty-gritty of editing videos, let’s start by taking a look at how you can change the playback speed using some of the common video players you get for free with operating systems.

Source: Pexels
How to change video playback speed using common video players
If you want to play around with your video files and preview what they look like when sped up or slowed down, you can rely on the good old:
1. QuickTime Player
2. Windows Media Player
How to make videos play faster using QuickTime Player
QuickTime Player is a popular free video player made by Apple. It used to be part of the iTunes package, but the company discontinued support for it in 2016. This hasn’t stopped plenty of people that have been familiar with it for years from using it. It can play some of the most common video formats, including:
- MOV
- MP4
- AVI
- MPEG
Changing video speed in QuickTime Player is easy. What you need to do is:
1. Open a video in QuickTime Player
2. Click on the Window menu
3. Go to Show A/V controls
4. Use the Playback speed slider to speed up or slow down the video
You can adjust the speed from 0.5x to 3x.
How to make videos play faster using Windows Media Player
Every Windows user is familiar with the Windows Media Player. It’s a popular video player that you can get for free with most versions of Microsoft’s operating system. It can play various formats, such as:
- AVI
- WMV
- MP4
- MPEG
- MOV
To change the speed of any video clip, you need to:
1. Open a video in Windows Media Player
2. Right-click anywhere on the screen
3. Click on Enhancements in the pop-up menu
4. Go to Play speed settings
5. Use the slider to change the playback speed
The settings work best from 0.5x to 2.0x. Other options can make your video freeze, and you’ll have to restart the player.
How to start editing a video in InVideo

If you want to edit the speed of your video clips and turn them into a fascinating project, you need to look for the best video editing software. Our browser-based video editing platform has got just what you’re looking for.
InVideo enables you to create high-quality videos using three practical methods. Each of them focuses on particular types of videos and different approaches when it comes to video editing. You can choose to make a video via:
1) Blank Templates
If you want to make a video without any premade template elements and control every aspect of the creation process, this is the best option for you
This option is made for importing scripts, website links, and various kinds of media files for InVideo to transform into a series of customizable scenes
If you’ve got a specific type of video in mind and you don’t want to start working from scratch, you can browse through our library of over 2,000 templates and use the one that fits your concept
To show you how you can change the speed of your videos and use them to come up with a captivating end product, let’s take a look at how you can work on your material using the Blank Template option.
To start creating your video with this option, you need to:
1. Log in to your InVideo account
2. Click on the Blank Template tab
3. Choose an aspect ratio for your video
4. Click on Start Editing
How to change video speed using InVideo

When the editor opens up, you need to upload your media files. Go to the Uploads tab in the left panel. Click on the Upload button at the bottom of the menu and select the videos and other files that you want to include in your project.
Once all the files are imported, they’ll appear in the Upload menu. You can click on any of them to preview them. Drag and drop them onto a scene to apply them.

Now that your video is a part of the scene you’re working on, you need to click on it to change its speed. Go to the Edit menu on the right and look for the Playback Speed tab. Here, you can use the slider to set up the speed of your video from 0.25x to 2.50x.
When you pick a particular playback speed, the duration of the scene in the project’s timeline will change automatically.
Other video options and features that you can utilize
You can utilize a variety of other settings and features in the Edit menu for your video element.
The Video Edit tab provides you with the options to:
- Crop the frame
- Trim the video
- Loop a video element
- Turn the volume on or off
- Use the slider to set up a blur effect
Under Video Resizing Options, you can set up how the video element appears in the scene. You can crop it, stretch it, or make it fit with other video elements.
When you go to the Video Animation tab, you can add starting and ending animations for the video element. This includes a wide range of options, such as Fade, Shift, Slide, Blur, Zoom, Bounce and Flip.
When you choose the animations, you can use the slider below to set up how long they play out.
The Change Project Colors tab enables you to ensure that your entire video has consistent color settings.
Adding advanced textual features
You can add various kinds of textual features to your video. If you’re using the footage to make a lyric video, you can create all sorts of enticing captions. Check out how to add captions to YouTube videos if you’re interested in that.

To add textual elements to your scenes, go to the Text tab. Here, you can choose if you want to insert standard or stylized text boxes. When it comes to the latter, you’ve got the following categories to pick from:
- Text Styles
- Classic
- Modern
- Astons
- Social Media Credits
- Location Boxes
Click on the text box of your choosing to add it to a scene. You can rotate it, stretch it, and move it around as you like.
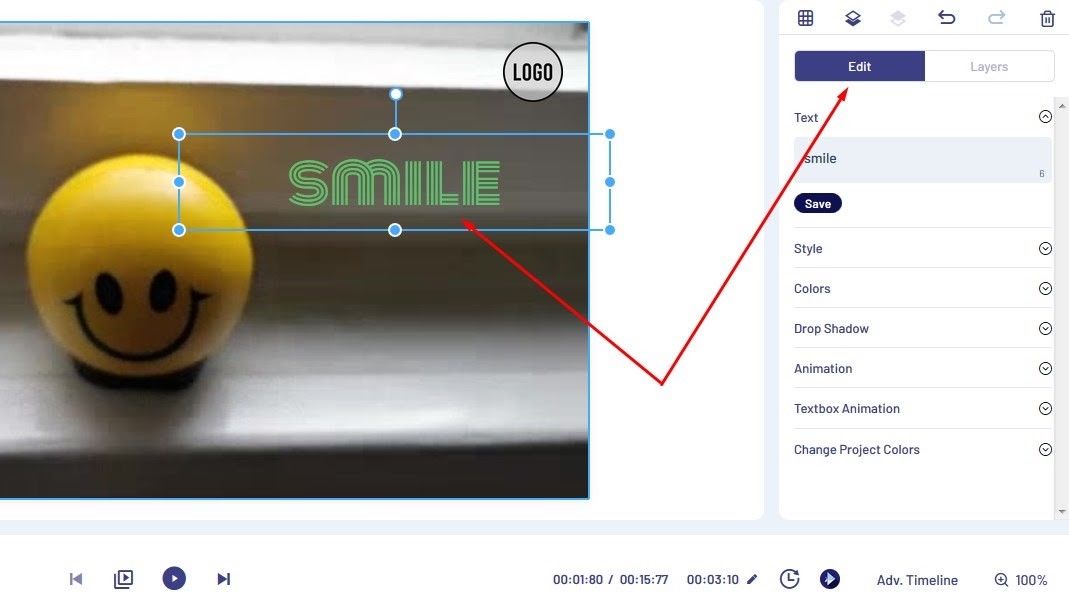
To access advanced text editing options, click on a text box and go to the Edit menu on the right. Here, you can play around with a variety of options, including:
|
InVideo Advanced Text Editing Options |
|
|
Style |
Change the font and pick the desired size, style, height, and alignment for the text |
|
Colors |
Choose the text color that works best for your project |
|
Drop Shadow |
Set up a drop shadow effect and pick a color for it |
|
Animation |
Animate the way the text appears, focusing on letters, words, or the whole sentence |
|
Textbox Animation |
Choose an animation for the whole text and set up its duration |

Editing your video using the Timeline

The timeline is where you can edit your entire project in a sequence. You can change the duration of each scene by dragging the edges around. If you want to rearrange scenes, you can drag and drop them to different positions along the timeline.
If you want to include more footage, use the Add Scene button. When you click on the three dots, you can choose whether you want to delete or duplicate a scene. You can also pick the Best Scene Time option to match the duration of a scene to the original recording.
You can add transitions by clicking on the arrows connecting the scenes. InVideo provides a variety of transition effects, including:
|
InVideo Scene Transition Effects |
||||
| Glitches | Light Leaks | Animations | Brushes |
Overlays |
|
RGB glitch, digital break, flicker glitch, etc. |
Subtle, bold light, film burn, long flash, etc. | Blur, rewind, impact, curtain call, etc. | Corner stroke, circular stroke, etc. |
Fan, arrow, circle, tetris, stripes, etc. |
When you click on the blue button with a triangle, you can use our Intelligent Video Assistant (IVA). This feature relies on artificial intelligence to analyze your scenes and determine whether you have made any mistakes.
When IVA finds an error, it will inform you about it and suggest how to fix it. You can click on Resolve to apply IVA’s solution or find a way to take care of the issue yourself.

To get a more traditional overview of your project, click the Advanced Timeline button on the right. This view enables you to see all your project elements as layers. You can change their duration and set up how they overlap. Some of the layers are locked, so you’ll have to click on the lock to be able to move them.
How to add a voice-over to your project

You can create engaging guides, reviews, and explainer videos by adding a voice-over to your project. Click on the Add VO button in the top-left corner of the timeline. InVideo provides three options when it comes to voice-overs:
1. Record a voice-over directly using the platform
2. Import your pre-recorded audio file into the project
3. Use the automated text-to-speech feature to generate a voice-over based on your input or any textual element in a scene

InVideo provides a vast selection of voices based on different languages. Pick a language and browse through different names until you find the voice that suits your video. You can hear how each one sounds by clicking on the play button next to it.
Once you’re done choosing, click on the Generate VO button. You’ll be able to preview your generated voice-over before you decide to add it to a scene.
You can add background music to accompany the voice-over you’ve recorded or generated. Go to the Music tab and browse through the many songs we’ve got to offer or upload your own.
InVideo provides an extensive library of over a million royalty-free media files. If you want to add some of our videos and images, go to the Media tab. Use the search bar and see if we’ve got anything that fits into your project.
Other features that InVideo has to offer

InVideo provides a variety of other features that you can add to your scenes to make them more engaging. This includes effects, shapes, stickers, enhancers, etc.
When it comes to effects, you can choose one from the following categories:
- Confetti
- Powder explosion
- Snow
- Smoke
- Light leaks
- Fireworks
- Hearts
- Grunge
Click on an effect to add it to your scene.
Enhancers are another attention-grabbing solution that you can add to your project. You can choose from over a hundred mask overlays, turn a scene into an animated collage layout, and incorporate a Twitter or Instagram post into your video.
InVideo also has a selection of eye-catching stickers for various purposes. You can improve a marketing-related video with categories such as CTAs, ratings, business, e-commerce, and social media icons. For a less serious project, you can insert various stickers of pets and emojis.
We’ve also got options made for particular holidays, such as Halloween and Independence Day.
What are the benefits of using InVideo?
Our video editing platform provides plenty of benefits that you should consider. For starters, InVideo is a software solution made for novice users that want to start making professional-looking videos quickly and with little effort.
The navigation is intuitive, and you’ll get a hold of all the amazing features that InVideo has to offer in no time. Instead of spending hours on your video project, you’ll need less than ten minutes to come up with fantastic results with our video editor.
Even though InVideo is easy to handle, we don’t expect you to figure everything out on your own. We’ve got a vast selection of video tutorials that cover every aspect of using our software.
If you can’t find the answer to your question, you can rely on our customer support team. Our agents are available 24/7. All you need to do is open up the chat in the bottom-right corner of the screen, type in your inquiry, and someone will be on your case in a matter of minutes.
Another awesome aspect of our platform is that it’s a browser-based solution. This means that everything you do happens online. You can click out of your project without worry—it will be there waiting for you when you return.
When it comes to convenience, you should know that InVideo is compatible with different operating systems. You can start making a video on Windows in your office and continue editing it on a Mac device at home.

Can I afford InVideo?
If you thought that such a robust and user-friendly solution is expensive, we’ve got good news for you. InVideo is one of the most affordable video editing solutions on the market. We offer two paid plans:
|
InVideo Paid Plans |
|
| Business |
Unlimited |
| Annually—$10 per month
Monthly—$20 per month |
Annually—$30 per month Monthly—$60 per month |
The Business plan has only two monthly limitations:
- You can’t export more than 60 videos
- You can use up to 300 premium media files
With the Unlimited plan, you can use InVideo with no restrictions.
To top it off, we also provide the option to use InVideo for free without an expiration date. The free version is similar to the Business plan, with the inclusion of a watermark on all your exported videos.
Whichever plan you subscribe to, you’ll be able to use all the features that InVideo can offer.
Sign up as soon as today to start creating professional-looking videos using InVideo!