
Imagine if you could get leads for your business without door-knocking, cold-calling, or spending a fortune on ads. That’s what a real estate YouTube channel can do for you and pay dividends for years to come.
At a time when video content is reigning high, your real estate marketing strategy can be incomplete if you don’t create and leverage videos, given that 78% of people watch online videos every week. And there’s no better way to get started with it than YouTube, which offers the best ROI for video as compared to any other social media channel.
If you want to leverage this channel and set yourself up for some YouTube success that gets you active conversions, we’ve prepared a detailed guide to help you kickstart your YouTube marketing journey. Stick with us, and we’ll also show you how to start creating your YouTube videos like a pro using InVideo’s feature-rich video editor. We cover:
1. Setting up your channel
2. Creating videos
3. Optimizing your YouTube videos
4. Real estate YouTube marketing best practices
5. Best real estate YouTube channels to follow in 2025
Let’s dive in!
1. Setting up your channel
Once it’s up and running, your YouTube channel will become an extension of your personal brand and online presence. So, it’s important to get some basics right from the get-go:
A) Naming the channel
The first step in setting up your channel is deciding its name. You can go with your personal or business name—choose what you commonly use to market your business. This will help your existing clientele recognize and subscribe to your channel and make it in line with your other marketing channels.
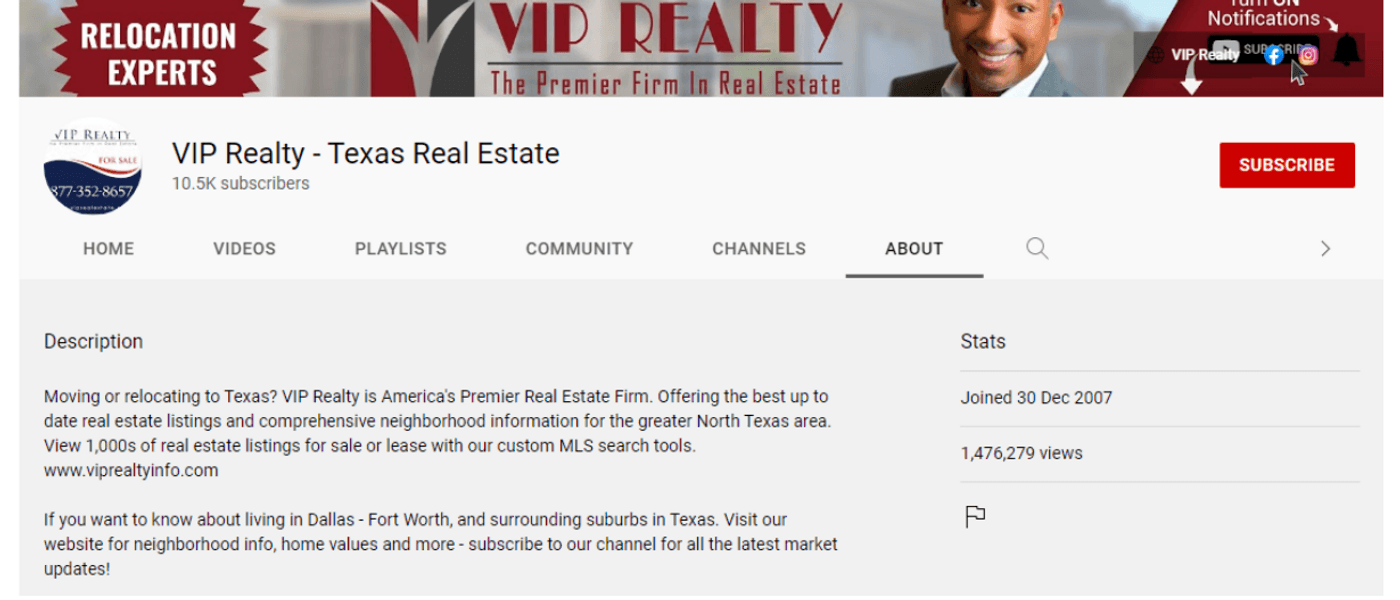
B) The “About” tab
Your about section is a precious space that can pull viewers and get them to hit the “subscribe” button. It should describe who you are, what you do, what your channel is about, what content viewers can expect, and why they should subscribe.
Here’s how VIP Realty conveys this information while keeping it short and crisp:
You can even take inspiration from your website’s about page for this. Also, make sure to add links to your website or socials to build credibility further and allow people to check out your business or reach out.
C) Banner and profile image
At the top of your channel comes your header image or banner—it immediately catches the eye and is precious real estate (no pun intended).
So, use the banner wisely to convey your name, what you do (in short), what type of content you post, and your contact information. You can even add a high-quality professional picture of yourself, your logo, and some stunning property shots on it.
Here’s an example of a solid banner. Besides the details above, it even mentions the areas where Kristi works and when she posts on YouTube, both great additions.

You can also keep it minimalistic like Matt Leighton here.

You can add your business logo or a professional headshot for your profile picture—the latter can catch attention, help people put a face to your brand, and build recognition.
D) Channel trailer and description
Your channel trailer is a video pinned atop your channel, shown to users who haven’t subscribed yet.
It’s a great way to welcome new viewers, introduce yourself, your work, what your channel is about, and what they can gain from it. Take inspiration from Kristi Bell’s channel trailer here:
Make sure to end this video with a call to action (CTA) asking viewers to subscribe to your channel and hit the bell icon. And, keep the video short and crisp—60-90 seconds is a good length.

Like other YouTube videos, there’ll be a description accompanying your trailer video too. Its content will be more or less the same, but it’s best to tweak a few elements and spice it up, so viewers feel tempted to subscribe.
E) Make a real estate YouTube marketing plan
When you’ve got the nitty-gritty details out of the way, you can’t just jump straight to creating and posting videos.
You need to have a long-term vision for your channel and understand your why behind creating it—that’s what will guide your videos going ahead and motivate you to stay consistent.
Think about:
- What’s your long-term goal with the channel?
- What topics will you cover?
- What content will help your audience?
- What kind of videos do you want to make—property listings, neighborhood videos, interviews, market updates, educational videos, or a mix of all these?
- What’s your value proposition? What can make you stand out from the hundreds of realtors on YouTube?
Creating a publishing schedule for your real estate YouTube videos can also help. Decide how often you’ll post and what days you’ll dedicate to filming, editing, and posting based on what suits your work schedule.
The whole idea is to figure out your posting cadence and understand where you want to go with the channel. Then, you can start with the exciting part—video creation.
2. Creating videos
The topic, script, footage, and audio quality—all determine the success of a YouTube video. So, let’s understand how you can get each of these right and make compelling videos for your channel.
A) Research and ideation
Understanding what your audience wants and what works in the real estate world is crucial to creating quality videos that serve your bottom line and get you the engagement you deserve. This involves:
1. Perform keyword research
Whether used in your channel’s “About” page, trailer, or video description, keywords are an integral aspect of YouTube and help its algorithm understand and rank your videos.
While you’d want to go for high search volume keywords like “real estate,” “realtor,” or “houses for sale,” there’s great competition and content around these phrases, which will reduce your chances of ranking on YouTube and getting more eyes to your videos and channel.
Instead, focus on long-tail keywords related to your local market or city’s name. Use tools like Google Ads or Ahrefs to see what real estate terms the people in your city are looking up and which ones have good search volume but low to moderate competition.
You can also type in your city’s name + a real estate term in YouTube’s search bar and see what suggestions come up.

This will be a good starting point to understand what real estate-related content your target audience searches for and consumes and help you plan your keyword strategy accordingly.
You can also explore the videos that appear for these search results and perform a content gap analysis to assess what they’re doing and what pain points or key points are missing. This will help you add more value to your videos and add more keywords to your list.
2. Observe the YouTube real estate landscape
Exploring other real estate YouTube channels and the videos they make can be a great source of inspiration.
Look at videos performing well within and outside your market. For instance, if you sell in Houston but noticed that San Antonio travel guides perform well on YouTube, that right there could be a solid idea for a video.
While researching, watch out for videos that gain higher views than the creator’s subscriber count. This means that views on those videos didn’t come from their subscribers alone, i.e., there’s a demand for that content but a potential gap for such videos on YouTube—that you can leverage.
Another great idea—look at your immediate competitors or real estate agents from nearby markets. See the topics they cover and the questions and comments viewers leave on their videos and create content around those queries.
3. Tap into your clientele
Take hints from the questions your leads generally ask you or ask your existing or past clients if they had any questions before doing business with you. Creating videos to solve those queries will help you target pain points and generate quality leads through education.
Take inspiration from John Pena here. In this interview, he talked about how he started creating videos exploring El Paso and its neighborhoods because people used to reach out to him asking where they should move in the city (11:50).
This highlights another important point—not all your videos need to be about your market’s real estate trends and property tours. You can also create videos on the neighborhood, restaurants, and the culture of your area—anything that will help your audience in their buying process.
B) Filming
Once you’ve found the right ideas, it’s time to start planning and filming your YouTube videos.
1. Scripting your videos
The first step is to map out your video and decide what you’ll cover. The best way to do this is to prepare a script or outline beforehand, so you know what you’re going to talk about and don’t ramble while recording.
In your script, iron out your introduction—it’s best to start with a hook that grabs viewers’ attention and compels them to continue watching it. Also, give a brief introduction about yourself, telling the viewers who you are, what you do, and what the video offers.
Then, chalk out the body of your video—you can break this down into short bullet points so you know what to talk about, and even if you forget, you can remember with a quick glance and continue.
After discussing the main topic, end your video with a relevant CTA—you can ask viewers to like your video, subscribe to your channel, or reach out from the information in the description box.
You can also mention if you’d like to incorporate specific property shots somewhere and some thumbnail and music inspiration and ideas, so you can shoot and edit your video accordingly.
Now, whether you create a detailed or bare-bones script will depend on the type of video you're creating. For instance, for a market updates video or an educational video providing tips, you'd want to create a detailed outline to structure your video properly and know what to say when.
On the other hand, for property tours, keeping some pointers of what you’d like to say handy can work. You can build upon the points while shooting—this can help bring an element of spontaneity into your video and make it feel natural and conversational.
Pro tip: When planning and scripting your video, try keeping it under 10 minutes (real estate agent Loida Velasquez recommends 5-7 minutes) to best retain the audience’s attention while still giving them sufficient information.
2. The elephant in the room: What equipment do you need?
Many real estate agents hold themselves back from creating videos thinking they need fancy, professional equipment and technical know-how to get started.
That couldn’t be farther from the truth. You can practically start creating real estate videos with your smartphone—ensure the lighting is good and there’s no background disturbance.
Some basic, budget-friendly equipment you can invest in to up your video quality is a lapel microphone (to make your audio better and clearer), tripod or gimbal depending on the video and where you’re shooting, and ring light.
But the basic idea is—don’t overcomplicate filming if you’re doing it yourself. You can start small and simple and still create stellar videos for your channel. And you can always tie up with professional filmmakers and video producers to create higher-quality video productions.
C) Editing
Once you’re done filming, you’ll be filled with excitement and would probably want to upload your video straight to YouTube, but pause.
There are quite a few ways you can make your video more engaging and exciting for viewers, which can enhance your chances of getting good results with your YouTube efforts.
For instance, the first few seconds make or break your video and so it’s best to ensure you start it with a bang with shots that hook viewers.
You can also add text to your audience to reiterate what you’re saying and enhance the viewing experience, thus building retention. Meanwhile, music and transitions can give your video a flow, and make it professional-looking.
Additionally, it’s also important to keep your video short and crisp without any fluff so viewers don’t bounce off and are engaged throughout.
All these factors can help you enhance your video and ensure you post high-quality and engaging content on YouTube.
Luckily, a video editing tool like InVideo can help you achieve all this and more. It’s simple to use and offers a range of exciting features you can use to create stunning videos even if you’ve never edited a video before.
Here’s how to start with InVideo and take your YouTube videos to the next level:
Step 1: Create an InVideo account or sign in to your existing one. On the homepage, click on Black Canvas, the Wide (16:9) aspect ratio, and then Make a Video.

Step 2: Once the editor opens, upload your video(s) or images from the Upload Media option on the left panel.

Step 3: Once uploaded, you’ll see the clips on the left panel. From here, drag-and-drop your first clip into the editor.

You’ll see a prompt to trim your video. Click on Use Full Video to use the entire clip, or use the sidebars at both corners to use a portion of your video.

Step 4: To add the next video/image, click on the + Scene on the right-hand side of your video in the timeline and select Blank Scene.
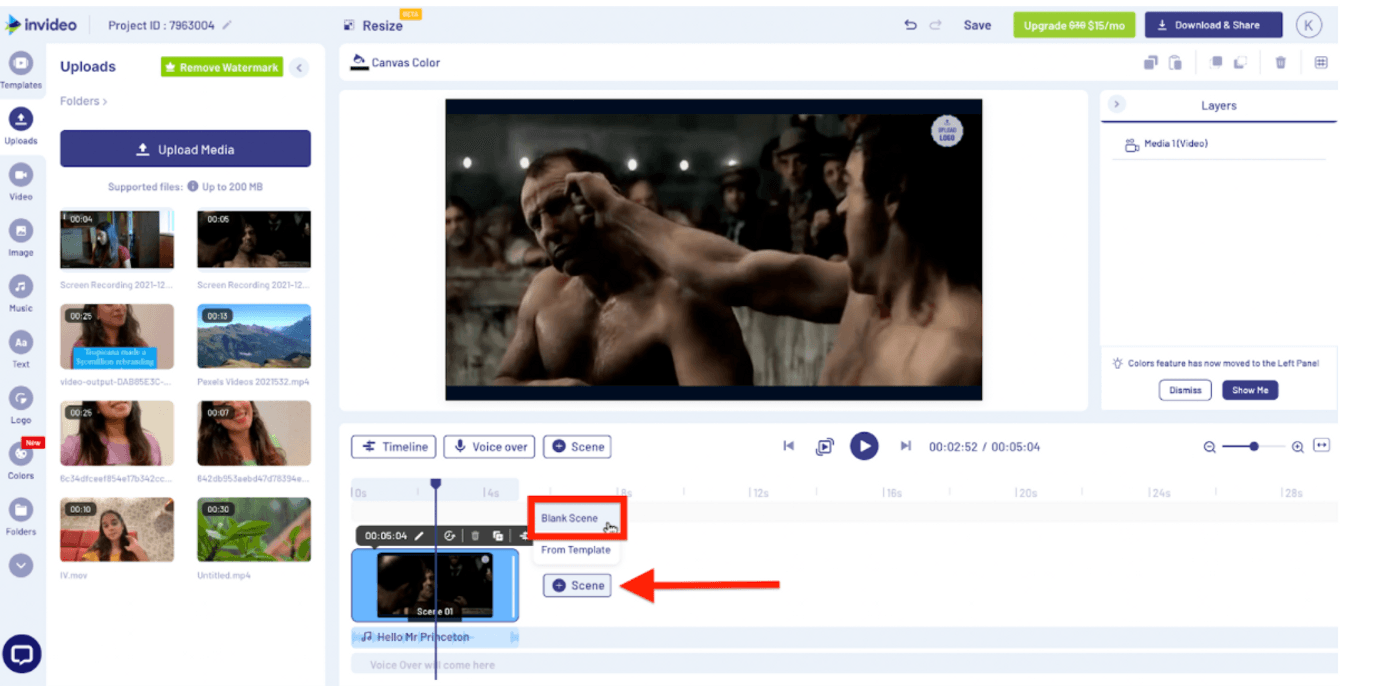
You can also add a scene from one of InVideo’s real estate templates to your video to add some visual interest. Click on + Scene and then From Template. Then, browse and pick a template of your choice and add any scene from it.

Step 5: Once you’ve arranged all your clips on the timeline, tap the / icon between two clips to add transitions between them and make the segue smoother.

Step 6: Click on the Text option in the left panel to add text accompanying each frame. So, for instance, you can add your name and contact details in the opening and closing montages of the video or property details in case of a listing video.

Step 7: If you want to add a voiceover, click on the Voiceover option above the timeline and record the audio from within InVideo or upload one from your computer.

Step 8: Add music to your video from the Music option in the menu bar to make it more engaging and interactive. Here, you can find InVideo’s rich collection of songs sorted by mood, genre, SFX, and choose what best suits your video.

Once you find the right track, click on the three dots next to the video and click on Replace Music.

Next, tap the soundwaves in the timeline, then Edit and Volume & Fade to adjust the track’s volume so your voice is audible.

Step 9: Click on Logo in the menu bar to upload your business logo. Now, your logo will automatically get added to all scenes, ensuring your video is on-brand.

Step 10: Finally, go to the Stickers tab to add exciting CTAs like “Subscribe” or “Share” at the end of your video. Choose the sticker of your choice, drag it to the place where you want it, and use the sidebars above the timeline so it appears exactly when you want it to.

You can even add and customize an outro template like this to spice up your video’s end and finish with a bang.
Step 11: When you’re done editing and are satisfied with the result, hit the Download & Share button on the top right corner and then Export.

Next, download your video or click on the YouTube icon to share it straight to your channel!

InVideo makes editing and enhancing YouTube videos a breeze. But if you’re afraid to get in front of the camera or don’t have the time to record full-fledged videos, it’s not the end of the world. You can use one of InVideo’s 250+ real estate templates to create professional-looking and engaging videos and boost your channel’s content.
For a deeper understanding of how to edit videos that will help you get discovered on YouTube, check out this comprehensive guide.
3. Optimizing your YouTube videos
YouTube is first and foremost a search engine, and you need to use relevant keywords at the right places, so your target audience can discover your videos.
Once you’ve created and edited your videos to perfection, here’s how to optimize them so they rank on YouTube, get more eyeballs, and your efforts pay off.
A) Thumbnails
Your video’s thumbnail is perhaps the most important metric when it comes to the discoverability of your videos and their click-through-rates. You definitely don’t make it a last-minute thought.
While you can select a frame from your video as the thumbnail, it’s best to create custom thumbnails that attract viewers and convey what the video is about. In fact, YouTube says 90% of its top-performing videos use custom thumbnails.
You can add a close-up photo of yours to give the thumbnail a personal touch or use bright and contrasting colors to make it pop in regards to other videos on the same topic. When you’re creating thumbnails, you want to think from the perspective of the audience – will they click on this? Understanding and creating thumbnails that get higher conversions is an art in itself, and something that you will only be able to perfect over time.
To get a better understanding of how to create thumbnails, check out this helpful video:
Keeping your thumbnails consistent in terms of the images and colors you use and the text font, size, or placement here can also improve the overall look of your channel, as Heather Sim’s channel shows:

B) Titles
Titles are a prime place to use your keywords and help YouTube understand your video’s topic. Besides, the purpose of every search engine is to show the most relevant results to a user’s search query, so your title will also help YouTube understand to whom they should display the video.
Think about what people are likely to type in to see your video and create a title based on that to drive maximum views.
At the same time, make your titles engaging to compel viewers to check out your video. Here’s a video to help you create attention-grabbing titles:
C) Descriptions
Your video description is another element that helps YouTube understand your video and show it to the right audience. It is also super important in terms of search optimization of your videos.
In your description, give an overview of your video and make sure to use relevant keywords and hashtags. Also, add links to your website, listing pages, and social media accounts, so viewers know where to contact you. Here’s an example:

You can also include CTAs like a link to book a meeting with you or links to other videos viewers might find useful here.
D) Tags
You can only use so many keywords in your video title and description, but that’s where tags help. Youtube uses tags too to understand what your video is about and which searches and users it’s relevant to. Tags are not hashtags, but related search terms that you add in the backend while uploading your videos.
It’s best to add a mix of broad, popular, video-specific, and long-tail keywords as tags to boost your video’s discoverability and attract the right audience.
E) Captions/subtitles
Adding captions to your video is a great way to enhance your video’s performance and reach. They allow the algorithm to crawl your video better and direct it to the right users. Adding subtitles can help people understand your message more clearly as well as boost retention for people who might not necessarily be fluent in the language you speak.
Given that over 80% people watch online videos with the sound off, adding subtitles can help you capture attention because people will be able to understand what you’re saying. They can also be super helpful for people who cannot hear or are hard of hearing.
All this can help you reach more prospective buyers and sellers and grow your channel and business, so make sure to add and leverage captions.
F) Setting up playlists
Although not a video optimization tip, clubbing related videos together to create a playlist can get viewers to stay on your channel for longer and send positive signals to the algorithm, indicating that users find your content useful.

It can also help users navigate your channel more easily and derive greater value from it, thus improving their experience and pushing them closer to hitting the “Subscribe” button. However, creating playlists will only make sense once you’ve published a rich collection of videos.
4. Real estate YouTube marketing best practices
We’ve covered all the basics of starting a channel and creating and optimizing your videos. But here are some pro tips to guide you through the process and bring you closer to YouTube success:
A) Understand your audience
Before you set up your channel or start creating videos, take the time to understand who your ideal audience is, the problems they’re facing, and the content they’d like to see.
Think about questions like:
- Are they first-time homebuyers, homeowners, or relocating?
- What’s their income and budget?
- Do they live with their family or by themselves?
- What are their interests and hobbies?
- What type of properties are they looking for?
For instance, in this interview we mentioned above, John discussed (19:05) how he niched down to focus on people who were relocating to El Paso, i.e., the relocation market. He asked himself, “what type of information would I need if I were to move to this city?”—and that formed the foundation of his videos.
B) Show your personality in your videos
To break through the real estate YouTube noise and make your videos stand out, you need to add your spin to them and showcase your personality.
Share your backstory with your audience, tie your experiences and expertise into the videos you create, highlight your passions and interests, and build a connection with your audience. This will help people resonate with your content and return to your channel for more.
Consider Soomin Kim here, for instance. In his very first video, he didn’t just talk about how he’s a realtor, but also that he’s a husband, father, and someone who recently relocated. This way, he established a personal connection with his audience and gave a unique perspective to all his videos going forward.
C) Value first, selling second
Posting content on your YouTube channel can ultimately help your business’s bottom line, but that shouldn’t mean you’ll blatantly promote yourself in every video.
You can take a few seconds to introduce yourself in each video and end with CTA to let viewers know where to get in touch. But the bulk of the video should be the main topic it’s on. The goal is to educate, inform, and provide value to your audience—so they turn to you when they have a real estate need.
D) Promote your videos
Once you publish a video, it’s a good practice to share it on your social media and email campaigns, so it gets as many views as possible quickly. Good initial traction will send positive signals to YouTube’s algorithm, signaling that they should push your video to more viewers.
You can also embed relevant videos on your website. Besides increasing views, this can also improve your website’s search engine optimization—as videos can make visitors stay on your website for longer.
E) Keep an eye on channel analytics
All through your real estate YouTube marketing journey, make sure to check your Analytics to understand what content resonates with your audience and what doesn’t.

Some key metrics you should look out for are:
(1) Impressions click-through rate—to assess your titles and thumbnails’ effectiveness.
(2) Traffic source types—to understand which channels (email, social media, website, search, playlists) work best for you.
(3) YouTube search—to see the search terms that brought people to your video and assess the effectiveness of your keyword strategy.
(4) Average view duration—to understand if your videos are engaging viewers from start to end and where you can improve.
(5) Audience demographics and when they’re online—to see if you’re attracting the right audience and optimize your posting times.
5. 5 Best Real Estate YouTube Channels To Follow in 2025
The best place to start with your real estate YouTube channel is to look at other channels, take inspiration from the pros, and learn from what they’re doing well to drive your own strategy. Here are our top 5 recommendations:
#1 - Mike Sherrard
A real estate coach, Mike’s entire channel is dedicated to helping real estate agents scale their business with social media marketing. From the interviews he hosts to his educational videos, you’ll find great information and inspiration on his channel on what content to create on YouTube, how the algorithm works, how to build your personal brand, generate leads, and more.
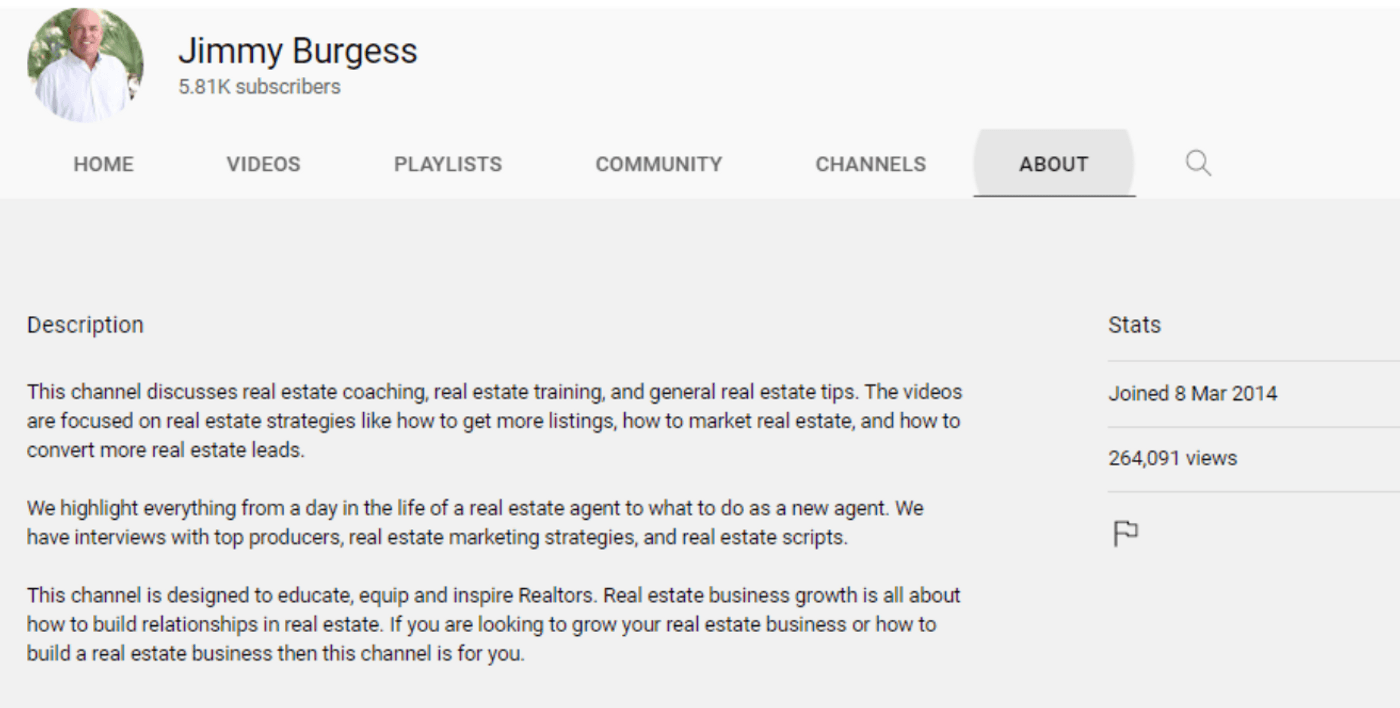
#2 - Jimmy Burgess
From skills real estate agents should master to the type of marketing videos they should create, Jimmy’s YouTube channel is a goldmine of information to grow your business. Subscribe to his channel and watch his videos even fleetingly, and you’ll still gain a lot.
Also, notice how skillfully he incorporates all relevant keywords in his “About” section while keeping it simple, crisp, and easy to understand.
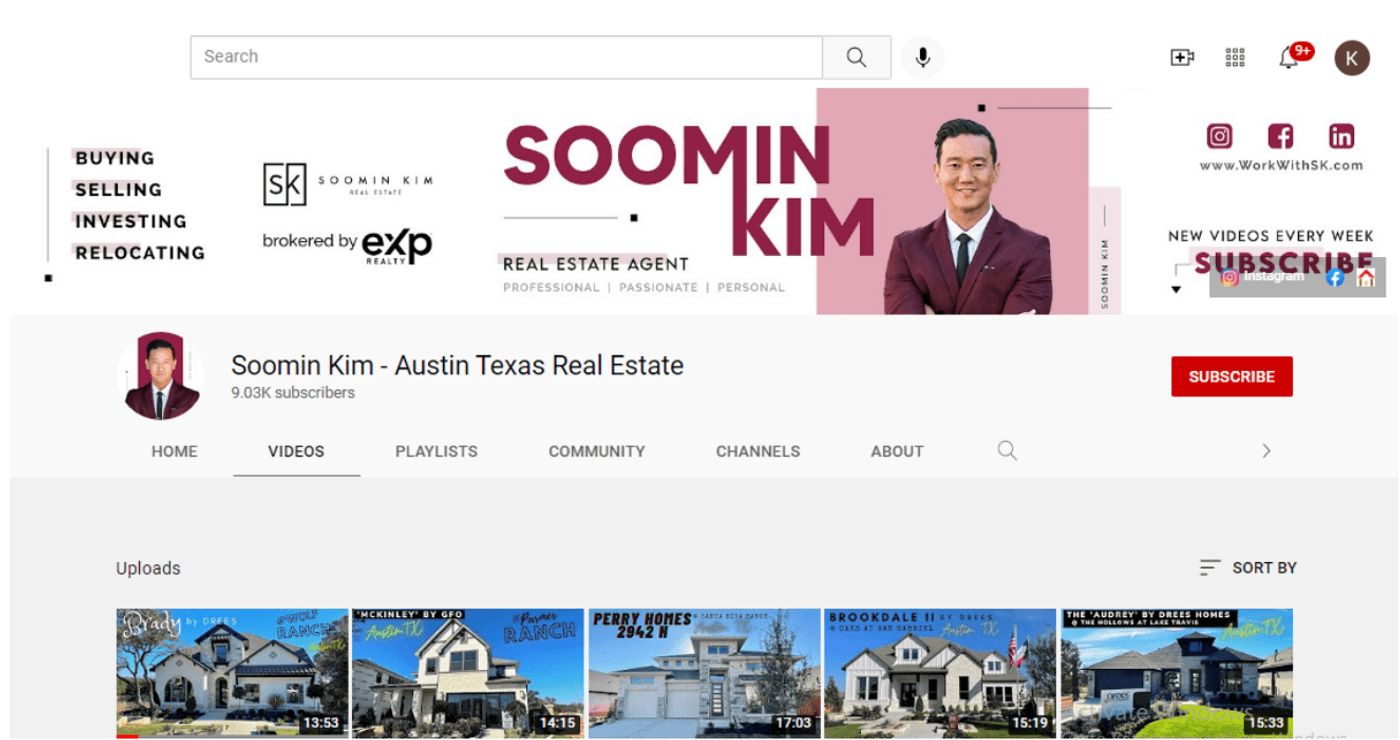
#3 - Soomin Kim
Soomin started his channel about a year ago, shoots his videos on his phone and using just basic equipment, and is proof that you don’t have to overcomplicate making videos for your real estate business.
You can also take inspiration from his YouTube banner and profile image—they’re clean-looking, feature professional snapshots, convey exactly what he does, and set the tone for his channel.
#4 - Loida Velasquez
From real estate tips and tricks to beautiful apartment tours, Loida uses YouTube to promote her business and teach you how to grow yours.
Her channel trailer is also note-worthy—it’s not like ordinary trailers with the realtor speaking into the camera introducing themselves. Instead, it features stunning shots of what she does and what her channel is about, with text and high-energy music.
#5 - Jessica Riffle Edwards
Jessica is another example of how you don’t need top-notch equipment to get started—she shoots many quick, informative videos right from her car using her phone. Besides that, she also posts simple but eye-catching home tours that you too can easily create.
Wrapping up
Now that you know how to get your channel up and running, all that’s left to do is start. After all, your learning will not begin until you take action. So, set up your channel, start making YouTube videos or shorts, experiment with your content, engage with your audience, and you’ll learn the rest on the way.
If you’re ready to start your YouTube channel, here are some real estate video ideas for you, and a guide to begin real estate marketing. And if you’re a visual learner, we also have a YouTube channel where we give you the latest tips and tricks to help you create engaging videos and supercharge your marketing strategy.
This post was written by Komal and edited by Adete from Team InVideo