
Creating an engaging, well-performing YouTube video is more than just stitching clips together and calling it a day. Nearly 500 hours of content is uploaded on the platform every minute, so you need to ensure your video brings something unique to the table and holds the viewer’s attention.
The solution? Editing—it’s the last mile that determines whether your video becomes a hit or miss. But the real question is, where and how do you start with editing?
We’ve done the legwork and prepared a complete guide for you on how to edit YouTube videos with a feature-rich tool like InVideo, even if you’ve never edited a video before. Stick with us till the end, and we’ll also give some pro tips to help you hook your audience to your video and make them watch for longer.
Here’s what we’ll cover in this article:
A. Things to know before you start editing
B. How to edit YouTube videos
C. Pro tips for editing YouTube videos
Let’s dive in!
A. What you should know before you start editing
Before we get into the meat of the article, let’s briefly understand how the YouTube algorithm works and the factors you need to consider while editing your video.
YouTube tracks and uses various metrics to decide whether to push your video to more users, but two key ones are retention rate and watch time.
Audience retention shows the percentage of viewers who leave or continue watching your video at every single moment.

Meanwhile, watch time is the total time people have spent watching your videos.

Under YouTube Analytics, you’ll also see metrics like average percentage viewed (the percentage of your video a typical viewer watched) and average view duration (the average minutes per view).

All these metrics assess your video’s ability to hold the audience’s attention and keep them interested and engaged. YouTube wants more people to watch more videos on its platform and for longer, so the better your watch time and retention rates are, the more likely it is to push your video to more users.
Bottom line: A higher retention rate helps boost your video’s watch time, which can further help bring more eyes to it.
Your video’s topic, content, and quality—all play a crucial role in determining how engaging it is. But editing is the final piece of the puzzle that can help you enhance the look and feel of your video and make it crisper and engaging enough for viewers to stick till the end.
Now that you know what metrics matter, let’s see how to edit videos for YouTube to increase their chances of hitting good numbers.
B. How to edit YouTube videos
The best part about editing is that the basic steps remain the same no matter what software you use.
For this article, we’ve used InVideo’s YouTube Video Editor to demonstrate the steps. The editor is intuitive, simple to use, and comes with unlimited stock footage and features like music, stickers, and animations that can enhance your video and bring you closer to YouTube success—and that too, for free!
Let’s look at how to edit YouTube videos:
1. Import & organize your footage
The first step is to gather all your footage—A-roll, images, audio—and rename files based on what they contain so you can quickly identify them while editing.
You can then go on and import your clips to your video editor. What can also help at this stage is organizing your footage by media type, i.e., creating separate folders on your editor for your A-roll or your primary footage, B-roll, or supplementary footage (additional images, videos, animations), and audio (voice-over, music, sound effects).
This way, you’ll save yourself from getting lost in a sea of footage while editing because you’ll know exactly where each asset is.
Here’s how you can do this on InVideo:
Step 1: Go to InVideo’s YouTube Video Editor and click on Create your next YouTube video.

Step 2: Tick Pre-made templates if you want to add your clips to one of InVideo’s templates—they come with exciting visuals, animations, graphics, and text to help you create a stunning video quickly and easily.

Or, click on Blank Canvas if you want to edit a video from scratch. Then click on the Wide (16:9) aspect ratio and Make a Video button.

Step 3: Once you reach the editor, click on Upload in the left panel and then Upload Media. Then, pick the files you want to import from your desktop to the editor.

Or better yet, click on the Folders option from the same menu bar and create a separate folder for each of your media types. Click on each folder to upload footage under it.

Once you’ve imported and organized your media, it’s time to compile them and bring your YouTube video to life.
2. Create your narrative
Before you start building your video’s main content or narrative, first review your primary footage (your A-roll) and select the clips you want to keep. You can then start adding them to your editor’s timeline.
This step doesn’t involve just compiling your footage but also condensing it down to include only the meat of the matter. Not only should you remove any clip that doesn’t add value to your video’s story, but you should also cut and trim:
- Dead air, awkward pauses, stutters, and fillers like “um,” “uh,” “like,” etc.
- Parts where you or the speaker are going off-topic.
- Parts where the information is getting repetitive.
Remember: Watch time and retention are critical metrics—and repetitive information, long pauses, or discussing topics viewers didn’t sign up for can make them lose interest and drop off your video.
Besides cutting the fluff, it’s also important to position your clips in a cohesive sequence, so your video has a flow and logically presents information. This will help engage viewers and ensure they derive maximum value from your video.
Here’s how you can do this on InVideo:
Step 1: Once you’ve uploaded and reviewed your footage, drag and drop your first clip into the editor.

Step 2: You’ll see a pop-up to trim your video. Here, you can watch your clip again, click on Use Full Video to use the whole clip.
To make cuts within a clip (for instance, to cut out a long pause), select the start and endpoints of the first section you want to add.
Then, click on the + sign at the right corner to add a section and use the sliders to fix the starting and end of the next clip. Hit the Add button to add the trimmed scene to your video.

Pro tip: Avoid making cuts mid-sentence, or they’ll create an abrupt jump in your video and ruin the viewer experience. Instead, match the beginning and end of your clips with the start and end of sentences. You can refer to this blog to learn more about the different cuts you can use to enhance your video.
Step 3: Click on + Scene in the timeline and tap Blank Scene to add your next clip. Then, drag and drop the clip into the editor, trim it to cut the fluff, and hit Done.

Rinse and repeat this step with all your clips, and you’ll create a crisp, value-packed narrative for your video.
While reviewing and editing your main footage, you can also brainstorm and note where you want to add B-roll, text, stickers, etc., which brings us to our next point.
3. Add B-roll to your video
Once you’ve set your main content, you can use B-roll to make your video more engaging and comprehensive. B-roll is secondary footage that you can cut into and out of, often while your main footage’s audio continues playing. This cutaway footage helps break the monotony while providing viewers a better understanding of what you’re talking about—because you’re not just telling them but showing them.
Look at this video, for example. Here, the interviewer and interviewee’s chat constitutes the main chunk or A-roll of the video. But they’ve also used additional footage (B-roll) of actual highlight videos to excite viewers and help them understand what they’re talking about.
You can also use B-roll to hide cuts—say you cut out a long pause in one of your clips, creating a slight jump between the two sections. You can place some additional footage between these portions to explain your point, and you’ll get rid of that jumpy effect and make the flow smoother.
Bonus: Want to learn more about how and where to use B-roll? Here’s a tutorial for you:
What’s even more interesting is that there are many different types of B-roll you can add to your video.
You can shoot supplementary footage specifically for a video and add it wherever the context seems fit to convey your story better. Or, you can turn to stock footage to get your message across and add visual interest to your video. The only key is to use relevant clips that help visualize what you’re talking about.
If not footage, you can also use text slides in between your video to break the monotonous flow and provide better context to viewers. For instance, you can insert a text slide every time a new segment starts in your video, as this video does:
InVideo makes it super easy to add B-roll and enhance your video’s look and engagement. Even if you’ve not recorded supplementary footage for a particular video, you can go through InVideo’s collection of 8 million+ stock images and videos, and you’ll find something suitable. Here’s a step-by-step on how to add and edit B-roll on InVideo:
Step 1: Upload your B-roll footage in the editor or browse and pick from InVideo’s stock collection.
All you have to do for the latter is click on Video or Image from the left bar based on what you want to add and then type in the keyword or topic you’re looking for footage on.

Step 2: Like you did with your A-roll footage, drag and drop your B-roll clip to the scene where you want to add it. This will show you a popup asking how you want to add the footage—click on Add as a Layer here.
Trim your B-roll to include the part you want, and then hit Done.

Step 3: Your narrative will be the first layer of your video in the timeline, while the B-roll will sit on top of it. You can also click on the B-roll to footage and use the sliders to fix its start and endpoints.

Step 4: To edit the added B-roll clip, click on it, and a toolbar will appear on the top. Here, you can change its playback speed, mute the audio, add animation, etc.

Step 5: On the canvas, drag the edges of your B-roll footage and place it where and how you want it in your video.

Step 6: To add text slides to your video, tap + Scene and then Blank Scene.

Step 7: To add text, go to the Text option on the left panel, choose your font, heading style and customize your text.
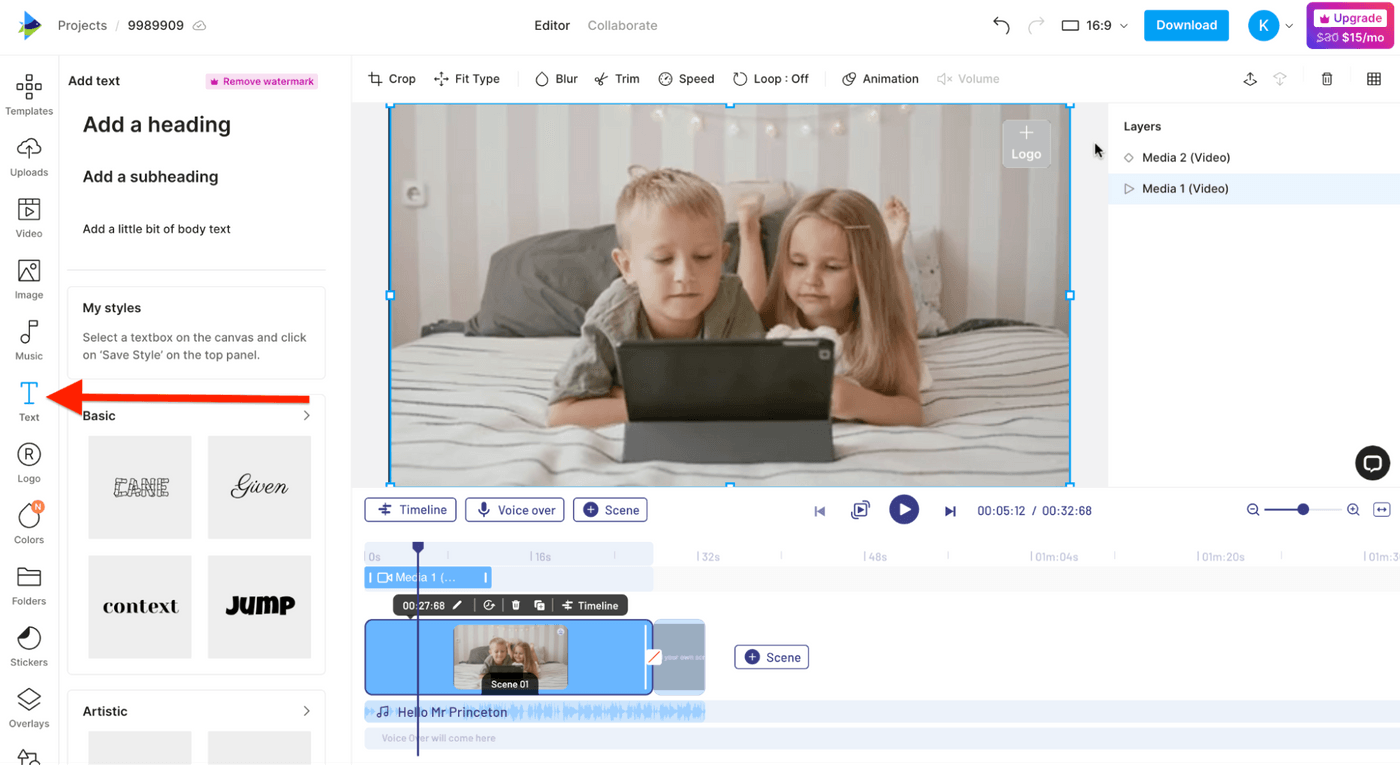
Step 8: To change the color of the canvas, click on it and then the Canvas Color option that appears.

And voila! That’s how you can add some exciting footage to your video to complement its central narrative and improve the viewing experience.
4. Add music & sound effects
A video is an audio-visual experience. So, once your visuals have been taken care of, you need to ensure your audio is high-quality too, or viewers will drop off before you know it.
You can ensure your video sounds good to the ear by filming with the proper equipment and in a noise-free area. You can even record a voiceover straight on the InVideo editor to enhance your voice’s clarity and provide viewers with a better experience.

Music is an exciting element that can create an ambiance for your video and help your audience understand what emotions you want them to experience. But the way you use music depends on the type of video you’re creating. For instance, in a tutorial or talking head video like the one below, it’s best to have your soundtrack playing softly in the background—just to create an ambiance while ensuring your voice is audible.
But in a travel vlog or promotional video, the soundtrack can be the star of the show—it sets the tone for your video and helps glue viewers to what you’re showing.
As the above example shows, timing your scene transitions with your song’s beats in such videos is imperative to hooking viewers and building excitement. Whether you’re using music just for the ambiance or more, InVideo offers a rich collection of copyright-free songs that you can use to elevate your YouTube videos.
Here’s how you can add music on InVideo and even edit your video to its beats:
Step 1: Click on the Music option in the left panel to browse the music library.

The key to using music in your YouTube video is to ensure it matches your video’s mood. InVideo makes this super easy because besides genre, it also has music tracks organized based on mood.
Pick the mood you’re going for in your video—whether it’s inspiring, relaxing, or dark—and you’ll get various songs to choose from.
Step 2: When you find the right track, click on the three dots next to the song, and click on Replace Music to add it to your video.

Step 3: To edit to the beat, listen to your track a few times to understand its flow and how you want to go make the edit.
There’ll be a slight spike in the audio waveforms when the beat hits. You can use this as a visual guide to understanding where to cut a clip and start a new one.

Pro tip: Use headphones to listen to music clearly and understand the precise moments when the beat hits and ensure your cuts are on-time.
You can also watch this tutorial on how to find the right music for your video and edit it to the beat:
Step 4: Click on your music track in the timeline and then Edit to increase or decrease its volume or add fade-in or fade-out effects.

Besides music, you should also consider adding sound effects to give viewers an immersive experience and make them feel more engaged in what you’re talking about.
You can use effects when a text or graphic pops up on the screen or to transition between two clips (with the whooshing sound, for instance).
Say you’re telling viewers to like and subscribe to your channel mid-way through the video. Instead of just saying this, you can add “like” and “subscribe” icons to your scene and use pop or bell sound effects to reel viewers in and impress them.
You can find such sounds under Sfx in the Music section.

InVideo’s music library has all these sound effects and more—all you need to do is run a search for the effect you’re looking for.
The best part is that InVideo preserves the audio quality (whether of your voiceover, music, or sound effects) when you download the video, so you can be rest assured that your audio quality will be top-notch.
5. Add a compelling outro
You have all the ingredients of an engaging YouTube video—quality footage, value-packed and well-flowing narrative, stunning B-roll clips, and music. Now, end your video with a bang with a clear and compelling call-to-action (CTA).
People who’ve watched your video till the end are most likely interested in the topics you cover and your video style—so capitalize on this interest and direct them to the next step.
How you end your video and your CTA can be the difference between someone subscribing to your channel, watching another video of yours, or dropping off never to see you again.
But don’t worry—your CTA can be something as simple as asking people to like your video, subscribe to your channel, watch another video on a related topic, or leave any questions or feedback they may have in the comments. High engagement can encourage YouTube to pick up your video, so don’t miss out on this opportunity.
While you’ll have to take care of this while filming and speak out your CTA as you’re signing off, you can also use one of InVideo’s outro templates to spice up your video’s ending and keep viewers glued till the last minute.
For example, you can customize a template like this and add your end screens while uploading to direct viewers to other videos on your channel:
6. Review your video
Your video is all done and ready to be uploaded on YouTube—but before you download and upload it, do a confidence check to ensure everything’s in order.
Make sure there are no typos in the text you’ve added, no glitches, the cuts are in place, the music fits well, and your audio is clear.
Once you’re satisfied with your video, tap Download on the top right of the InVideo editor, and then Export.

After this, your video will start to render. You can then download it to your desktop or share it straight to YouTube right from InVideo!

C. Pro Tips for Editing YouTube Videos
Now that you’ve understood how to edit YouTube videos, let’s look at some best practices you should keep in mind during the process to ensure your final output is engaging, delivers value and generates views.
Tip #1 - Watch all footage first
Before you start editing, make sure to watch all your footage—even the clips you think you won’t end up using.
You might find interesting moments where you least expect them. And even if not in the main content, you can still use bits from a clip in your introduction, a montage, or B-roll. If you find a part of a clip that you like and want to keep, make sure to note its time stamp and how you want to use it, so you don’t forget later. You can do this in a note-taking app or simply using a pen and paper.
The other reason why going through your footage is a good idea is that this will give you a sense of how you want to go about your edit—the flow you want for your video, where you want to include what part, where to add B-roll, what type of music you think will go best, and more.
Tip #2 - Think about how you want to use music beforehand
Adding music to videos usually comes at the later stages of editing, but the selection of the music is one of the first things you should do because that determines the complete mood of your video, even for talking head videos. The wrong music selection can completely ruin the mood and feel of your video.
Go over to the music tab on the left side of the InVideo editor, browse tracks based on genre or mood, and you’ll find one that matches the mood you want to go for in your video.
For videos that don’t have dialogues, it is best to sync the cut on your clips to the beat or tempo of the music track for a more seamless edit. For videos with dialogues, you want to use music tracks where one particular segment or instrument doesn’t stand out too much to interfere with what is being said.
And no matter how you use music, make sure not to blast it at a 100% volume. You don’t want your audio levels peaking because that is just not fun to listen to for the audience and can quickly hamper your video’s engagement.
Tip #3 - Focus on the first 30 seconds
Under the audience retention section, YouTube also shows you how many viewers stayed on your video after the first 30 seconds, i.e., your intro.

So, the 30-second mark is crucial to tell YouTube your video is engaging and encourage it to push it. Moreover, given people’s short attention spans and the sheer amount of content available on the platform, it’s also said that it takes viewers less than 30 seconds to decide if your video is worth their time and whether to stay or drop off.
That’s why it becomes important to start your video with a hook—it can be as simple as addressing the title of your video, the pain points a viewer might be experiencing, and how they can benefit from watching the video.
For instance, notice how Virag below keeps the video’s introduction short yet instantly hooks viewers by making them feel they’re at the right place. He even tempts them to watch the video till the end, saying he’ll tell them exactly how to get such stunning video results—a great way to boost retention and watch time.
Another excellent idea is to pick an interesting segment that comes later in your video and show that in the introduction, as in this video. This can help build excitement among viewers and make them stick around for longer.
Or, you can even add a montage of some of your best shots and clips in the introduction to hook and excite viewers, as this video does amazingly.
It’s also good to add a separator (like a logo reveal) between your introduction and the rest of your video, as shown in this video. This not only helps make your video more engaging but also helps viewers understand that the main content is starting.
The good news is that you don’t have to go looking anywhere for this separator. InVideo has a ton of short intro templates like this one here that you can use and customize for this purpose.
Bonus: Want to learn more about how to spice up your video’s intro? Read this blog that covers 5 exciting YouTube intro ideas with examples!
Tip #4 - Change the visual every 4-6 seconds
If you have the same visual going on for too long, you’ll risk losing the audience’s attention and making them drop off your video. On the other hand, changing visuals every few seconds can add excitement to your video and give it a good rhythm and pace.
Using images, popups, stickers, and B-roll can help here. Transitions, animations, overlays, and effects can also help bring visual variety to your video and retain your audience’s attention.
Another excellent idea is to use cut-ins—keep one clip as it is and slightly zoom in on the subsequent one, and you’ll create a visual difference between the two without much effort.
You can record wide and close-up shots while filming your video and then put them together to create this effect. But even if you don’t get close-up shots, you can use InVideo’s Crop tool to crop your clip and create a zoom-in effect.
Here’s how this will look:
Here’s a video you can watch to learn how to add cut-ins and other cuts:
Another great way to make your video more engaging is to introduce supplemental changes by sprinkling elements like screenshots, screen recordings, stickers, and text slides throughout.
This is especially important for videos where you’re talking to the camera. If you feel you’ve been sitting in one spot and talking for too long, a visual can help bring some excitement to your video and provide viewers with a change of scene.
Cathrin Manning here uses this technique well. She uses text, screenshots of the comments people leave on her channel, and images like the following on top of her video. This helps bring some change to the frame and illustrate her point.

Tip #5 - Make use of on-screen text
Using text is an important editing technique that not only helps add variety to your frame but also helps your viewers to get re-engaged because you highlight what you’re talking about on-screen.
Text slides are one way to do this, but you can also add text on a frame, as shown below. For this, it’s a good idea to go through your script and highlight words and phrases you think are important. Then, you can add them as text to the relevant frame.

Adding lower-thirds to identify speakers or simply when you introduce yourself in the video is also a good practice.

Not only can you add text on InVideo through the Text panel, but you can also choose from a variety of styles and fonts and set the in and out time as you like.
Speaking of which, make sure to keep the text you add short (1-5 words), readable (even on smaller screens), and leave it on screen for long enough so viewers can read it.
Tip #6 - Don’t go overboard with cuts and transitions
Cuts and transitions help you remove unnecessary information and bring variety to your video. But use too many, and you’ll draw attention to the edit and away from your video’s story, which is not what you want.
So, use your cuts and transitions sparingly and intentionally—in a way that they’re not noticeable and look effortless.
If you’re making a talking head video, it’s best to put your cuts at the end of a sentence so people can grasp what you’re saying without any disruption.
As for transitions, don’t use one between every two clips. Instead, it’s best to use them when you’re moving from one segment of your video to another, or there’s a change of scene—like a change in location or time of day.
Bottom line: With all the elements discussed above—images, text, and transitions—the key is not to go overboard, or you’ll distract, overwhelm, and put off the viewer. Try to achieve a fine balance between your main narrative and these additional elements.
Tip #7 - Edit ruthlessly
It may be hard to let go of portions and clips, but make sure to cut out any information that’s deviating from your video’s topic or not adding to it.
The key is to watch your video from a viewer’s perspective and think of the value you’re receiving per minute. Ask yourself questions like “what did I learn from this?” after every section or “do we need to go that in-depth?” and you’ll understand what you need to get rid of.
Tip #8 - Find your style
While all the above tips are crucial, how you edit your video ultimately boils down to your preference and editing style.
The key to finding your style is to, firstly, experiment and see what tools and features you like using and that delight your viewers.
Secondly, watch YouTube videos from creators you like—study their editing style and try to understand what you enjoy about their videos.
This will help you understand what you want to and don’t want to include in your videos and develop a style that you can then use consistently in all your videos and build recognition.
Wrapping Up
Editing YouTube videos doesn’t have to be stressful, but it also can’t be taken for granted because it largely determines your channel success. No matter how good your shot footage is, if you don’t edit it well—it won’t come out the way you wanted it to be, and thus won’t create an impact for the audience, losing out on engagement. So, prioritize editing YouTube videos.
Follow the process on how to edit YouTube videos, keep the pro tips in mind, and edit keeping your viewers first, and you’ll create a polished video that pleases viewers and the YouTube algorithm.
To know more about how to create YouTube videos and prepare a solid strategy for your channel, you can refer to this guide. Practicing what we preach, we also have a YouTube channel filled with crisp and engaging videos where we give you the best video-editing tips to take your skills to the next level. Be sure to check them out!
This post was written by Komal and edited by Adete from Team InVideo